- wooden cutting board,
- brushes and acrylic paints,
- glass of water,
- colorless varnish.
- Gouache paints - yellow, green, black and red
- Squirrel tassels 2 and 3
- Jar of water
- A soft cloth to remove excess paint
- Small white plate without patterns, for the palette
Khokhloma painting is quite popular. Such painting will not require too much skill in drawing, the main thing is to put in a little effort, perseverance and attention.
As an example of a painting element, you can draw this:
Khokhloma welcomes winding lines, berries, flowers and birds.
First, draw the base - a winding line. And then you start drawing the berries, and then the leaves.


Everywhere you need to start with the main winding lines, and then paint.
I propose to paint the cutting board in the Khokhloma style.
To work you will need
First of all, let's mix the paints to get a golden color. To do this, take yellow and metallic colors.
Let's start drawing the stem.

let's draw a berry at the top

then two more berries

a little lower we also draw a twig with berries

on the left we draw a twig with leaves on it

now a twig with three leaves, and a curl in the middle

let's start drawing the background

continue to draw the background

paint over the background completely


We also cover the side of the board with golden paint.

Now we cover the board with clear varnish. Everything is ready!


Drawing Khokhloma painting Even a child can do it. The basis of such painting is plant elements and sometimes birds and fish. These are mainly twigs, berries and leaves, all work is done in four colors: black, red, gold and green.
Even a child can handle curls, circles and dashes:

First, we draw a picture with a pencil, you can copy it from the Internet, and then we start coloring, starting with the largest elements:

After we have painted everything Large with the color we need, paint the background black. After the background has dried, we add additional touches to our twigs, drawing on the blackness of the background.
If painting occurs on a wooden surface, after drying it can be coated with several layers of alkyd varnish with intermediate drying.
Here are a few elements and step-by-step master classes on drawing Khokhloma painting:


Video master class on creating Khokhloma painting with your own hands:
If you study with your child, you need to start with gouache (4 colors - yellow, black, red and green) and drawings on paper, studying the required patterns, and then, having studied the main techniques for drawing flowers, berries and blades of grass, you can take up wooden boards, wooden boxes and paper boxes made of papier-mâché for decoration with acrylic and oil paint. Be sure to cover the top with at least 2 layers of varnish (but not nitro - it spoils oil paint).
The drawing is placed on a black or yellow-gold background; the large elements are first marked, then the medium ones and only then the small ones. At the end, small curls, strokes and berry dots are added. First, everything is painted in turn with each color, allowed to dry well, and only then the next color is taken.
It’s better to start studying with the main elements:
Kholm painting was very popular during Rus', but now it has gone out of fashion, but the trend for Kholm painting has remained.
Kholm painting is ideal for painting a variety of dishes, kitchen utensils and simply for painting walls.
Even a child can learn to draw in this style; there is nothing complicated here, because this technique uses mainly vegetation, and sometimes animals.
Here are a few examples that you can draw yourself:


Also, it will be very useful to watch a special video:
Painting with Khokhloma is very exciting. They used to teach this in ordinary Soviet kindergartens, because I remember some of the lessons. Now this is no longer fashionable and they teach children something completely different. If you do everything according to the old custom, then this complex technology. But for children they made it simplified and understandable.
So, for work we need:
To begin with, we start with simple elements, which in Khokhloma painting are called grass. It is performed with separate rhythmic strokes. The brush should be held perpendicularly with three fingers.
Here are the main and basic elements of weed.


Now for the practical lesson. Looking at the bowl, which is decorated by the master, children are given the opportunity to come up with an ornament themselves and paint a wooden spoon with a grass pattern.

And this is a grass ornament using kriul.

Kriul serves so that the rounded shape of the product can be emphasized.

More important leaf patterns.

By combining all these patterns, you can paint pottery in a very original way together with your child.
Draw Khokhloma painting patterns in the form of curlicues with berries, leaves, and flowers. Draw a wavy line from which curls are drawn on both sides. On each curl, draw two leaves and a berry at the end of the curl. You can draw a Khokhloma painting pattern in the form of several curls, one black curl and from it two to four colored curls of the same shape, for example, two green, two yellow. Below are several patterns of Khokhloma painting. You can take the grass pattern as a sample for training, practice on a separate piece of paper, and then draw on clean slate. You can draw a pattern on the image of a jug or plate.


This will sound funny, but painting in the Khokhloma style is done using exactly the same technique as painting dishes, which was done in ancient times. Nizhny Novgorod and surrounding villages. Each element of the drawing is done with one paint, after which the picture must dry. As soon as you are sure that the colors will not mix, you can take another paint and paint the necessary elements with it:
It's even easier with a pencil - you don't have to wait for the paint to dry:

You can make a drawing in a graphic style, simply repeating the Khokhloma style. If you want to follow all the rules, then you should take colored pencils.
Khokhloma painting is a beautiful painting on dishes that was used back in the 17th century. The name is given from the area where the painting comes from, from Khokhloma, from Nizhny Novgorod region. Khokhloma painting appeared thanks to the crafts of craftsmen from that area.
Before painting the product, you first need to turn spoons, mugs, tablets and other utensils on a wooden machine, make the surface smooth, then cover it evenly with drying oil in several layers, and make a layer of aluminum powder. After this, you can apply the painting.
Khokhloma painting is an ornament with the appearance of plants, twigs, berries, flowers, symbols, curls. Red, yellow, black, as well as green and others are often used in such painting.
The finished item is coated on top for strength.
Oil paints are used.
There are different techniques for Khokhloma painting. The gingerbread pattern is a large pattern in the center from which smaller patterns branch off.

There is also a pattern for the background - curls, which is done with yellow and red paint on a black background.

To complete a drawing, you need to use creativity and invention to create ornaments. To make a pattern yourself, there are basic lines, symbols from which you can start learning to draw. Simple elements are accessible even to a child; it is also useful for children to learn painting, it develops skills.
I suggest painting the board at home. Let's take a board, as well as gouache paints, PVA glue, and brushes.

You can make a drawing for painting yourself or take templates from the Internet. Then you need to copy from paper to the board.
First of all, we will treat the board with egg white as a primer. Once processed, let it dry.

Following the egg white, cover the entire product with gold paint.

We paint the berries with bright paint.

Draw the veiny part of the leaves.


Paint the entire background around the contours with black. Then you need to let the paint dry completely.
Often, when we come to a housewarming party, we think in stereotypes and give tea sets or dishes. But what if each guest comes with a set of cups or plates? We advise you to pay attention to such a wonderful gift as a cutting board, especially since you can paint it yourself. Or rather, not even paint it, but burn your own drawing on it! The topic of designs for burning on a cutting board is very popular today, and that’s what we’ll talk about.
Even if you have no experience in pyrography or wood burning, it’s okay, this activity is available to everyone: both adults and children. There is absolutely nothing to be afraid of here, because pyrography is not difficult, but very exciting. You can see an example in the photo.
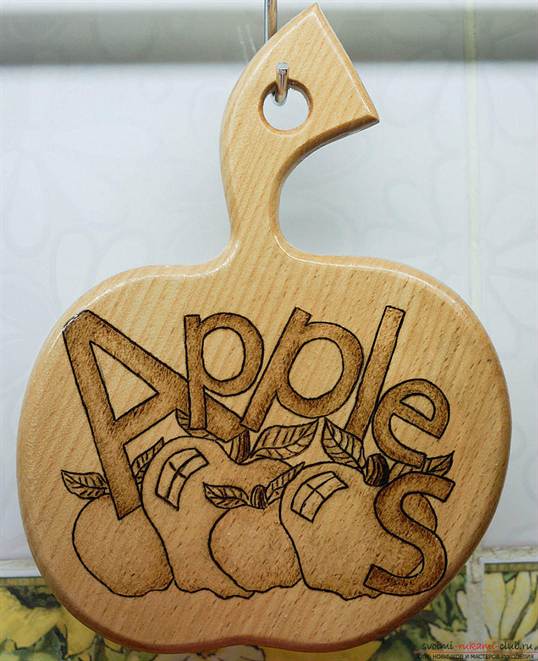
Wood burning designs are easy to find online and there are a wide variety of templates and stencils that are suitable for beginners. The main thing in this matter is to be patient and have 1.5-2 hours left for a simple drawing.
What you will need

First of all you need pyrograph. This is a special wood burner. It can be purchased at craft stores. The pyrograph also comes with a special set for wood burning. This set includes a board (not a cutting board) and a ready-made stencil for burning.
It is very easy to buy a set; today they are distributed in almost all hobby hypermarkets and handicraft stores.
You will also, of course, need cutting board. It is best to choose a board made of light wood. Linden or birch are perfect. The next thing you need is sandpaper. Acrylic or watercolor paints will also come in handy. paints, to decorate the board with color. Additionally you will need wax to carry out the waxing procedure after finishing painting the finished drawing. Waxing will add richness to the image and preserve the colors of both wood and paint for a long time. You will also need stencil and pencil to transfer the drawing to wood.

Learning to translate

Many people ask the question “How to transfer a drawing onto a board?”, so this is done using a stencil. You need to find and download pictures of fruits, flowers or animals that interest you, as these are the most commonly used patterns for wood burning. It's best to choose simple templates, especially if you are doing pyrography for the first time.

Print the downloaded stencil and cut out the figure if the figure in the picture is empty. If there are additional internal parts, you need to use carbon paper. Place it on the wood, place the printed stencil on top and trace the design. Try not to let the image move.

There is another way to transfer a picture to the board. You also need to print the stencil you like, printed in a mirror image. Prepare a bowl of water, decoupage glue, wood varnish, acrylic paints, a brush and a sponge.
Cut out a stencil or finished design, then carefully coat it with decoupage glue and attach it to the wooden surface with the design facing down. Smooth the design with a sponge so that it does not “bubble” and also so that there is no excess glue left. Let dry. It is best to leave the work to dry overnight.

Once dry, moisten the motif with a damp sponge and begin to erase the paper until the design appears on the wood. Carefully get rid of all the paper. Then we begin to rub the remaining paper with our fingers, making pellets that remain on the wooden surface. We brush them off the tree, and what remains is a finished drawing, which, after complete drying, can be supplemented by burning (for example, burning its outlines) or simply decorated with paints. Then coat the work with varnish.

Mastering the technique
Once the design is traced onto the board, it’s time to start burning. Make sure the board is completely dry. Then heat the burner until the nib turns dark red.
Be careful when working with a hot pyrograph, it is very dangerous! It is better to do everything more slowly, but there will be no consequences.
Burning is best done from the contour to the center. That is, we first outline all the outer edges and only then move on to the inner ones. It is best to burn in separate areas: once you have worked on one, move on to the next, but in another part of the drawing. This will allow the drawing to cool evenly and will not create unnecessary lines or random strokes. When the work is completed, it can be decorated with paints. And then treat it with wax so that the board has a shine.
Let the owner of the house decide for himself whether to use your gift in everyday life or hang it on the wall or put it on a shelf. In any case, your gift will find a worthy place in the kitchen and in the heart of your friend!


When starting to draw in Photoshop, we first create a new canvas of sufficient size. It is important to remember that a canvas that is too small will not allow for good detail in the image, and one that is too large can be a real disaster for a weak computer. So, we have created a new document, then fill the background layer with gray, create a new layer and start drawing the board.
We use a slightly rich orange shade as the basis for our board. Draw the shape of the board, and make the bottom a little darker, so that the orange begins to turn into a reddish brown. Using a less saturated orange (here you need to slightly tighten the sliders to yellow) we apply small oval spots on our board. This will help create a variety of colors on the board.
To draw cracks on the board we choose brown color. It is important to remember that the cracks should not be exactly the same shade. Where the base of the board is lighter, the cracks should be made a little lighter accordingly. We use light beige color to draw illuminated corners, edges and worn areas. We add scratches for greater realism and try to ensure that all the flaws are different in shade.

The lines should vary in thickness - this will make the drawing more lively and natural. Add some dark lines to the edges of the board.

Create a new layer with the blending mode Multiply and a light beige tone and draw the dents, creating an interesting structure of the board. Then you need to change the opacity of this layer to about 20-25 percent at your discretion, and in some places erase the dents with a soft brush.

Create another layer, this time with the Overlay blending mode. Now we need light - gray in order to draw edges on the dents. Set the transparency of this layer to between 50-65 percent.
The master class was conducted by Svetlana Bevz.
This painting can be used to decorate not only a cutting board, but also any item you like.
Materials:
Kitchen board (beech) 15x25 cm;
PVA glue;
Paints (acrylic or gouache);
Brushes: round squirrel, kolinsky, synthetic No. 1-4, cat brush (if available);
Pipette (for berries);
Varnish.
Petrikovskaya painting- traditional, unique, elegant, bright and fabulous. It seems that she came to us from some children's fairy tale. It originated in the village of Petrikovka, Dnepropetrovsk region, in Ukraine. In Petrikovka there was a custom to paint the walls of whitewashed huts with colorful floral patterns. And the housewives painted these patterns with special brushes made from cat hair, or simply with their fingers. The paints, which in those days were prepared from the juice of herbs or vegetables, were diluted with egg or milk, and the brightest colors were chosen. The most diligent housewives were called “chepurushkas.”
This is how this truly folk art was passed on from generation to generation.
Now Petrikovskaya painting is experiencing its rebirth: it is developing, becoming more modern and gaining more and more great popularity and love both in Ukraine and abroad.
How to paint a cutting board with your own hands.
We prime the board with a mixture of water and PVA glue in a 1:1 ratio. Apply this liquid to the board with a brush, dry it and apply again. The primer closes the pores of the wood, so the paint is not absorbed, and accordingly its consumption is reduced. Plus, the primer is a kind of protection for our work (Fig. 1).
We paint the board brown (this is the color I chose for the background). We create a sketch on the board. Since the background is dark, we underpaint the composition elements with white paint. This will greatly simplify further painting, and also give it brightness and richness. If you don’t do this, then your composition will simply “drown” in the background, it will be dull and dim (Fig. 2).

We write down all the main elements in the painting (Fig. 3).

Next, we proceed directly to painting the board. First of all, you should prepare workplace, brushes and paint. Take a dark pink color and mix it with white to get a pink color (Fig. 4).

We start painting with the largest elements. To paint the flower petals we use a transition stroke. To do this, first put dark pink paint on the brush, and then dip the tip of the brush into light pink (Fig. 5).

We paint the petals by moving the brush from top to bottom, bringing all the strokes together in the center of the flower (Fig. 6).

We register all the pink flowers in the same way (Fig. 7).

We paint the second row of leaves with light pink paint (Fig. 8).
Since ancient times, our ancestors painted on wooden surfaces various patterns. After all, painting on wood looks great both on a rustic frame and on a kitchen counter. wooden utensils, it is also appropriate in the interior of residential premises.
Perhaps someone would like to try decorating their home with painted household items, but does not know where to start or what is needed for this. For this you need, besides brushes and paints, very little - most of the necessary things can be found at home.
We prepare everything for work
Before you start creating an artistic masterpiece, you need to prepare in advance everything that may be useful during the work process:
- blanks (any wooden item that you plan to make beautiful and unique);
- soft pencil;
- eraser;
- sandpaper of various grain sizes;
- paper sheets (for those who work from sketches);
- a set of brushes of various thicknesses;
- palette;
- templates (for those who cannot draw);
- paint;
- primer;
- transparent varnish (it is advisable to coat the finished pattern with varnish so that it is less damaged);
- container for liquids (for water or solvent, depending on the colorant).

The wood primer is selected according to the type of paint, but the choice of paint must be taken seriously.
Features of coloring materials
Most often, home craftsmen use the following types of paints when painting on wood:
- gouache;
- watercolor;
- acrylic;
- aniline;
- oil
Gouache
In another way, these dyes are also called poster dyes. They are a thick, opaque mass. They are easy to work with, but complex designs with many shades are impossible to create. To draw, gouache must meet the following requirements:
- easy to apply to the surface;
- After drying, do not wear off or crack.
In order for the pattern drawn with gouache to hold more firmly, to dilute the paint, use not water, but an aqueous solution of PVA glue in a 1:1 ratio. This allows you to do without preliminary priming.

Gouache drawings always turn out bright, colorful, and the dye is cheap. Gouache is suitable for those who are starting to master wood painting and create their first masterpieces.
Watercolor
Everyone knows the simple ones watercolor paints, which schoolchildren use to draw. Compared to gouache, they are more transparent and allow you to create a complex pattern with many shades. In order to get a beautiful drawing, watercolor must:
- lie flat on the surface of the workpiece, without stains or streaks;
- After drying, hold firmly.
The main advantage of watercolors is that if mistakes occur while drawing, the product can be washed, dried, primed and painted again.
Acrylic
Acrylic-based paints are among the best, and painting on wood with them is not only beautiful: acrylic dyes additionally protect and strengthen the material. Manufacturers artistic paints They offer a wide color palette for drawing, but they are not profitable for beginners to use.
Why? The fact is that acrylic compositions are quite expensive, so for beginning artists who have not yet fully mastered the technique of drawing, it will be expensive to use them. But those who have already achieved some experience can create their own masterpieces with them to decorate the interior.
Oily

The dye is diluted to a working consistency with the recommended solvent (White spirit, drying oil), after which you can paint. But oil paints have the following features:
- they give only bright shades (you can use them to paint an object like Khokhloma or make a stylish gold pattern on a black background);
- durable, once dry they cannot be removed.
Those who have at least a little drawing experience will enjoy working with oil paints, because they can be used to decorate the interior of living rooms inexpensively and for a long time.
Aniline

Aniline-based dyes are increasingly found in the interior of houses; they are used to paint wooden walls or small decorative objects, and in rural areas craftsmen decorate their homes with them. Aniline dyes have a number of positive qualities:
- They are easy to draw with.
- You can get many beautiful shades with them.
- They are inexpensive.
Getting ready to paint
Before applying beautiful patterns, the basis needs to be prepared. To do this you need to do the following:
- sand with sandpaper, gradually changing from coarser to finer, the base until smooth;
- coat the surface with a wood primer that matches the paint being used;
- wait for the primer to dry and apply a color base, painting the product with the desired color.
After the color base has dried, it is possible to apply a design using any technology.
How to make a drawing
Depending on the level of skill, painting on wood can be done using the following technologies:
- point;
- using a stencil;
- drawing from sketches.
Stencil method
Drawing using a template is the simplest: all you need to do is put the stencil on the surface, trace it with a soft pencil, and you can paint it. You can make a stencil yourself by copying any picture you like or asking a familiar artist to make a template.
Point method
The dot technique also helps to create beautiful things for those who do not have artistic skills. The point method consists of drawing a set of reference points on a sketch drawing and copying it as accurately as possible from the selected sketch onto the surface to be painted.
The dot drawing method requires some skills. But maybe it’s worth remembering how in childhood we connected numbers with lines and got some kind of silhouette? The point method of painting is based precisely on this, and the more points are transferred, the more accurate the match will be with the selected picture, which then will only have to be colored.

The point-by-point method of transferring a picture onto a base allows those who have almost no drawing skills to create artistic masterpieces. Simply copy one or more drawings using a soft pencil and color. You can do it as it was in the original, but it’s better to show your imagination and choose your own colors.
According to sketches
This technique involves free creativity when a sketch is drawn, and then transferred to a base and painted. Sketches can be both elements of a painting (for artists) and any geometric elements (for those who do not know how to draw professionally). Using sketches, you can come up with your own unique pattern for drawing, and it doesn’t matter what is used: geometric shapes, plant elements or free professional creativity.
Paint wooden items not difficult. By mastering one of the proposed techniques and choosing the right paint, you can create real masterpieces, making your home or apartment interior truly unique.