Children's games are becoming more and more attractive, because this world gives more and more more possibilities and material things. Dolls continue to be in fashion, but more importantly, many of their accessories are selling like never before. Food, household items, furniture and even a house, this is what we can find on store shelves, but all this can be done with our own hands much cheaper. For example - food, so let's get ready and try to make beautiful food for the dolls together.
How to make food for dolls from dough?
Let's start with simple things, how you can make beautiful food from dough. We will need:
Salt dough
. Toothpicks
. Stationery knife
. Paints, pastel
. Varnish
1. First of all, let's make a pie, it will be good lesson for beginners. Roll out the dough and cut a circle out of it using a regular bottle cap. The base is ready, now you need to decorate it, we do this using the same dough only with stripes made.
Use toothpicks to give the correct shape.

3. And finally - croissants. Roll out the dough into a thin layer and cut out a circle using a bottle cap. Divide the circle into 6 even parts and start rolling the croissants. Next, we paint them with pastels and place them in salt. This way we make them more attractive.

4. To make our miniature food last longer, it should be dried in the oven. To do this, place our baked goods in an oven preheated to 110 degrees.

For a more attractive look, the pie can be immediately cut into pieces.
5. The last step is to give the baked goods a natural look, using paints - brown and white. Don't forget to varnish the food when the paint dries.

How to make food for dolls from plasticine?
Plasticine is also good for making food. It is easy to process and is not very expensive. And so, today we will make chocolates, for them we will use:
Brown and white plasticine
. Toothpicks
. Stationery knife
Let's get started!
1. Roll out the plasticine in a small layer and divide it into even squares.

2. The mold for the candy is ready, now you need to decorate it, for this you use white plasticine twisted into a thin tube.

3. The last step is to decorate the candy with coffee beans, which we will also make from plasticine.

4. The second type of candy is a little more difficult to make. We roll small balls of plasticine and then process them with a toothpick and brush. Use a brush to make a small indentation on top, and use a toothpick to make many edges on the sides. Here's what we get:

Ready-made candies can be placed in a small box.

How to make food for dolls from clay?
We have prepared photo instructions that will help you quickly and beautifully make food for dolls from polymer clay.


How to prepare salted play dough.
Take: 1 cup of premium flour, 1/2 cup of fine salt (not iodized!), ¼ cup of very cold water. Mix flour and salt in a bowl. Pour water in small portions, kneading the dough well each time. The amount of water may vary, depending on the properties of the flour, so water should be poured in small portions. Knead until the dough crumbles and sticks to your hands. It will turn out very similar to plasticine. The dough should be stored in a closed container or bag to prevent it from drying out in the refrigerator. Shelf life is three days. To keep the dough longer, you can add 2 tablespoons of citric acid when kneading. (UPD - It seems that citric acid somehow interacts with varnish for children's creativity, the first time I made it without it and the varnish was transparent, but now it’s kind of whitish.)
How to color the dough.
You need to take a small piece of dough, make a flat cake and put a little gouache in it. Knead this piece until the dough is evenly colored. You can first mix the color on the palette and then color the dough. But it is much more convenient to color the dough with the main colors, and then mix the already colored pieces until the desired new colors are obtained. When sculpting food, it is very important to replicate as accurately as possible the color of what we are sculpting.
For example – sausage color = pink + a little brown
pink = a lot of white + a little red
To sculpt food you will need the following colors - white (a lot), pink, sand, brown, yellow, orange, green, red. And be sure to leave part of the dough uncolored.

We sculpt almost as if from plasticine. Take the dough out of the container in small pieces so that it does not dry out. If the dough is still a little dry, add a few drops of water. If it's a little wet, add a little flour. You can also flour your hands. To glue individual pieces of dough, moisten the joint with water using a brush. We use available materials for modeling - a garlic press, a strainer, toothpicks and more.
How to blind:

Broccoli
Let's see what broccoli looks like. Mix three green shades. From a piece of the lightest shade we make a sausage, divide it into small pieces - these are broccoli legs.
We press our dough through a kitchen metal strainer, we get an interesting texture. We moisten the leg with water and “glue” onto it what we pressed through the strainer.


Sausage
We make a thin sausage-colored flatbread. Place thin strips of white dough on it. We roll up the cake, roll it a little in our hands and put it in the refrigerator for a while. When it has cooled, cut the sausage into slices. We saw, rather than press, the dough.


Ice cream
We make a sand-colored cake, a ball and a cone from white. Using the back of a knife, press out the cells on the flatbread, like a waffle. Let it sit for a while and dry slightly - a piece that is too soft will not be able to be wrapped like a wafer. We make ice cream from the white parts and wrap it in a wafer.

Cheese
Cheese color = yellow + a little orange.
Make a flatbread, cut off the excess to make a triangular slice of cheese. We make holes with the rod from the handle, large holes with the back, small holes with the nose of the rod.

Bread and other dough products
We make pieces of bread from uncolored dough, pies can be made from uncolored dough or from sand-colored dough. We tint the already completely dry products with oil pastel crayons for children's creativity - we create a golden brown crust.


It is better to dry finished products simply in air, on a smooth surface - for example, on a plastic file or oilcloth. When the top is dry, turn it over to dry the bottom.
When dry, the products turn a little pale; they must be coated with any varnish. It is better for children to use a special water-based varnish for children's creativity - it is odorless.

More
You can make a completely liquid dough (add water) and spread it. This way you can depict butter on a sandwich or chocolate icing.

In order not to get confused with the sizes, it is good to try on the plate from which the toys will then be eaten while sculpting.


We got to dessert.


Bon appetit:)
Delight your children by making dishes and food for their dolls from a variety of materials: paper, plasticine, clay, lids and caps.
Such utensils consist of plates, cups, saucers, a teapot and other items.

It's hard to believe that these items are made from waste material. Look at what similar dishes for dolls are made from.

Some objects need to be glued together, then painted in a certain color.
To make it as clear as possible for you how to make such utensils, watch the master classes, illustrated with photographs.
How to make a plate with your own hands?
Made of plastic

To make such items kitchen utensils, you will need:
- plastic lids for vegetable oil;
- scissors;
- cardboard;
- stickers.
Attach a sticker to it, glue this element to the center of the circle.

If there are no stickers, then just draw a flower on cardboard.
You made small plates for dolls, see how to make deep ones. To do this, you will need the plastic packaging from Kinder Surprise, which is located inside this artificial egg.
Cut off the deeper part from the shallower one, singe the edges as follows. Place baking paper on the electric burner and place the workpiece on it, cut side down. If you have a gas stove, then the glassine needs to be placed on the frying pan.

From paper
Here's how to make a plate for dolls out of paper so that it is deep, like a bowl. This will help.

Cut a strip 1–2 cm wide from white or colored paper. Screw it onto a pencil or rod and remove it from this auxiliary device.
Glue the tip, slightly pull the middle to give the plate shape.
From polymer clay
Beautiful plates for dolls are also made from polymer clay. To make them, you need to take:
- polymer clay;
- white acrylic paint;
- caps;
- toothpick;
- brush;
- glossy varnish.

Knead the plastic. Roll out a piece, attach a round object to it, cut out the future vessel according to this template. Now place a round object of smaller diameter in the center of the workpiece and press it onto the plastic.
Attach a toothpick to the edges of the plate, making them openwork. Paint the edge. When it dries, smooth it out with a knife. You can draw a flower in the center of the dish, then leave the plate to harden in the air or bake in the oven (this is written in the instructions for the specific polymer clay).

From cardboard

On the wrong side of the cardboard, draw a circle of the same diameter as you want the bottom of the plate to be. Draw a larger circle around this blank. Cut out the resulting ring, which is located between the large and small circle.
Make a cut on its side. Align the two edges of this blank, glue them in this position. Place the remaining circle on the cardboard and cut it out to spare. Glue the prepared ring onto this blank, you will get a plate with sides.
To make this item more durable, you can make several layers and glue them together.

And here's another interesting option, which will allow you to make a whole toy set for feeding dolls. It will require old boards that have failed and should not be thrown away.
How to make a toy set for dolls?

You can see what kind of source material was used. You will need to carefully disconnect the small elements from the base so as not to damage them, remove the winding with your hands, slightly prying it with the tip of small scissors.
Insert a wooden rod inside such an element and saw off the excess.

Make several of these toy containers with wooden lids and write the names of the seasonings on them on small paper strips. Attach them with glue or tape.

The child will also be delighted with the kits for bulk spices; they are also quite easy to make.
Take a metal element, use a nail and a hammer to make several holes in it.

All you have to do is close the lids and admire what an interesting toy set you have created.

You will transform old capacitors beyond recognition. To do this, you first need to remove the covers from their lower parts and saw off one part in half.

Work on some other details in the same way. This is what you will get at this stage.

Go around the edges of these blanks with a file to make them even. In the same way, you need to process smaller parts, such as handles and lid opening elements. Cut these items from a tin, for example, from a can of condensed milk or stew.

Solder them into place and see what a wonderful gaming set you have.

You can make it from other materials together with your child, for example, from plasticine.

- To do this you need to knead the plasticine. To make a saucer, roll the mass into a ball, flatten it, slightly lift the edges up.
- Show your child how to make a cup. To do this, you also need to first roll the ball, then press into its center with your finger, shape it into a cup.
- To make a handle for it, roll a thin sausage out of plasticine, bend it slightly and attach it to the side.
- You can also make a coffee pot out of plasticine. To do this, you first need to roll this material into a pear-like shape. This is the body. To make a handle, roll a sausage out of plasticine, bend it and attach it to the side. The spout of the coffee pot is also made from a curved sausage, and its lid is made from a shape similar to a flatbread.

Look how delicate and beautiful it will turn out.

A set of dishes can be made from natural materials. Just now the acorns are ripe, you can stock up on them to make crafts throughout the winter.

To make such a set, you will need:
- acorns with caps;
- twigs;
- twigs;
- small hacksaw;
- glue gun

Saw off a thin circle from the branch, which will become a saucer. Place a cup on it; you need to turn the acorn cap into it. Glue a curved rod as a handle. Make another similar cup and saucer, and you can start a doll tea party.
You can make a wide vase from an acorn cap and glue cone scales to the bottom, decorating this item.

Make children's play even more exciting by making not only dishes for dolls, but also food for them. Of course, the kids are not averse to using a real one, but this one will quickly deteriorate and is short-lived. You will show them how to make food for their charges so that they can play with it for a long time.
How to make food for dolls?

Look how wonderful this lemon cake looks. His great advantage lies not only in his beauty appearance, but also that you can play with it for a long time. After all, this dessert is made of polymer clay, which is quite durable.
Do not give such items to play with small children; it is difficult to explain to them that this is not a real cake and should not be tasted.
Before you make food for dolls of this type, you need to take:
- polymer clay of the required colors;
- toothpicks;
- stationery knife;
- rolling pin.
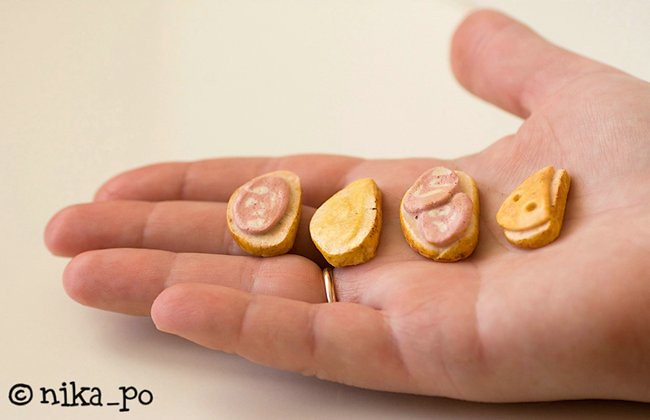
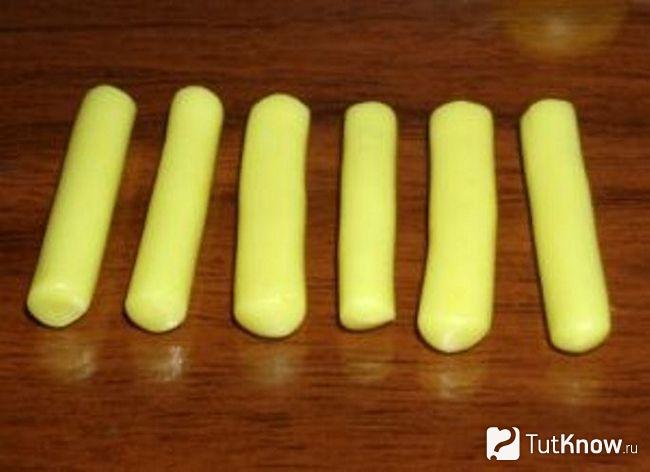
Now take the light yellow clay and cut this piece into 6 equal pieces with a utility knife. Roll each into a sausage.
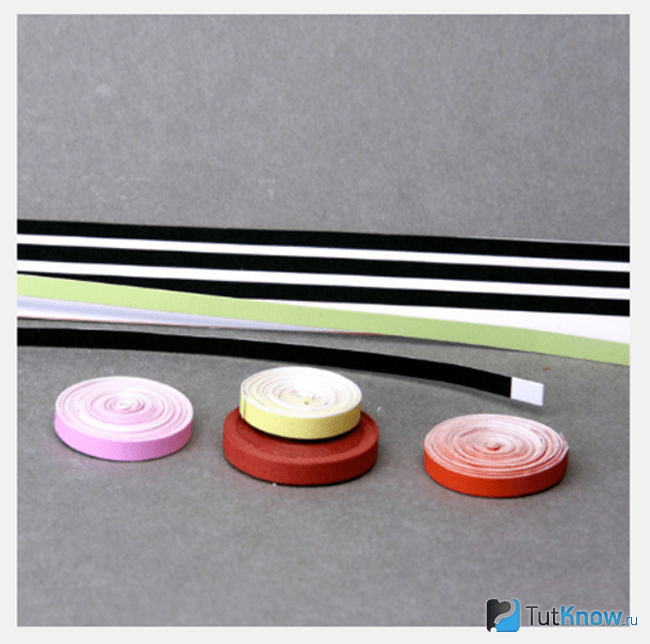
Next, use white clay, which needs to be kneaded in your hands and rolled into a thin layer. Place the first yellow sausage on it and roll it into a roll.

In this way, decorate all the yellow sausages, using a knife to give them a drop shape. Now roll a rope out of white polymer clay; it will become the central element. Attach six decorated slices to it.

You need to wrap the resulting beauty first in a white and then in a yellow layer of polymer clay.

It's time to make the cakes yourself. To do this, you need to roll out a circle of white, brown and yellow polymer clay. Roll them out into thick cakes and place one on top of the other.

To make the doll cake next, you need to tackle the lemon shavings. To do this, you need to chop a hard piece of clay into shavings with a sharp knife, then roll the sides of the cake in it, attaching this decoration with your fingers.

Roll out the white plastic into thin sausages, roll them into a rope and bend them into roses, decorating the cake with this improvised cream.

To ensure that the lemon preparation cuts well, put it in the freezer for half an hour. Then it will be easy to chop this sausage into thin slices, which is what you will do.
Place them on the surface of the cake, decorate with shavings of brown clay, and admire with your child what a wonderful food for the dolls it turned out to be.

Place this masterpiece in the freezer for 30 minutes, then it will be easy to cut into slices.

To show how fluffy the dough is, carefully make a few holes on one side of the piece and then on the other. Following the instructions for polymer clay, leave this culinary masterpiece to air harden or bake in the oven.
And here's how they make food for dolls from other pliable material.
From salt dough

To make similar bakery products, you will need:
- salt dough;
- molds and bottle caps;
- pastel;
- stained glass paints;
- stationery knife;
- rolling pin;

Use cookie cutters to cut out cookies from the rolled out salt dough; the remnants of this material will make beautiful closed pies.

- Here's how to make food for dolls so that it looks like bagels. Roll out the salt dough flatbread into a thin circle, first cut it in half, and each half into three more pieces.
- In each of these triangles you need to wrap a small sausage of dough, then form a bagel. To do this, this triangle must be rolled up, starting from the edge, towards the corner.
- Using yellow or light brown pastels, add color to the bagels by painting them. Dip each one in coarse salt as if it were sugar.

You can cut several pies into pieces, then bake all this wealth in the oven so that the dough dries.

To open pies were more realistic, coat the spaces between the flagella stained glass paints dark red color. Mix white acrylic and acrylic varnish, paint the top of the cookies with this “glaze”.

You can decorate the cookies with multi-colored beads, then you need to put the baked goods in a box and decorate the doll table with it. Salted dough fruits can also be found here. Create them from the remains of this material.
Make apples and bananas together with the children, paint them with gouache of the desired color, then varnish them.

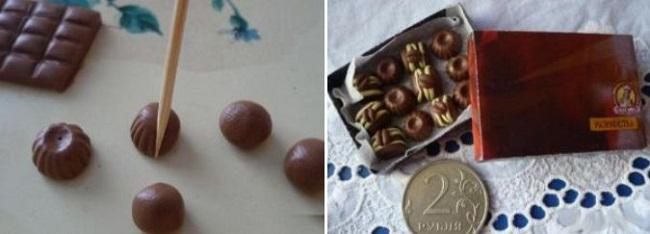
A chocolate bar will also come in handy. To make it, take:
- brown and white polymer clay;
- stationery knife;
- toothpicks.

To make chocolates for dolls, you need to mold small balls from brown plastic and use a toothpick to apply a design on them. All that remains is to put the candies in the box and you can put them on the kitchen table.
Food for dolls can be made from a variety of materials, such as fabric. The main thing is to know how.
If you liked the topic, we suggest you see how to make food for dolls that will be like from McDonald's.
Perhaps the child will want to “feed” his charges healthy food? Then see how to make borscht for them.
The third master class will teach you how to make dishes for dolls: forks, spoons, a ladle and other items.
Little owners of a crowd of dolls do not lag behind their handicraft mothers and everyone demands for their “girls” new things, then furniture, then... food. However, mothers themselves are seriously interested in either collecting dolls, or creating doll miniatures, or both. We bring to your attention a master class on making food for dolls, namely small jars of preserved food!

To make food for dolls - miniature mushrooms, tomatoes and cucumbers - we will need the following materials:
glass jars;
polymer clay (white, brown, red and light green);
dry pastel;
thin rubber hair ties;
thick paper;
super glue;
sandpaper;
clear varnish or epoxy resin;
dry dill;
black peppercorns (small).

Food for dolls: job description
Let's start by making mushrooms: knead the white and brown polymer clay well and roll it into thin sausages.

Cut the sausages into small pieces with a knife.

We roll balls out of brown plastic and form them into hats for future mushrooms.


We also roll balls out of white plastic and give them a droplet shape - these will be the legs. We place the blanks on the glass on which we will bake the products in the oven. Instead of glass, you can use foil.

Now we knead the red plastic for the tomatoes. Roll out the sausage a little thicker than for mushrooms. Cut into small pieces different sizes(small and large tomatoes).

We roll balls. To give them more natural look, “draw” the butt: break off the tip of a toothpick, dip it in green pastel crushed with a knife and lightly press the middle of the future tomato.


To make cucumbers, roll out light green polymer clay. We cut into small and large pieces.

We give the plastic a cucumber shape and imitate the rough surface using a toothbrush.

We tint the cucumbers with crushed dark green pastels. Leave the ends light.

Well, what would preservation be without garlic - especially if it’s food for dolls! The cloves are made very simply - we cut a ball of white polymer clay into 4-6 parts, depending on the size of the slice we want to get.


We send the glass (foil) with all the preparations to the oven and bake according to the instructions indicated on the polymer clay packaging. Typically the temperature for baking is 110 - 130 degrees.

Baked products harden and become like plastic. We collect mushrooms from two parts. We sand the leg with sandpaper and glue the cap to it with superglue.


Now comes the fun part - filling the jars. Place garlic on the bottom, you can add dry dill and small peppercorns. Next - cucumbers, tomatoes, mushrooms; Sprinkle with chopped dry dill again on top.


Fill the contents with translucent varnish. You can also use fimo gel (requires re-baking the product) or epoxy resin.

We glue the corks with superglue. Use a knife to cut off the loop.


We cut out small squares from thick paper, cover the jars with them and secure with rubber bands.


That's it, the miniature food for the dolls is ready, we send the jars to the dollhouse. If you do not cut off the loop on the cork, you can hang the preserved food on a keychain.


You can also buy ready-made fruit canes made from polymer clay in handicraft stores, cut them, put them in jars, fill them with epoxy - and you get jam or compote. It’s not difficult to make other sweets that you see in jars here in the photo. And if we are talking about larger dolls, for example, Baby Bon, you can offer them more substantial food - for example, .
Irina Golub specifically for the site
They became incredibly popular a few years ago and every year they have more and more fans. These toys are collected by adults, and children also happily play with them. For monster dolls, young housewives build entire play houses with furniture and all the necessary little things. A popular question among toy fans: how to make food for Monster High dolls with your own hands from scrap materials? We present to your attention a selection interesting ideas and mini master classes.
Materials and techniques for making miniatures
The easiest way to make food and other little things for dolls is using the modeling technique. Any plastic material is suitable for this. The easiest way to make these or plasticine is with children. Teens and adults can try making food and dishes for dolls from polymer clay. Do-it-yourself Monster High if you have never worked with miniatures before? Experienced craftsmen use not only own hands, but also auxiliary accessories. It is most convenient to have a set of special shaped spatulas on hand. But if you don’t have such tools, it’s okay - they can be replaced with improvised items. Take a pen refill, several felt-tip pens of different cuts, plastic cutlery and any other household items that can leave marks on plastic material and give it the desired shape.
Vegetables and fruits made of plasticine

How to make food for Monster High dolls from plasticine, where to start? Try creating simple shaped products. Even a child can handle sculpting fruits and vegetables. You can make balls of red plasticine - tomatoes or apples, decorate them with small leaves. The green “sausages” will turn into cucumbers. It is not at all difficult to make bananas from yellow plasticine. Gradually move on to more complex shapes, try making pears, eggplants or bunches of grapes.
“Cooking” complex dishes
We figured out how to mold fruits and vegetables, but is this Monster High food? You can make miniatures of any shape from plasticine in a variety of colors. modern manufacturers are also pleasing. Monster High dolls are notable primarily for their aesthetics. This series depicts the children of famous monster characters. And each doll is made in its own style, has its own tastes and history. An appropriate addition to such toys would be cakes in the shape of skulls, or a chocolate cake in the shape of a coffin. In your Monster High kitchen you will prepare food that will definitely look unusual. How to fashion such dishes and products? Miniature products with complex shapes can always be cut from a rolled out layer of plasticine of suitable thickness. By improving this technique, you can create real masterpieces - for example, layer cakes or pizza.
For play or admiration?

The food for the dolls is ready, but what should we do with it next? Can we immediately move on to the game? Attention: many types of plasticine retain their plasticity for a long period of time, even outdoors. This means that your crafts may not last long or even seriously ruin something in How to make food for Monster High dolls to play with? If you sculpt from plasticine, cover finished product transparent nail polish or furniture polish in several layers. Puff pastry products are dried in air or in the oven. After this, they can be painted to your liking and also varnished.
Paper food and kitchen accessories

It’s an interesting idea to try filling a doll’s refrigerator with paper miniatures. You can also make a variety of pies using the appliqué technique, and if you use corrugated cardboard you will get an excellent imitation of puff pastries. Go into your kitchen and look at the stock of your refrigerator and cabinets. You will probably see a lot of cardboard and plastic packaging. You can repeat them in miniature, also using paper as the starting material. It’s not at all difficult to glue simple-shaped boxes from it, then just paint them and dry them. If making doll food from scratch seems too complicated for you, you can try looking for ready-made factory-made art kits on sale. They are often called that way: “DIY dinner for a doll”, “how to set a table for Monster High”. How to make your own food using a ready-made kit? Instructions are included with the toy. Most often, the kit includes blanks and paints for coloring them; sometimes it is proposed to mold some complex-shaped object from plasticine selected by color. Try making doll products in various techniques and very soon you will be able to organize a real feast for the whole doll family.