Have you ever seen pictures of nature or a cityscape, which are presented in the form of a ball and look like a small planet? This . This effect can be achieved quite easily standard means Adobe programs Photoshop. This article is a lesson on creating spherical panoramas.
Photography in the form of a spherical panorama.
1. Choosing a suitable photo

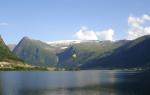
The result depends on the chosen photograph more than on the execution technique.
A spherical panorama can be made from any photo. Ideally it should be a 360° panorama, but any shot with clear edges will do.
Before you start creating a panorama, you need to crop the photo so that the edges are approximately the same. This will allow you to avoid a sharp drop at the junction when looping the image.
2. Transformation into a square

After cropping, you need to make the photo square. This must be done using the command Image - Image Size. The height and width parameters (Width and Height) must be made the same.
3. Flipping

Now you need to turn the image upside down, that is, 180°. This can be done by going to the Image menu - Rotate Canvas - 180 degrees.
4: Polar coordinate filter

At this stage the planet itself will be created. You need to go to the menu Filter - Distort - Polar Coordinates. In the window you need to select the Rectangular to Polar option. In the window preview you can see what happens.
5. Order on the planet

Spherical panorama.
If you look closely at the image, you can see that the seam is not joined. This is because the left and right edges of the image are not the same. To remove a seam, simply use the Cloning Brush or Stamp tool. In some cases, removing the seam is not possible. Then you need to more carefully work out the edges at the stage of cropping the image or take another photo.
The example image at the first stage was cropped so that the trees on the left and right sides were the same height. This made it possible, after applying polar coordinates, to only retouch the seam with a stamp and blur.
6. Not just landscapes...

This technique can be used with almost any image, but not all results will be satisfactory.
Beautiful "Planets" emerge from landscapes and panoramic shots, but you can use the described technique with macro shots.
7. Incredible panoramas of buildings

Buildings in spherical panoramas.
When traveling and travelling, everyone takes a lot of boring and monotonous photographs of various buildings and monuments. sometimes it’s a pity to delete them, but it’s simply not interesting to look at them. In this case, you can always make a spherical panorama, which will transform the appearance of your photographs.
8. Looking through a lens or the planet in reverse

This technique allows you to spin the planet in reverse
The principle of creating this effect is to skip the step of flipping the image 180°. In this case, the Polar coordinates filter will turn the planet inward.
This image resembles a photograph taken with a fisheye lens. Processing in Photoshop allows you to achieve a similar effect only programmatically.
9. Let's get creative

You can use absolutely any photograph for distortion.
The inward swirling effect can look good in any photo. Sometimes it will look better and sometimes worse. It all depends on the original photo.

Using the Polar Coordinates Filter
This article demonstrates that using the Polar Coordinates filter, a little imagination, and the right source images can create new worlds in just minutes in Photoshop.
Based on materials from the site:
The PhotoShop toolbar undergoes changes with each new version of the program. Throughout its existence software product it has undergone transformations aimed at ensuring user convenience. When you hover your cursor over each tool on the panel, a brief description of it appears.
This option will be available only if in the “Interface” tab, “Settings” item, you have a checkmark next to the “Show hints” item.
Where are the rulers located?
A user who is just beginning to understand all the intricacies of this graphic editor has probably already managed to get at least a brief idea of the meaning of each tool. Many users are stumped by fairly simple tasks, such as aligning an object on a canvas.
They try in vain to turn on the ruler, probing the toolbar with the cursor and looking for the treasured clues. However, a distinctive feature of the PhotoShop graphic editor is the ability to perform various operations in different ways. This rule also applies to the display of “Rulers” or “Rulers”. You can select the "Ruler" command from the "View" menu and attach it to the left at the top work area. If you are not comfortable using the menu, you can try using the key combination “Ctrl” + “R”.
Now you know how to enable a ruler in PhotoShop. But what if you need to change the division scale?
Guides and units of measurement
By default, the graphic editor prompts the user to use a centimeter ruler. However, just right-click on the ruler and you can select one of 12 items (millimeters, pixels, inches, etc.). You can also pull out guide lines from the ruler. To call them, just use the “New Guide” command in the “View” menu. If the rulers are turned off, the guides will remain stationary. When you press the key combination “CTRL” + “H”, the guides disappear.
Using a ruler with a protractor
To use coordinate rulers, just find the button with the image of an eyedropper on the toolbar. Beneath it lies the namesake of the coordinate ruler used to frame the work area. To determine the coordinates of the beginning of a segment, as well as to determine the height and width of an object in PhotoShop, use the Ruler tool.
Just click on the right point and, without releasing the mouse button, draw a line that measures the parameter you need. The setting value will be displayed at the top of the settings panel. When you click again, a new line will appear. The ruler can be moved as desired. To do this, you need to grab the line itself or the crosses located at both ends with the mouse. The X and Y in the settings panel indicate the coordinates of the starting point.
The letters Ш and В indicate, respectively, the width and height of the object in relation to the starting point. Parameter Y denotes the angle of inclination relative to the center line, and L1 is the distance between two points. If you hold down the Alt button and move the cursor to the cross of the starting coordinate, it will change its display to a protractor icon. Using this tool, you can draw a line at a certain angle, the value of which will also be indicated in the settings panel.
If you place the cursor over the “By measurement scale” button, a not very clear hint “Calculate Ruler tool data by measurement scale” will appear. If you check this function, you confirm the use of the units of measurement that were selected in the settings. You can use the Edit menu to select units of measurement. You can also select them in the Info palette by clicking on the triangle located in the upper right corner.
It was said earlier that to call a particular tool you can use various ways. This also applies to Lineyka. You can call it by pressing the key combination “Shift” + “I”. As a result, a ruler icon should appear on the button with the Eyedropper tool. Similarly, you can hide the ruler.
How to align an object using a ruler
The ruler can also be used to straighten the image. Stretch the ruler on the picture, specify the straightening horizon and click on the “Align Layer” button. This may result in the disappearance of part of the image that extends beyond the document. If you click Align Layer while holding down the Alt key, the entire image will remain in place. You can verify this by expanding the canvas, or using the “Move” option.
Using PhotoShop CS6
For this version everything remains the same. As it modernizes, the Photoshop program is enriched with new features and functions. However, the transition from CS5 to CS6 was marked by a rather sharp jump. 27 points have changed. This has never happened in the entire history of Photoshop. However, the methods for enabling the Ruler tool in PhotoShop CS6 remain unchanged. You can still use the checkmark in the Rulers row of the View menu. The key combination “Ctrl” + “R” also works.
You can simply grab the square located in the upper left corner where the rulers meet with your mouse and drag it down, choosing a new starting point for the image. In the place where you release the mouse button, zero points of the rulers will appear. To return them to their original position, just double-click on the same square located in the upper left corner.
Finally, it is worth mentioning one very rare, but very strange misunderstanding. Sometimes users try to put all the tools in their places immediately after starting the program and wonder where the rulers went. This problem can be solved very simply. To enable a ruler in PhotoShop, you simply need to create a new document or open an existing one.
The exact location of shapes and lines relative to the central point is a task that can be done in Photoshop using the coordinates of the shape. Let's create a new file. Setting up the guides. This can be done using the “View” - “New Guide” tab. In the dialog box, select the type of guide.
We will need one horizontal and one vertical guide. Use the Move tool to move the lines.

Create an Ellipse shape.

Press the key combination Ctrl + Alt + T. A transformation area will appear.

For further manipulations, it is necessary to change the location of the central support point. The point must be moved to the center of the canvas.

Let's move on to the coordinates. Set the rotation angle to 30 degrees, as shown in the figure. Click on Enter.

We repeat the same steps: activate the transformation, shift the fulcrum and set the rotation angle. Confirm the action by pressing Enter.


RESULT

Using a straight line as an example, we create a mesh. Create a “Straight” shape. Having first become a straight line, press the Shift key and draw a straight line.

Press the key combination Ctrl + Alt + T. Do not move the fulcrum point, which will allow you to transform relative to the center of the figure. Set the coordinates for the X axis. Press Enter.

We continue to perform the same steps.


Create a horizontal line.

Let's activate the transformation. Change the coordinate of the Y axis. Press Enter.

We continue to form the grid.

You can select excess sections of the mesh, add a layer mask to the layer and invert it in the “Image” - “Correction” tab.
RESULT