The concept of landscape as the basis for the composition of a park or garden. Types of landscapes: simple, complex, panoramic. The degree of closure and dismemberment of space.
SCENERY- space as a separate element of the landscape, limited by the limits and conditions of visual perception. The landscape evokes a feeling and mood that is perceived similarly to the artist’s canvas. According to the spatial principle, landscapes are divided into open, semi-open, semi-closed and closed. A closed landscape is characterized by a predominance of volumetric elements (woody plants) with insignificant planar, horizontal ones, which limits the possibilities of a wide and free view of the space; these so-called “shade areas” exclude visual connections between the components of the landscape. In regular parks, an example of a closed landscape can be a bosquet, in landscape parks - massifs and groves. Open landscapes are distinguished by the predominance of planar elements, “areas of light,” and close visual connections between landscape elements. Examples include clearings, lawns, and large flower beds.
When planning to create beautiful landscapes in your garden, you must always remember that both in nature and in the garden they exist according to the same laws as paintings framed and hanging on the wall. And the composition of landscapes is determined by the same factors, the most important of which is compositional unit .
Landscapes are visually perceived in space differently, depending on their complexity:
Simple landscapes usually have one subject with a single
compositional unit;
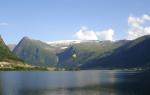
Complex landscapes usually have two or three plots, they combine
unified by one concept and form a single whole, for example a view of
Temple of Friendship in Pavlovsk, opening from old Sylvia,
includes three compositional units: the temple building itself, the bridge
Rossi and the Slavyanka River (Fig. 75);
Panoramic landscapes cover a circular picture with many
tion of compositional units and consist of several simple units
tight paintings.
LANDSCAPE PICTURE- part of the park (garden) space, visually separated from the general park (garden) space and conditionally enclosed in a “frame” that limits the field of vision, and has a certain compositional structure. Unlike a painting, a landscape painting is three-dimensional and can be perceived by the observer from several points.
Scenery- an integral part of the landscape, which can be perceived as an artistic whole space. A mandatory feature of a landscape is the predominance or presence of natural components.
Composition knot– this is the center where the main objects of the image are located. Note, in parentheses, that it does not have to be at the geometric center of the image. And anything can serve them. For example, several trees or one standing alone (tapeworm), a flat lawn or a bright spot flower, the surface of a pond, a waterfall, a stream, a gazebo entwined with climbing roses, etc. etc. Things to consider:
Firstly, the distance from the observer to the painting. But since our landscape, unlike a picturesque one, is not flat, but three-dimensional, then, depending on the depth of space, you can be guided by the distance either to the compositional center of the picture, or to its foreground, or, less often, to the background (background). Let’s say it’s good to admire a small flower garden from a distance of several meters, and a tapeworm or a group of first-size trees (linden, oak, pine) from a distance of several hundred meters. Secondly, the width of the picture. This is the distance between the objects that are the “frame” of our picture. Let the line connecting them be drawn only conditionally.
Thirdly, the height of the picture. This value is determined by the height of the landscape elements. But, like any artist, the designer must take into account the “air”, including the sky and the plane of the earth (water) in the composition. And finally, the horizontal angle of perception of the landscape. The full circle - 360° - is seen only by visitors to man-made circular panoramas and climbers standing on the peak of the mountain. Typically, the viewing angle ranges from 15 to 60°, and its optimal value is 23–28°. The 28° angle is used by landscape designers as a baseline measure of the perceived landscape.
Open and closed landscapes.
In a closed landscape Volumetric elements (woody vegetation) prevail with minor planar and horizontal elements, which determines the limited visibility of space. In the overall composition of the park, closed and shaded landscapes form shade areas.
In an open landscape the dominant role is played by horizontal surfaces - meadows, reservoirs, which determines significant visibility in the distance and breadth. Open landscapes form the brightest parts of the overall composition of the park.
In constructing spatial plans of landscape paintings, the following forming elements are used:
Frame– the purpose of which is to limit the side and upper parts of the foreground in order to isolate from the general space of the park an area on which it is desirable to focus the viewer’s attention.
Backstage– side curtains or screens, which represent an element in the construction of the second spatial plan of landscape paintings.
Dominant paintings or compositional focus are the most expressive part of a landscape painting, concentrating the main attention of the viewer.
In the formation of a landscape, an infinite variety of compositions can be created with different spatial plans and dominant objects, the choice of solution for which is determined by both the natural situation and the artistic design.
When organizing a landscape, you should follow the rule of “economy of attention” of the observer, excluding from the field of view all unnecessary elements that could disrupt or distract attention from the main thing. Parks are characterized by a multi-faceted landscape and a periodic change of pictures that are revealed to the visitor as they walk.
Composition of open spaces in the park. Parterres, clearings, water surfaces. Planar structures.
Forest park, park and garden landscapes are areas with functional and imaginative characteristics; having their own physical, biological and emotional appearance. This is the environment surrounding a person. Landscape is a visual, contemplative concept; the perception of the area is similar to a painting.
Water and water devices are essential components of the natural environment. Water reduces air temperature, increases its humidity, and significantly affects the microclimate. Depending on the regime of feeding surface flow, reservoirs can be flowing, drainless or with slow flow. Rivers, streams, reservoirs on rivers, ponds on small rivers are classified as flowing water bodies. Ponds located in ravines, ravines, depressions, as well as digging ponds on level ground are classified as drainless reservoirs. Reservoirs are fed with water from rain, snow, glaciers, and underground. River water supply is usually mixed.
The most common water features in the park are ponds and lakes.
The shape of reservoirs can be compact, curved, elongated, complex.
Glades, lawn. Almost all green areas require open spaces of greater or lesser size in which grass grows densely. Grassy surfaces are divided into lawns and meadows (clearings, lawns. Decorative lawns are divided into parterre and ordinary. Parterre lawns are placed in the most important, ceremonial places. They should always appear as smooth green carpets. A meadow lawn is no longer a lawn, but a meadow. It is picturesque park meadows with a free layout, natural meadows with wildflowers. The composition of meadows should be given special attention when designing large gardens and parks. The relationship between them and woody areas determines the artistic appearance of individual areas and the park as a whole. It is generally accepted that the width has the greatest landscape advantages. have clearings with an average width of 80-120 m.
The size of the clearings depends on their purpose and the size of the green object.
The clearing should reveal the space of the park. The perception of the landscapes of the clearing largely depends on the layout of the paths. (the path leads straight to it, abuts against it. The path approaches tangentially) The decorative nature of its edges plays a huge role in the perception of the clearing. Park glades have an aesthetic purpose - to bring space, light, and warmth into the landscapes.
Glades in the landscape of a city park have great compositional and functional significance. They are necessary in the composition as open spaces, contrasting with plantings, and are used for walks, games and sports.
Depending on the use, the clearings have a lawn cover of varying composition.
Parterres. Parterre is a decorative composition located on a horizontal plane, made from plants, inert materials and water. The parterre can consist of one, two, four or more elements.
From the windows of the buildings, the ground floor should be perceived as a whole. The main requirement for the ground floor is its simultaneous and complete visual perception.
In the design of the parterre, plant motifs are used: stylized branches, leaves, flowers of plants, arranged in various combinations. In most cases, the background for the drawing is sand, crushed stone and various inert materials.
The pattern of classic parterres fairly evenly fills the area allotted to it, without leaving large free gaps.
An integral part of the parterres are perimeter ridges (stripes), which perform not only a protective, but also a decorative role.
| " |
Publication date: 10.07.2015
There is a stereotype that to get good landscape photographs you need to go somewhere far away, to the mountains or exotic countries. And therefore, they say, landscape photography is a genre in which only avid travelers can shoot.
In this article I will try to show that excellent shots can be taken even in the backyard of your summer cottage. It is enough to be more attentive to the surrounding nature.
Photographers often have the illusion that somewhere in distant countries with different nature, different landscapes and people, photographing is more interesting and easier than at home. After going on a trip a couple of times, you will see that everything is not so simple. Any environment (country, type of landscape) has its own difficulties in shooting, which you will not know about until you arrive there.
Observe nature. Stay outside the city more often. Everywhere in the world there are times when nature is especially beautiful. According to my personal observations, for Central Russia this is June and September-October. June landscapes are decorated with many flowers, and at this time you can often see beautiful fogs. The autumn months are decorated with yellow foliage.
Observe the nature of your region. Surely it has its own characteristics that can be effectively conveyed in photographs.
Go explore. When you go for a walk in the countryside, don’t rush to take decisive photos in the next few minutes. Find several beautiful places, advantageous shooting points, think about the angle. It could even be the meadow or river bank closest to your country house, places with a slight difference in elevation, or the edges of a forest. Think about what time of day and in what weather this place will look its best.
In clear weather you can take great shots, but the sky may turn out “flat”. Cloudy days are the most boring to photograph, but days when sunlight peeks out from behind the clouds can produce expressive images.

Regular time. The most favorable lighting occurs at scheduled times: early in the morning or late in the evening. If you choose the right shooting point, angle and time, you can effectively convey the moment of sunrise or sunset in the frame. It is worth noting that such photographs will require very precise exposure from you and the ability to fit into the dynamic range of the camera or expand it.

Tripod and wide angle lens. These are the things without which serious landscape photography is unthinkable. With a wide-angle lens, you can include the entire landscape in the frame, not just parts of it.
For Nikon cameras with an APS-C matrix, we can recommend the Nikon AF-S 10-24mm f/3.5-4.5G ED DX Nikkor lens. For full-frame cameras, Nikon AF-S 18-35mm f/3.5-4.5G ED Nikkor and Nikon AF-S 16-35mm f/4G ED VR Nikkor are optimal.
A tripod will allow you to take sharp shots at long shutter speeds. And you will have to use long shutter speeds if you take photographs during the regime time.

Oddly enough, telephoto lenses can also be used when shooting landscapes. They allow you to “snatch” distant details of the landscape and express the perspective in the frame in a different way. This photo was taken with a Nikon 70-200mm f/4G ED AF-S VR Nikkor telephoto lens.
Don’t be afraid to include “traces of civilization” in your frame. Practice shows that such objects can fit well into the surrounding landscape: village houses, bridges... You may be able to find a windmill or windmill to photograph.
For example, in this frame I included an abandoned electricity building and a mobile phone tower:

Look for secluded places. It is not at all necessary to look for incredible landscapes and panoramas. You can find miniature, cozy corners. Perhaps only you will know about them. The edge of a forest, a shady alley, a river bank - these places are also interesting to photograph!

...All the footage for this article was filmed in the Moscow region and nearby areas. As you can see, in your native land there are many picturesque places that can be beautifully captured in photographs. The main thing is the desire to find something unusual nearby!
Before this post, I wrote only about travel, but today I will break tradition and share with LJ readers a short article about landscape photography that I wrote for one of the photo magazines.
I didn’t explain all the nuances in detail and load them with photo terms, so I explained in simple terms what aspects need to be taken into account during the shooting process and in preparation for it.
Landscape themes are closest to me, so in this article I want to talk about shooting in this genre.
I’ll say right away that I have never studied this craft anywhere, and I don’t have a diploma from a photography school. Everything came somehow by itself. I bought my first DSLR camera three and a half years ago, and I still use it today. During this time, I managed to take several dozen good shots and write more than 50 photo reports. Some even think that I can shoot masterpieces, but from the outside, they probably know better.
Unfortunately, I don’t yet have many opportunities and free time to travel, but at the first opportunity I try to break out of the web of everyday life somewhere away from the city into nature, taking my camera with me. First of all, I go to relax my soul, unload emotionally and get distracted. I have no thoughts in my head of shooting a masterpiece at any cost; rather, on the contrary, it seems to me that before this I have already given the maximum of my capabilities and there will never be a better shot than before.
Very often we travel with our whole family or with friends...
My childhood spent in the countryside in the summer apparently left an imprint on my mind, which is why I shoot many of my landscapes in the Russian outback. I really like the grandeur and diversity of Russian nature, the unusually beautiful monuments of wooden architecture, remote and half-abandoned villages and the rickety huts and fences familiar to every Russian person...
These pictures really impress me!
Professionals believe that the “landscape” genre does not quite fit many of my photographs: some sites, as well as the organizers of most photo competitions, classify my photographs in the “architecture” or “cultural heritage” section. But I photograph what is close to me and pleasing to the eye, and it makes no difference to me what genre it is called. I would simply call my work “Photo for the soul”.
To the traditional question: “How was this filmed?” I can talk at length and in detail, but in the format of this publication I would like to briefly go over the main points that allow me to take good photographs.
Preparing for shooting
I didn’t take a single more or less decent shot by accident. All my travels and short forays are well planned and prepared...
I consider the most important aspect in landscape photography to be the choice of shooting location (the so-called location). You can take as many photographs as you want of the beautiful view of the park from the window, trample the shore of a nearby lake in search of the perfect shot, or shoot the sunset near the nearest grove. You may be able to take some good photographs, but you will only get the most beautiful work by moving through time and space.
During my school years, I was seriously involved in orienteering, participated in all-Russian and international competitions, and was also involved in tourism along the way, so I am relatively well versed in maps. This helps me a lot in choosing a location and preparing a route. I would even say that studying maps and terrain is a hobby that goes along with photography.
The current possibilities of the Internet are truly limitless, so all ideas are born after studying information from the World Wide Web.
On Google maps, Google Earth, Wikimapia, Panoramio (ordered to live long) - I look at photographs and unique places from satellites. By the way, you can “drive” along many roads in Google maps in a virtual car and preview the surroundings. I look for interesting notes and articles on popular websites among photographers, travel forums, and also on networks. There is a lot of information about monuments of wooden architecture on the website Sobory.ru. I would especially like to mention nature reserves, national and natural parks. These territories, by definition, should be of interest to landscape painters. I put all the information received together and get the optimal route.
To get to some locations, it is sometimes necessary to provide additional means of transportation, such as a boat, bicycle or skis.
If possible, it is better to visit the object before shooting, conduct reconnaissance and “try on” angles - it will not be superfluous.
I visit both the sites of photographers’ “pilgrimage” and places where photographers have not yet reached. I like the second option much more, since the end result is often an unexpectedly pleasant result and always a unique picture. In areas where dozens or hundreds of shots have already been taken before me, I try to approach the shooting outside the box and bring something of my own to the picture.
8
Choosing a time to shoot
This is the second point I would like to mention. I take most of my shots at the so-called “regime” time: about an hour after dawn and an hour before sunset. Soft and warm light gives the photo richness and richness of colors and details the texture of objects. Transitions between bright and dark areas are smoother.
In addition, in the morning and (less often) evening hours, there is a high probability of the formation of fogs, which emphasize the depth of the image, beautifully scatter the light and blur the contours of objects, making photographs more mysterious and fabulous.
Naturally, it is important to understand where the light source will be at the time of shooting. To do this, I look on the Internet for the exact time of sunrise and sunset, and then, focusing on the sides of the horizon, I overlay the direction of movement of the luminary on the map.
Well, and of course the most important thing is the weather.
When the chosen shooting point is nearby, it’s enough just to look outside the window and at the weather forecasters’ promises on your phone. And if it takes a long time to travel, then I get acquainted with the forecast in at least three sources and look at the estimated map of the movement of atmospheric fronts. It helps you adjust your route as you go.
Having analyzed the above-mentioned points, I already have a clear movement schedule and approximate pictures in my head, which will subsequently appear on the matrix of my camera. It must be said that it is almost always possible to carry out our plans, but in some places you have to return again...
Technical component
I shoot with a Sony A65 and three lenses: Sony CZ16-80, Minolta 70-300, Samyang 8mm. There is also a portrait prime Sony SAL-50F18.
The first lens is universal; I use it to shoot about 80% of all frames. It has excellent sharpness and color rendition.
I take landscape shots mainly with an aperture closed to f/8 - f/13 (this ensures maximum sharpness throughout the frame) with the lowest possible ISO value in auto (not always) focus mode. I set all these parameters, including shutter speed, in manual mode. If there is a need to get beautiful rays from the sun in the frame, you can close the aperture even further.
I record the frame on a memory card in jpg and raw format, and I need the second one only for backup if I suddenly have to pull out shadows or highlights. Information is restored from shadows much better than from highlighted areas, so most often I shoot landscapes with underexposure.
May many photographers forgive me, but I rarely use a tripod. It is clear that at night, in low light conditions, etc. conditions are nowhere without it. But during regular hours the light changes rapidly and, as a rule, it’s enough for me. Sometimes you even have to jog from one shooting point to another so as not to miss the moment. But I love running and extra exercise never hurts :) A tripod in this situation significantly reduces efficiency. Sometimes I shoot with exposure bracketing, but here, as a rule, I don’t need a tripod. Even panoramic shots in 90% of cases I take handheld.
About panoramic photography
I do some of my work using the panoramic technique - stitching together several frames taken from one point with overlay. In the final version, such photographs look completely ordinary. And the point here is not at all in the desire to shoot scenes for posters or to get exorbitant pixels, it’s just that a panorama gives volume, depth and sharpness to the entire frame, allows you to direct the viewer’s gaze from the foreground to the middle and background, create the effect of presence in the frame, and of course it gives wider coverage.
I really like photos with an interesting foreground, so when constructing a frame (be it a panorama or a single shot), I try to start with that. You can use stones, flowers, leaves, etc. as the foreground. If there is nothing to catch your eye on, you can improvise by dragging, for example, some kind of snag.
Processing
I post-process the frames in Photoshop Ps5. I mainly edit shadows and highlights, contrast, saturation, apply filters and sometimes the technology of expanding the dynamic range of the image (HDR). I do not welcome photo collages. I also stitch together panoramas in Photoshop, mostly in automatic mode. I refine the inconsistencies and geometry by hand.
It should be noted that using a photo editor allows you to improve the frame, but the source must be of high quality. If the photo frankly doesn’t turn out well, then no editor will make anything useful out of it.
I am critical of many of my shots. It so happens that at the time of shooting you lose sight of some moments, and simply neglect some nuances. After some time, you begin to understand that it could have been filmed better.
That's all, in a nutshell. But perhaps I missed something.
Summarizing all of the above, I want to say the following: if you are engaged in photography, do it with soul, be creative and improve your skills. Take a responsible approach to choosing a shooting location, plan your route, study the weather...
I wish you all good luck, interesting travels and beautiful memorable shots!
I tried to summarize my experience in landscape photography and give the most important tips for beginner photographers. I hope my tips will help you learn how to shoot a very beautiful, memorable landscape.
Landscape photography allows you to preserve memories of those rare moments and helps you mentally transport yourself to your favorite places. But it’s one thing to shoot for yourself, and another thing to convey the atmosphere of a place to people who have never been there. Not everyone can do this.
We are used to living in cities, among concrete and glass. Many people only occasionally manage to escape into nature, enjoy clean air, clear water and piercing silence. And therefore, every meeting with nature seems special, you want to remember it for a long time.
1. Plan your trip in advance
Oddly enough, the work on creating a beautiful landscape begins long before pressing the shutter button - it begins with planning a trip. Wherever you are going to spend your vacation, in the Altai mountains or in the middle zone on the shore of a lake, collect as much information as possible about this place in advance. Analyze satellite images and topographic maps - from them, for example, you can understand which mountain peaks will be illuminated at sunset or dawn. Find photos other people have taken of the area - even if they're shot on a point-and-shoot camera, this will help you get a better idea of where you'll be shooting. Highlight the most interesting features of the area - it could be a beautiful mountain peak, or an unusual tree on the bank of a river - and concentrate your attention on these objects.

Lake Poperechnaya Multa, Altai Mountains, mid-September.
2. Explore the area
Surely many of you have found yourself in a situation where, at the sight of the colors of the flaring sunset, a person begins to fuss and tries to take off at least something in order to capture the rapidly disappearing light. In such a situation, you are doomed to failure. To avoid this, devote all your free time to exploring the area. If you're vacationing on the shore of a lake, walk around the lake and look for interesting places on its shore (for example, rocks covered with variegated lichen or a stream flowing from the lake).
Take a walk through the forest or along a river, climb higher up the slope - somewhere you will definitely find something unusual and beautiful. During such research walks, take test shots so that later in the evening you can review them in a calm atmosphere and choose the most interesting places for shooting. And when the sky once again lights up with sunset colors, you must stand at a point you have previously chosen with your camera at the ready.

I found this shooting point after several hours of exploring the area.
3. Landscape is, first of all, light
Most amateurs prefer to shoot at midday, when the sunlight is very harsh. However, photographs tend to come out flat, with muddy colors and excessive contrast. Meanwhile, the sunlight is most beautiful and soft during regular hours - at sunrise and sunset, plus or minus an hour. Try to shoot during regular hours, and you will see how your photos will sparkle with completely different colors.
During research walks, use a compass to understand where the sun will rise and set - think in advance where it is better to shoot sunrise and sunset. The exact time and location (azimuth) of sunrise and sunset can be found, for example, using The Photographer’s Ephemeris program (http://photoephemeris.com).

A sunrise of rare beauty, photographed by me completely alone - the rest of the tourists were sleeping at that time. When they woke up, they saw only the sky covered with gray clouds.
4. Photographic equipment
Always use a tripod. If you have a choice between bringing a tripod or an extra lens, choose a tripod. A tripod can turn the simplest camera into a powerful tool that allows you to shoot landscapes in almost any conditions. It is advisable that the tripod allows you to install the camera at any height from 20 cm to 1.5-2 m. The weight of the tripod is not so important if you are not going to shoot in a stormy wind.
I recommend using a wide-angle lens; it is most popular when shooting landscapes. For example, if you are shooting with a DSLR camera with a crop factor of 1.5, it could be a lens with a focal length range of 10-20 or 12-24; respectively, for full-frame cameras – 16-35 or 17-40.
A tripod is a landscape photographer's most powerful weapon.
5. Shooting from a low position
If you find an interesting foreground to photograph (for example, flowers or rocks covered in moss), try lowering the camera on the tripod. This will focus attention on the foreground and make the photo more expressive.

Shooting from a low position (40cm above the ground) made it possible to focus attention on the flowers by visually increasing their size in the photograph.
6. Depth of field
In a landscape, every area of the photograph needs to be sharp, from the grass in the foreground to the snow-capped mountain peaks in the background. To achieve the desired depth of field, relatively large aperture numbers are usually used - from f/8 to f/16. The larger the aperture number, the greater the depth of field. However, it should be remembered that at large aperture values (f/16 and above), sharpness can deteriorate significantly due to diffraction.

The f/13 aperture made it possible to sharpen almost the entire scene from rocks to mountains.
7. Dynamic range
Dynamic range (DR) is the difference in brightness between the lightest and darkest parts of the scene. When shooting sunsets and sunrises, the camera often cannot cope with the large DD of the scene, and white “overexposures” and black “underexposures” may appear in the picture. The easiest way to avoid such problems is not to shoot in backlight. For example, instead of filming the sunset itself, try turning the camera 90 degrees and filming the mountains illuminated by the last rays of the sun.

The DD of this scene is significantly less than that of the sunset, which was blazing behind me at that time.
8. Volume
A good landscape should have volume. Our eyes always see a three-dimensional picture, since we have two eyes. But the camera only has one “eye”, so in order for the photo to become three-dimensional, you need to make an effort. The sense of volume in a photograph is created through tonal and spatial perspective. Volume can be enhanced by light. The greatest volume is achieved with side and back lighting of the landscape. Try to choose a shooting point so that the photo contains both close objects (foreground) and distant objects (background). Ideally, there is a smooth transition between different plans, for example, a stream flowing from the background to the foreground.

Spatial perspective makes the photograph more voluminous. Sunlight illuminating the ridge at an acute angle reveals its texture.
9. Get up early, go to bed late
Perhaps the most important tip. Get up an hour before dawn and go shoot, regardless of the weather. I know how difficult it can be to get up at 4 am and get out of a warm sleeping bag into the cold air, but believe me, it’s worth it. Likewise, an hour before sunset, go shoot regardless of the weather. Remember that gorgeous sunsets with rainbows only happen after rain, and in order to capture them you need to get pretty wet.

It rained an hour before sunrise. It was hard to imagine that literally half an hour later an incredibly beautiful doomsday would take place over the lake.
10. Be patient
Beautiful light does not happen often, and you will have to be patient to wait for it. No amount of advice will allow you to create dozens of beautiful landscapes a month. Even the best landscape photographers spend an average of 5-10 days creating a single image - time spent waiting for light. This needs to be taken into account when planning a trip - if you stay in some place for less than a few days, then the likelihood of taking a beautiful photo in this place is close to zero.

Taiga Eye Lake, Ergaki Natural Park
P.S. Ask your questions in the comments..
At first glance, the title sounds absurd and meaningless. It would seem, what could be simpler? Come to the shooting location, set up a tripod, take out your camera and shoot for fun! But while conducting photo tours, I became convinced that there was still a problem. If not a problem, then definitely a subject for conversation. So, fresh from the last two photo tours to the Carpathians, I want to share some of my thoughts on the topic.The first thing I encountered was the inability to “see” and “search” for a frame, as well as being “stuck” in one place. I have observed a situation where novice photographers, having arrived at the shooting location, simply do not know what to shoot. On the one hand, it seems natural - the area is unfamiliar, but on the other hand, there are so many new and interesting things around that it makes your eyes wide open. In fact, the problem is somewhat different and now we will try to figure it out. The situation is something like this: you bring a group, for example, to a dawn shooting, you say: “Everyone, let’s unpack, take out tripods and cameras, here we will shoot at dawn,” you show certain angles, a short briefing and... after a while you notice that the participants stand still, limiting themselves exclusively to the angles that you have already shown, taking a bunch of completely identical shots. Everyone is filming the same thing. We have to again show other angles or objects to shoot (literally saying: “Look back/left, etc.”) and... history repeats itself again.
Meanwhile, landscape photography involves a constant search - searching for locations, searching for angles, objects in the foreground, waiting for optimal light, shooting time, etc. You need to constantly move around the area. It is necessary to clearly understand: the frames will not come on their own, they must first be found, seen with the eyes, perceived mentally and then only captured with a camera (the latter is the simplest and easiest). What has been said, of course, does not mean that you need to rush around the area, mindlessly shooting bursts right and left, filling the flash drive with a bunch of frames, which will then be disgusting to look at... I think we’ve all had cases when, having come home, we start looking at the footage and we wonder: where is all the beauty that we recently saw? Why don't the footage capture it?
Therefore, upon arriving at the shooting location, it is advisable to calmly look around, evaluate the light, the direction of sunrise/sunset, select objects that can be used as foreground, middle, distant, etc. It is very important to choose your rhythm of shooting, optimally moving around the area in search of a good composition and the light you need, and not hanging for a long time at one tree/haystack/rock/house, etc. This way you can take N number of different shots in one output. In addition, when shooting in a group, try not to shoot from the same position as the rest of the participants - look for your own unique shots. Why do you need the “thousand-first” photo of the same house/tree/haystack?!
Advice: don’t stand still, choose the optimal rhythm of movement for yourself and constantly explore the area. Personnel do not come on their own; you need to “hunt” for them.
For example, I had to literally hunt for this frame, constantly moving in an attempt to catch a horse in the frame:
Exception: you already know the area well, have a clear idea of what exactly you want to shoot, have mentally built a composition, placing objects in the places you need, and are simply waiting for the right light or other conditions to realize your creative vision. As an example, I can give this frame:
I knew exactly the time and place where the Moon should appear, mentally imagined this frame and all that remained was to arrive at the place, set up the tripod and wait for the necessary condition - the moon rising.
The second mistake of a novice landscape photographer is focusing on shooting exclusively in one direction - the direction of sunrise or sunset. Yes, as a rule, it is at the place of dawn/sunset that the colors are the brightest and most expressive. This is all understandable, predictable, but not axiomatic. In practice, the most beautiful light is not always the most beautiful; the brightest and most beautiful colors are clearly observed in the east or west during dawn/sunset. Often the opposite happens. Therefore, during morning or evening shooting, do not forget to look back.
Here are some examples of photographs taken with the above in mind. That morning there was an absolutely clear cloudless sky, so the dawn itself did not represent anything interesting - well, the sun came out from behind the mountains, so what? But the most interesting thing was observed from the opposite side - the rising sun beautifully illuminated the peaks of the mountain range, giving them a yellow-red hue:
Another example, taken at sunset, the sun was behind me to the left, illuminating the clouds with pre-sunset rays:
Advice: don’t forget to turn your head back from time to time, look around! Anything can happen, so we turn our heads and look around more often! Nature is full of surprises! :)
Exception: again, you may have some special idea and shooting task and you have little dependence on specific conditions. For example, you deliberately want to include the sun in the frame and shoot objects in backlight. Let's say, in this picture the presence of the sun is simply necessary, because... “creates” the atmosphere of the morning, fills the photo with light:
A similar situation, trees in backlight and fog look just great: 
The next problem is what I call “limited panoramic vision.” Often, for landscape photography, we use a wide-angle lens and limit ourselves to it. No matter how paradoxical it may sound, by doing so we limit ourselves, narrowing the horizon of our vision. Try using a telephoto instead of a wide-angle and looking through the viewfinder. You will be surprised to discover that a well-known landscape contains new interesting facets that were simply lost before.
Here is a slope of the Carpathians blooming with forbs, shot with wide-angle optics: 
and here is the same slope shot with a lens with a focal length of 200 mm:
Completely different pictures of the same place! And it’s enough just to “narrow” the angle of view!
Advice: Don’t be lazy, alternate lenses with different focal lengths while shooting - this will expand new horizons and show new angles!
Exception: you know exactly what you want to shoot and how you want to shoot, hence the intelligent choice of a lens with the appropriate focal length.
It seems that's it this time. :)
As always, I will be grateful for the constructive dialogue, additions and wishes expressed in the comments.
Previous articles.