For those who live in the country from early spring to late autumn, it makes sense to have laying hens and feast on homemade eggs. In dacha conditions, it is quite possible to make a simple but comfortable chicken coop.


Design Features
You can order a chicken coop from a carpenter, buy it ready-made, or make it yourself. There are many types of structures, from a small portable version to a large-scale structure. When designing a chicken coop, you should choose a warm but cool place. The house with nests and perches should be raised above the ground, this will help protect the birds from the night cold and dampness.
Mini-chicken coops for several birds can be easily moved to another place. They can be made in the form of a stretcher, put on wheels, or simply moved in parts. Large plots of land can afford large chicken coops with spacious walking areas. Sometimes bird houses are built on several floors.


Free-range chickens lay eggs more happily. But anyone who dares to release them into the garden will be left without a harvest. The poultry owners found a way for the birds to get some exercise and preserve their vegetables. They build long corridors from the mesh into which birds can leave the coop and enter it from the other side.


With summer option summer cottage You can not complicate your life at all, make the simplest chicken coop, in the form of a triangle from several sheets of slate, and a small run covered with mesh. Those who like complexity can build a beautiful poultry house with a string of houses, windows and flower beds. Or a mini-house for broilers, similar to a real rural hut.


How to build it yourself
Before you start building a chicken coop, you need to know how many birds will live in it; the size of the future building depends on this. It’s quite possible to make a poultry house in the country with your own hands, you just need to follow the step-by-step instructions.

Preparatory work
In any construction, time is needed for preparatory work. This includes: selection of location, project, materials, preparation of drawings and calculations.
Selecting a location
The bird's health and egg quality will depend on the bird's comfortable condition. A correctly chosen location can further affect the egg production of chickens. On a hot summer day, laying hens will feel uncomfortable in the sun. It is better to place them under a shady tree. In the morning, the slanting rays of the sun should warm and dry the chicken coop, which has cooled down overnight, and for this it should be placed on the southeast side of the trees.


It is better to choose a place for birds away from the garden to eliminate the risk of getting into the room chemical substances when processing horticultural crops. Sewage, cesspool and compost pits should also not be located near the chicken coop and the run to avoid infection. If you attach a chicken coop to a summer house building, it is easier to heat and it is easier to look after the birds. Construction cannot be carried out in a low-lying area, as precipitation from the land will flow to the chicken coop.
It is better to plant a hedge around the birds' walk to protect them from wind and drafts. The bird can equally suffer from heat, cold and wind, so all these factors should be excluded. To make it easier to control the birds and close them at night in time, the chicken coop should be visible from the most inhabited places in the country. When the chickens come to rest, you just need to close the door behind them.

Project
Construction should begin with the preparation of drawings and calculations. At this point, the construction site must be determined, a sketch of the chicken coop must be drawn up in relation to the terrain and cardinal directions. It is necessary to indicate nearby buildings and trees, consider the level of shading, wind rose, and eliminate the presence of drafts. You can draw up a building drawing yourself, taking into account the characteristics of your site, or borrow it from the Internet.
The construction plan should include space for perches, drinking bowls, feeders and bird walking. Ventilation and lighting are thought out and designated. If you are planning a winter chicken coop, you should consider the heating system. The size of the building is determined at the rate of two hens per square meter plus 30% of the additional area for nesting. But in practice, birds are housed in larger numbers than required by regulations.


Construction process
During the construction process, all work is carried out in stages, focusing on drawings and calculations. At the initial stage, the terrain is marked and the foundation is laid.


Foundation
For several laying hens, you can build a small portable chicken coop; it does not need a foundation. A larger project will require a foundation.
They come in three types.
- Columnar. It involves the installation of pillars and the construction of a building using frame technology.
- Pile. Piles are used as pillars, which are driven into unstable soils or on sloping terrain.
- Tape. Most reliable foundation, it is poured with concrete around the perimeter of the entire building.
Simple country options most often use a columnar base; it is cheaper and easier to implement.


Holes should be dug along the contour of the future chicken coop to the freezing depth. Make the recesses at a step frequency of two meters. The volume of the support will be about 20 cm and rise 40 cm above the ground surface. The formwork can be constructed from a rough board, 60-80 cm high. Next, reinforce it with reinforcement, insert supports and fill it with concrete. You can start work from any corner of the future building. Cover the poured foundation with polyethylene and leave for a week until dry.


Floor
When the foundation is strengthened, the base part is tied. To do this, four 20 cm thick beams are laid on the roofing felt, creating a box. Using metal corners, the beams are fastened together.
Boards placed on edge (joists) are attached to the frame using nails. The areas between them are filled with expanded clay. Then, in order to protect the bird from rodents, the surface is covered with a fine-mesh mesh with a half-meter overlap, which will subsequently rise to the walls. A rough board is laid on top.
When constructing the floor, it is better to make a slight slope towards the door to make it easier to maintain the chicken coop in the future. When working with wood, you should remember that all wooden elements must be treated with antifungal and fireproofing agents. They insulate the floor when there are already walls.


Walling
The construction of walls should begin with the installation of side posts. In order to make a pitched roof in the future, the difference between the front and rear pillars should be about half a meter. It is important to remember that the roof slope should not be in the direction of bird walking.
Then the top trim is made using boards, they are attached to the racks with nails. Before installing the sheathing, you should find out the dimensions of the insulation. Thermal insulation layers are laid in the gap between the supports.
In the area of the door, window, opening for birds to exit, transverse guides are installed. When the frame is ready, the floor and ceiling are covered with edged boards.


Roof
To cover the roof, you need to prepare rafters. To calculate their size, measure the distance between the front and rear posts and add another thirty centimeters to the roof overhang.
The rafters, set on edge, are mounted to the top frame of the building. The distances between the rafters are equal to the width of the thermal insulation. The rafters are covered with polyethylene, lathing is made and the roofing is installed.
To insulate the roof, thermal insulation slabs are laid between the rafters. In northern regions, several layers of insulation can be used. A few centimeters of space should be left between the lining material and the thermal insulation for free air circulation.


Wall cladding
The walls are sheathed after roofing work. To the outside of the frame, bars are mounted to which boards, plywood, OSB sheets, or whatever it was planned to cover the chicken coop, are attached to. Insulation is laid between the racks.
The chicken coop is then lined from the inside. The area of the ventilation holes should be left without covering.


Construction and finishing of a chicken coop
The floor should be made of warm materials, and cement, ceramic tile, bricks are not suitable for it. Chickens are prone to rheumatism; if the floor is cold and damp, they sit on their feet and stop walking. Wood is the most suitable material for a chicken coop. In order not to spoil the wood flooring with chicken manure, the floor is covered with a thick layer of sand and sawdust.
The roof should not be built from materials that become very hot in the sun or make noise from rain and wind. Chickens lay eggs equally poorly both from fright and from overheating.


Ventilation
For solid chicken coops, you can install a ventilation duct under the roof. Small bird houses can get by with two openings with dampers on opposite walls.
The best option would be a hood equipped with a fan. To install such a system, two square holes should be made on opposite walls. One of them should be forty centimeters lower than the other. A special fan is inserted into the hole.


Lighting
Chickens cannot see well in the dark, if they are cold or scared, they begin to huddle in a corner and crush each other. In such conditions, it is convenient to have adjustable lighting with smooth switching off.
Perches and nests
It is more convenient to make perches removable, so they are easier to care for, and placed at different heights. A wooden ladder should be brought to the perch; it consists of a wide board with cross bars.
It is better to cover the nests with straw and change it periodically. Hay is less suitable because it rots quickly. Nests should be darkened; chickens do not like to lay eggs in bright light.


In the chicken coop you need to install several wooden perches at a distance of 30-50 cm from each other.

At your summer cottage you can provide yourself not only with fresh vegetables and fruits, but also with homemade poultry and chicken eggs. You can make a chicken coop at your dacha with your own hands. The main thing is to understand how many chickens there will be. It is better to carry out construction using drawings with exact dimensions.
 Project and drawing with dimensions of a country chicken coop
 Important aspect in the construction of a chicken coop - choosing the installation location. It is necessary to prevent the smell from the bird from penetrating into the house. Chickens also need peace and do not like noise. Therefore, it is better to build in remote areas of the site. You should not combine the building with a barnyard.
A walking area is set up next to the chicken coop. Enough . A platform of 2 x 10 m is built for 10 chickens. Calculations are made taking into account that there will be at least 2 m2 per head.
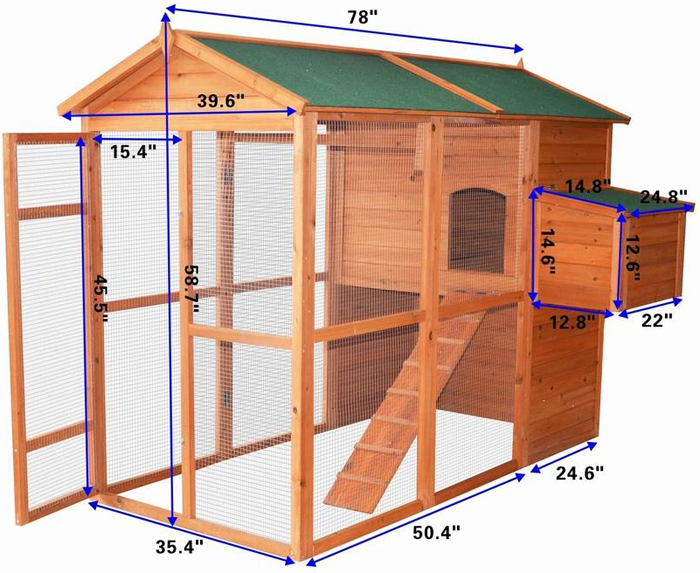 Design option and diagram of a chicken coop for installation on the site
 Advice. In the absence of sufficient area, you can resort to making tunnels. They are mounted around the perimeter of the area and allow the birds to run around to their heart's content.
It is better to install the building on an elevated plot of land. Then the soil will warm up faster, and moisture will not linger on the surface. It is necessary to provide for a shady and sunny side. It is recommended to place the windows in the sun and the exit in the shade.
 Names of elements and design of the chicken house
 What materials to choose for a chicken coop in the country
The simplest chicken coop can be built from scrap materials. If only summer operation is planned, then plywood or OSB is chosen as the main material for the walls. First, a standard frame is created, which is sheathed with sheet materials. This design will be enough to protect the chickens from adverse weather conditions. 
The winter chicken coop needs to be well insulated. Plywood and fiberboard can be used as a base. Others are also used Construction Materials: foam blocks, timber or sandstone. It is better to install the roof in a chicken coop for 10 chickens from slate, ondulin or roofing felt.
You should not install metal roofing. During rain or hail there will be a lot of noise, and birds don’t like it.
Due to these manifestations, the quality of weight gain and the number of eggs laid is significantly reduced.
 Roofing option made of soft tiles
 It is better to use mineral wool or polystyrene foam as insulation. These are cheap and beneficial materials for.
Small mice can live in such insulation. Therefore, they are covered on both sides with a metal mesh with minimum size cells.
 An example of insulating a chicken coop with foam sheets
 The best option is extruded polystyrene foam. Its price is higher, but the effect is better. Due to its properties, it repels fungi and insects. Rodents will not chew holes in it. It can be laid up to 3 cm thick.
How to build a chicken coop at your dacha with your own hands
It is better to build from four-edged timber measuring 100 x 150 mm. It is inexpensive and does not require any skills when constructing a building.
Foundation
Before its construction, a drawing is created in order to understand how much material will be spent. The materials of the entire structure and the final weight of the building are taken into account. This will allow you to calculate the load on the base.
If the chicken coop is small for 5 chickens, it will be easier to build. Columns can be made of brick or stone. Around, which is filled with cement-sand mortar. Don't forget to create natural ventilation under the floor, it prevents rotting.
Read also
How to build a goat shed
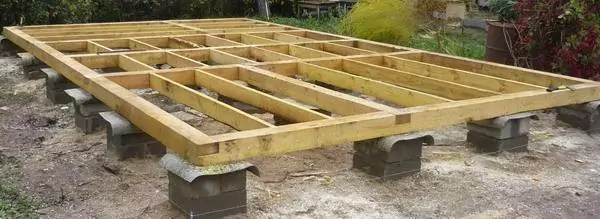
 Installing chicken coop floors on a simple column foundation
 The first step will be marking. To do this you will need rope and metal rods. The rods are driven into the ground exactly along the perimeter and tied with rope near the ground.
To check the correctness, you need to measure the distance diagonally with a tape measure.
At the second stage, a layer of soil up to 20 cm deep is removed inside the marking.
The soil can be used in the garden. In the corners, the surface is prepared for mounting the cabinets. Need to dig holes. Their depth is from 60 to 70 cm, width is about 0.5 m. 
The bollards should rise approximately 25 cm above the ground. To avoid mistakes, use a hydraulic level and a rope. The bottom of the resulting depression is filled with several layers of sand and gravel. The thickness should be on average 10 cm. Two bricks are laid in the first corner. On top is a layer of cement mortar. Two more bricks are placed across the previous ones. The action is repeated until the height of the pillar coincides with the intended level. The three remaining pedestals are made in the same way. When the work is completed, a break is required to allow the solution to harden.
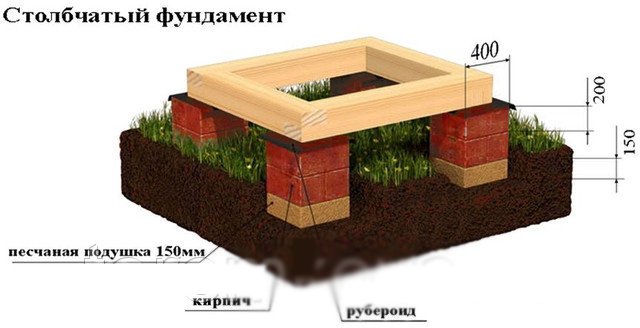 Diagram of a columnar foundation made of bricks
 In good weather, 5–7 days will be enough. The final step will be to treat the columns with bitumen or construction mastic. The remaining empty perimeter inside the pit is filled with coarse gravel.
Floor
Floors also require proper installation. This will protect the birds from wind and freezing. It is better to use double flooring. First, a subfloor is created. To do this, use a simple unedged board. It must be dry! The next layer is vapor barrier. 
Bars with a cross section of 100 x 100 mm are installed on top. Insulation is laid between them. Finally, the finishing floor is installed. It is better to make it from dry edged boards.
Builders recommend leaving ventilation ducts with grilles. During wintering they are tightly covered with panels.
Walls
Walls can be built in different ways and from different materials. We will consider the timber option. An insulator must be laid between the first crown and. The most affordable is roofing felt. It is laid on the surface in two layers.
 Scheme of laying roofing material between the foundation and the crown
 We must not forget about installing floor joists, which are also created from timber laid on edge. They are laid at a distance of at least 0.5 m from each other.
The connection of the crowns is best done using the tongue-and-groove system using a sealant. You can use simple flax jute fiber. They are often built from wood with natural moisture, so it is recommended to install dowels in corner joints. They will prevent distortions after the timber dries and shrinks. 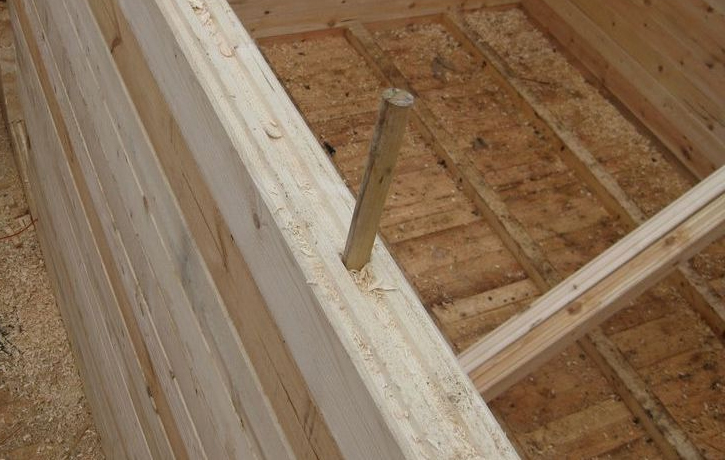
Ceiling
If you don't have food storage space, consider this option. The internal attic space can be converted into small storage space.
At the initial stage, the ceiling beams are strengthened. The ceiling itself can be covered with any boards. An important part - . Two ventilation ducts are knocked together from scrap materials and installed at different ends of the building.
 Options for natural ventilation in a chicken coop
 The first should be at ceiling level, the second 40 cm lower. Using dampers, you can regulate the temperature inside the chicken coop. The ceiling also needs to be insulated, but a more affordable insulation option can be used. Expanded clay or coal slag are suitable.
Construction of a chicken coop inside - how to properly build a roost
When the initial work on the construction of the chicken coop is completed, interior decoration begins. The main part is the roost, where the chickens spend most of their time.
 Several bird perch design options
 There should be at least 30 cm of perch per individual to make it comfortable. If a chicken coop is being built for 10 chickens, then the total length of the roost should be at least 3 m.
Many owners country houses After arranging the main building, laying out a vegetable garden and orchard, they are thinking about breeding feathered animals. In this case knowledgeable people They advise you to get chickens - and fresh eggs will appear on your table every day.
General structure of the chicken coop and its types
To breed birds in a backyard, it is necessary to build a special structure - a chicken coop. The place to place the chicken coop should be dry and located on a hill. Drainage is installed around it - a small hole or ditch to drain rainwater. If there is no hill on the territory, it is created artificially (from clay and sand).
The size of the building should allow birds to move normally. The area of the house with perches is calculated based on sanitary standards: 2–3 chickens per 1 m2 of free space, but the minimum area value is 3 m2.
The entrance to the chicken coop and the run are built on the south side, which is protected from the winds. The enclosure is hidden under a roof or covered with a canopy: from the hot sun and rain.
There are two types of poultry house: summer or winter, depending on the temperature living conditions and the amount of free space on the site. Summer construction in warm climates is made light and mobile - it can be moved from one place to another, if such an opportunity exists in an open area. And in mid-latitudes, a solid structure is installed immediately: on a foundation. The winter poultry house is built with additional insulation so that during the cold season the temperature inside does not drop below zero.
The chicken coop includes:
- house for chickens to spend the night;
- walk-aviary;
- perches;
- nests;
- a tray for collecting litter under the house.
While moving, hens develop better and lay more eggs, so the design of a poultry house implies the presence of a run - an enclosure, closed on all sides with a net.
A run is attached to the chicken coop so that the chickens can walk on fresh grass and breathe air without scattering all over the countryside.
Perches must be placed in the chicken coop: the birds use them as a place to sleep. The perches are made smooth and rounded so that the chickens can hold on comfortably and their paws are not hurt by splinters.
Perches are long perches attached to the walls of the chicken coop or installed on the floor on stable supports.
Additionally, nests are built in the poultry house: chickens will begin to lay eggs in them.
The nests are lined with a layer of soft straw or grass: the hens choose their favorite place, and sometimes it happens that everyone lays eggs in the same nest - taking turns
Drawing of a chicken coop, arrangement of perches and nests
For 6–8 chickens, the dimensions of the house on the foundation will be 2x2 m, and the aviary for walking is approximately 2x7 m. The minimum height of the room is 1.8 m so that the owner can freely enter it.
To build comfortable housing for chickens, you will need to make the correct calculations for the chicken coop and draw up a drawing
The perch can be made from timber, even knots, thick branches or other available materials. But it is important to follow the rules:
- Comfort: for an adult bird - 25 cm of perch.
- Strength: the perches should not sag under the weight of the birds.
- Safety: sharp corners are smoothed with a plane.
Perches are made with a thickness of no more than 4–6 cm in diameter, and the cut pole should not be round, but closer to an oval shape
Perches are installed in the darkest and warmest place in the room: away from windows and doors. It is recommended to install the perch on:
- 50–80 cm from the floor;
- 25–40 cm from the nearest wall.
Nests are knocked down from wooden planks or made up of plastic boxes with a lattice bottom.
- size of one nest: 30x30x40 cm;
- install nests at a distance of 30–40 cm from the floor;
- place them against the far wall, in the dark;
- lay soft and dry straw;
- for 10 chickens you will need about 4 nests.
A separate corner is prepared for raising chickens. It is recommended to separate adult birds and young birds.
On the drawing you need to indicate the location of all the necessary elements of the chicken coop so that it is convenient to build the structure using this marking
After drawing up a detailed drawing, we move on to the selection of materials.
Selection of materials and tools
- To fill the base - concrete mortar. Materials should be selected based on the type of foundation.
- For the frame - beams. For wall cladding - boards.
- For the inner lining and nests - plywood sheets.
- For the roof - roofing felt, slate or tin. 2 layers of roofing felt are also laid on the foundation (protection from rotting).
- For the enclosure - mesh and iron clamps.
- Screws and nails.
To make a chicken coop you do not need to prepare any special tools- only standard devices that are often used in the country are needed
The set of tools may vary depending on the dimensions of the structure being manufactured, but basic set required:
- Master OK;
- plane;
- roulette;
- building level;
- axe;
- mallet.
After full preparation Let's move on to construction.
Step-by-step instructions for making a summer chicken coop
Making the foundation
The ideal option for a 2x2 m chicken coop with a height of 1.8 m is a columnar base, which can be made from old bricks or stones. First of all, you will need to perform marking work:

After the marking work has been completed, you can begin making the foundation:
- We remove a layer of fertile soil 17–20 cm thick.
- We dig 8 holes in the corners and perimeter, 50 cm wide and 60 cm deep (there will be pillars in them).
- We fill the bottom of each hole with sand and gravel (10 cm).
- Then we lay 2 bricks and cover them with cement mixture on top.
- Next - 2 more bricks. The cabinet is laid out to the level of the rope. The cement mixture will help level the height of the cabinet.
- Treat finished pillars with bitumen or protective mastic. And fill the cavity between the pillars with soil, leveling it with the surface of the earth.
- The construction mixture hardens for about a week, then the timber grillage is installed.
For a chicken coop, the foundation is built smaller: with three pillars on each side; install a timber grillage on top
The finished foundation is left for a month. After which you can begin building the walls of the chicken coop.
Installation of walls and roof
It is recommended to use a frame wall construction. A panel frame is constructed and filled with a mixture of clay and straw in layers. Before installing walls, you need to waterproof the floor. An excellent basis for frame walls and floors is a support frame made of beams.
For walls and floors you need to make a support frame from beams
You will need to prepare material for racks, lintels and struts, which will increase the rigidity of the structure. Long support bars can be used not only as supporting parts for the walls of the poultry house, but also for the lower part of the run. The frame structure of the platform can be made from an iron corner. All that remains is to fix the mesh netting on it and cover the structure with polycarbonate.
The frame, covered with boards, is insulated with ecowool or mineral wool.
Chicken Coop Wall Installation Guide:
- You can build the walls directly on the wooden floor of the chicken coop. But you can also assemble each wall separately, and then install them ready-made.
Each wall must be assembled separately using wooden beams
- Openings are made in the walls for windows, a door and a box from which eggs can be taken.
You need to make openings in the walls: fold the blanks, align them according to the markings
- After this, all the walls must be knocked together, excluding distortions.
After preparation, they need to be knocked together into a single structure, taking into account the verticality of the racks level to the floor
- After the frame is assembled, you can proceed to making the roof.
In order for the structure to retain heat better, it is recommended to make a roof with two slopes. The frame consists of rafter legs and sheathing.
The roof can be covered with slate, metal tiles and other materials
The gaps between wall elements should be insulated. A vapor barrier film is laid on top of the insulating material. After this, the building is sheathed with plywood sheets.
The exterior of the structure is sheathed with OSB boards and plywood.
The outer part of the OSB board will need to be covered with glassine, and then sheathed with clapboard.
The outside of the structure must be covered with glassine and sheathed with clapboard
To prevent rotting of wooden parts, they should be treated with an antiseptic. It is important to periodically coat the walls of a wooden structure with lime to protect against pests.
Floor base
For the floor, take boards 50 mm thick, they are laid in 2 layers, laying insulation. The bars are taken 10x10 cm, the bottom bar should have a thickness of 26 mm. The surface is made smooth and cleaned with a plane.
A rectangular recess is cut into the floor base, through which the chickens will enter and exit along an inclined ramp. The floor is covered with a protective mixture for wood or lime and a dense bedding is laid. Layer thickness 5 cm (a mixture of crushed peat, straw, sawdust).
Ventilation and lighting of the chicken coop
Natural light and ventilation occur through windows and doors. But they are not always kept open (drafts are dangerous), so you will need to install automatic ventilation.
Ventilation through draft
An exhaust pipe extending beyond the roof is placed high above the perches. The supply pipe is placed in another corner of the chicken coop 20–30 cm from the floor. The draft occurs naturally, reducing the humidity inside the coop.
Chickens do not tolerate drafts, so it is necessary to provide supply and exhaust ventilation.
It is recommended to place the bird hole on the south side of the bird house. The minimum width is 30 cm and height is 40 cm. The hole can be combined with an entrance door. In this case, you will need to cut through the element at the bottom of the canvas.
Lighting
Egg production is affected by the length of daylight hours. In order for chickens to lay eggs in winter, they should be well fed and given the effect of 14 hours of daylight. During mass molting, the optimal duration of daylight hours is 9 hours.
- Install lamps with a power of 50–60 W. They are placed above the feeders. Sockets are placed in a closed panel.
- It is recommended to use red and fluorescent light bulbs. For every m 2 - 5 W of lighting.
Red light bulbs will not dry out the air around you and will only be able to heat those places where the rays hit
Installation of feeders and drinkers
Devices for feeding birds can be made independently or purchased ready-made.
Hopper feeder: it is made from a pipe with holes made along the entire length
They use a bunker version of feeders or homemade devices for serving food, fixed at a height of 15–20 cm from the floor: chickens will not dig into the grain and scatter it. If the feeder is placed on the floor, the area under it may begin to become damp.
Structures for feeding feed can be constructed from wooden planks or plastic containers. Summer residents recommend using tanks with sides of at least 2 cm. You can also build a tank under sand or shell rock (chickens peck at the mixture for better digestion of food).
How to make a small chicken coop
A mini-chicken coop can look like a cage. The dimensions of the cage for several chickens are 1x2 m. It does not need a foundation; it is placed on the grass.
A mini chicken coop for 5 chickens can be made in the form of a cage
Tools and materials for manufacturing:
- timber 50x50 mm;
- nails and screws;
- Rabitz;
- wooden slats 20x30 mm;
- iron pipes;
- door hinges;
- plywood sheets;
- tiles or slate;
- insulation material;
- hammer;
- saw;
- electric drill or screwdriver.
First you need to make a drawing. It is important to determine which side the windows and entrance will be located on. This will allow you to choose a place for perches and nests (in the far corner).
The drawing must indicate the location of all devices, as well as the dimensions of the poultry house.
Sequence of work:

Photo gallery: ideas for decorating a chicken coop
 With a flower bed on the roof: make high-quality waterproofing and plant cacti
  Chicken coop without a run: you can build a chicken coop with a detachable run
  A greenhouse-shaped walkway with a rounded arch: the design looks unusual
  Made in the form of a mansion, where the gable roof extends over the entire paddock
  Chicken coop with a square high run in the form of a summer gazebo
  Two-story poultry house: the chicken house is located on the roof of the paddock
  Teremok, in which one roof slope covers a square paddock
  Made with a flat roof, in a minimalist style
Features of winter design
The winter chicken coop is made more insulated, with windows facing south and with good ventilation. If the structure is designed for more than 20 chickens, then additional electric fans are built into the walls.
The temperature inside the poultry house should be above +12°C. Windows must be glazed and close tightly. In cool weather, chickens huddle together, warming each other.
The walls of an all-season chicken coop should be constructed of wood. The room with perches is separated from the entrance by constructing a vestibule.
It is best to make the walls of a winter chicken coop from wood and build a vestibule
The use of oil and infrared heaters is allowed. You can also use panels in the form of plates coated with film. They will radiate heat using infrared radiation. The structures are mounted on the ceiling.
It is advisable to use such devices if the walls are made of concrete or brick. When the temperature reaches the required level, the structure will automatically turn off.
Large chicken coops can cause significant problems. It is quite difficult to heat a large building, and the costs of thermal insulation will also be considerable. If you plan to keep birds all year round, then it is important to consider some features:
- The roof should be made of two layers.
- Cover the walls with thermal insulation material.
- If you plan to build a chicken coop from logs, then it must be thoroughly caulked. The floor is covered with deep bedding.
- In cold weather, additional frames should be installed on the windows.
- If the poultry house has an attic, then the floor should be covered with sawdust or straw.
- High-power lamps or a heater are often used for heating.
Video: making your own chicken coop
Making a chicken coop with your own hands is not a complicated process. The design can be made even from improvised means, it is only important to correctly draw up the drawing.
Many owners breed poultry. Most the best option- these are chickens. They are undemanding to living conditions, but it is necessary to build a good chicken coop. For a small family, it is enough to have 10 laying hens. To do this, you will need to make a chicken coop with your own hands for 10 chickens. Drawings and detailed instructions will help you build a quality structure.
You can make a beautiful and spacious chicken coop yourself
Read in the article
How to make a chicken coop with your own hands for 10 chickens: drawings and requirements
To get started construction work, you should familiarize yourself with the basic requirements for such a structure:
- placement of the building. A rectangular chicken coop should be placed from east to west. Chickens lay eggs better if there is enough daylight, so windows should face south;
- When creating a warm chicken coop with your own hands, it is worth remembering that the room should not be hot, since temperature value chickens will not lay eggs above 25 degrees. But even in winter it is necessary to create warmth. In cold weather you will also need a structure. The temperature must be at least 12 degrees;
- it is better to locate the building away from noisy places;
- high humidity can cause poultry diseases, so ventilation is necessary;
- The dimensions of the room are selected taking into account the fact that two chickens can be accommodated per square meter. In cramped conditions, chickens lay eggs worse.
Helpful advice! When designing a poultry house, you need to take into account that over time the number of individuals may increase and more space will be required.

When arranging a room, it is worth equipping the windows with shutters made of, and for walking, provide an area under a tree or under.
chicken coop cage
Features of chicken coop design
Drawings and photos will help you create a competent project for a chicken coop with your own hands. It is important to choose the right size of the building, which depends on the planned number of birds. The type of structure depends on how many birds will live in it and on the types of materials.

When designing, it is worth planning to open the door inward, and the floor should be arranged with a slope towards the entrance. This will make the cleaning process easier. It is worth considering the interior design of the room. There must be a sufficient number of drinking bowls and perches. For such a structure it is worth considering heating, lighting, etc.
Features of installing the simplest chicken coop at the dacha with your own hands: stages of construction and photos
When deciding how to make a chicken coop with your own hands, you should familiarize yourself with the main stages of installation.
The table shows the main steps in constructing a simple poultry house.
| Image | Stages |
 | Construction (only for structures with large livestock) |
 | |
 | Selection and installation of flooring |
 | |
 |
You can build a chicken coop from scrap materials. To save money, you can use the room without construction or use a base on posts, for which leftovers or cobblestones will do. The floor can be made of adobe or earthen, and the roof is made of durable plastic, tin or remnants of slate.

Nuances of creating a foundation
For a do-it-yourself chicken coop for 20 chickens, a photo of which can be seen in this review, you will need a more durable one. Depending on its type: or columnar - you will need a concrete mixture, a composition of or.

The foundation is erected in accordance with certain rules:
- the area is cleared and the top layer of soil is removed, about 25-55 cm;
- Sand and gravel are used as a cushion;
- the formwork is made of boards, its width is 25 cm;
- rods are used for;
- Concrete grade M300 is used.

Construction of the building can begin after the concrete mass has hardened. It is worth considering that the size of the site should be equal to the dimensions of the future chicken coop.
To create a columnar base, you will need markings, which are done using metal rods and rope. Then, cabinets are installed around the perimeter, which are placed at a distance of a meter. In this case, the supports should protrude 25-30 cm from the ground. They are strengthened with cement mortar bricks.
Chicken coop walls
When building a chicken coop with your own hands for 10 chickens, you need to prepare drawings of the walls. Wood is in demand as a raw material for walls. They are used for cladding walls. In this case, the joints must be thermally insulated. In addition to boards, you can use plywood or clapboard. Adobe brick is considered a good material. The combination of straw and clay helps retain heat.

Installed according to the standard pattern. As insulation to separate the foundation and beams, roofing material is used, which is laid in two layers. Floor joists are also made of timber, which is laid edgewise. In this case, voids and cracks are sealed with remnants of timber and flax-jute fiber.

Roof, ceiling and floor of the building
To create a winter chicken coop with your own hands for 10-20 chickens, high-quality floors and roofing are of great importance.

The arrangement has some features:
- it is better to use a gable roof, which will protect against the accumulation of moisture and snow;
- coating material: roofing felt or slate;
- thermal insulation is performed using mineral wool or.
In a gable roof, you can build a small attic where you can store bedding for chickens and feed. After installing the ceiling beams, the ceiling covering is laid. In this case, boards are used, and expanded clay and coal slag are used for insulation.

When building a chicken coop you need to do well. If they freeze, the room will be cold. It is recommended to use thick boards for the floor. First, untreated boards are laid, then a layer of vapor barrier material is laid, and treated boards are placed on top.
Note! When arranging a pitched roof, it is necessary to ensure that the slope does not point towards the poultry walking area.

How to make ventilation for a chicken coop for 20 chickens with your own hands: drawings
Particular attention should be paid to a do-it-yourself chicken coop. The ventilation device is responsible for supplying fresh air. This is especially important in the cold season, since birds are rarely outdoors. A budget and simple option is natural ventilation, which consists of ventilating the building. In this case, the exhaust window should be small and located on the ceiling or above the door. This scheme has many disadvantages, since heat will leave the room along with the air masses. At the same time, heating will require a large amount of resources.

A more reliable option is an exhaust system. It makes sense to install it if there are at least 20 chickens in the chicken coop. You can build such a structure with your own hands:
- two holes are made for pipes; the entrance for air passage should be located away from the perches;
- Instead of a pipe, you can make special wooden boxes, but they need to be painted and;
- pipes for supplying fresh air are located at a distance of 35-40 cm from the roof, and the pipe for exhaust rises 1.5 meters above the roof;
- To protect against precipitation, the upper ends of the pipes are equipped with small umbrellas.
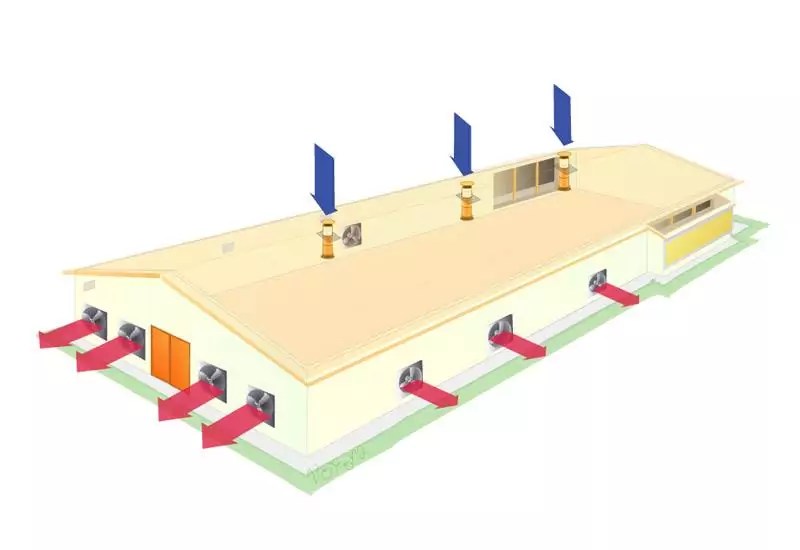
For uniform circulation, it is better to place pipes on opposite sides of the room. In this case, it is used, which is mounted in the window. You need to turn on such a system manually. There are also special sensors that allow you to control the humidity in the room.

How to arrange a chicken coop inside?
After completion of the main work, the interior of the room is arranged. Great importance has comfortable perches. In this case, the length of the perches and their number are calculated. These elements are best made from . The perches are ground to a rounded shape so that the chickens do not get injured. Perches should be installed at a height of 65-75 cm, and 55-65 cm should remain between perches. It is recommended to place special pallets or trays under the perches. This will make the cleaning process easier. It is better to make the perches removable to make sanitization convenient.

It is worth equipping nests in the form of boxes, which should be darkened. They are installed in a separate place, and the drawers are covered from above. A separate entrance is recommended for changing bedding and collecting eggs.

Another important element is the feeders. They can be made of wood and installed on a small hill. Bedding is made of peat, straw or sawdust. They come in different depths. When soiled, deeper litter is dug up. In addition, bedding is optional for the chicken coop in winter.

Lighting Features
Good food ensures the growth and physiological development of birds. You can create a well-equipped and lit chicken coop with your own hands for 10 chickens: drawings, detailed diagrams and photos will help you do this. High-quality lighting affects the following parameters:
- number, size, density and weight of eggs;
- chick development;
- digestibility of consumed feed;
- periods of egg laying and their duration.

When planning a lighting system, you need to know some features. Chickens do not see well in the dark, so in the evening, do not turn off all the lamps at once. When all the birds are settled on the perches, you need to turn off the remaining lamps.
For hatched chicks, lighting with a brightness of 35-45 lux is required. Then, as the bird grows, the light intensity gradually decreases to 6-8 lux. An adult bird will need a light of 10 lux.
A device for smooth switching on of the light is recommended, since if the light is turned off abruptly, the bird may become frightened. This is especially true for breeds that are bred to produce eggs. Chickens should also be accustomed to the dark from the third day of life, so that if the lights go out, the birds will not trample each other.
Helpful advice! If birds behave aggressively and pluck each other's feathers, then a reduced lighting intensity can solve this problem.

Heating
Before choosing, you need to take care of the insulation of the fences. There should be no drafts in the poultry house, so if the walls and roof are blown, they will not help.

It is worth insulating doors and windows, since through these openings most of heat. It is also worth building a deep litter. This design consists of a layer of slaked lime and 10 cm of shavings, sawdust and straw. Natural heat-insulating materials are also used: peat, foliage and even manure. Natural composting allows heat to be released.

If you approach the construction of a chicken coop responsibly, then this building can be made cozy and reliable. Using inexpensive materials, you can create a high-quality and well-equipped house for birds.
It is no secret to many that the comfort of keeping affects the health of chickens, especially in winter. Comfort in a chicken coop is created by proper lighting, ventilation, sufficient space for walking, convenient location of nests, feeders and drinkers. All this together allows birds to lay eggs in more. Therefore, during the cold period it is necessary to build a warm room for chickens, the independent construction of which will not be difficult.
Is it really necessary to build a warm chicken coop?
From the end of autumn to the first month of spring comes unfavourable conditions for chickens, which creates difficulties for poultry owners.
If in spring and summer period The chicken is active: it moves, digs in the ground, bathes in water, but in winter, due to many factors, its activity decreases.
The summer chicken coop does not require additional insulation and lighting
When temperatures drop and daylight hours shorten, birds' ability to lay eggs decreases or even stops completely.
- That’s why it’s so important to make a chicken coop that will provide:
- temperature level of at least 12 degrees and low humidity;
- artificial lighting - to increase daylight hours;
- the presence of low perches and egg-laying sites;
Meeting these requirements will allow poultry to comfortably overwinter without losing weight and laying eggs daily.
A properly built chicken coop can significantly increase the egg production of birds.
Options for warm chicken coops for the winter
A standard chicken coop is a utility room, next to which there is a place for birds to walk.
The site has a fence made of chain-link mesh with small cells that protects the chickens from predators. If the farm has no more than one and a half dozen birds, then this is an ideal option. It is possible to arrange a chicken coop with a greater level of comfort, with external and internal walking areas, but then it will take up a large area. This option is not suitable for small plots of land.
The winter chicken coop is built on a foundation on which a thick wooden floor is laid, and the walking area is covered with a roof.
Considering the number of individuals, the following types of chicken coops are used:
- From 10 to 15 individuals - a mini-chicken coop up to 10 m2 with a walking area of 4 m2. Such an area will ensure free movement of both adult birds and young animals in the case of breeding chicks. It is also required to be equipped with a window and a ventilation grill.
The mini-chicken coop is equipped with a covered run and a box for collecting eggs.
- From 20 to 30 individuals - a full-fledged room up to 20 m2, a height of 1.8 m and a walking area of 6 m2. These dimensions allow you to build a perch in several tiers and install up to 7 nests. If the area of your personal plot is sufficient, then it is better to build a chicken coop with a vestibule: it will provide the required temperature in the main room in winter.
It is advisable to build a winter chicken coop with a vestibule to protect chickens from drafts
- More than 50 individuals - a room of about 40 2, up to 2 meters high and a walking area of 12 m 2. Such a chicken coop requires additional thermal insulation, ventilation and installation of heating equipment. It is better to place the perches opposite the windows, and the nests (up to 10 pieces) in the back of the room.
Large chicken coops are built on high stilts, and the walking area is made under the premises
If the area of the personal plot allows, then the chicken coop will be equipped in a completely enclosed room, inside of which there will be a walking area, which will prevent the birds from hypothermia and ensure their free movement even at low air temperatures in winter.
The winter poultry house can be completely enclosed, providing the chickens with a warm place to roam
When you need a chicken coop at minimal cost, there is an option to build it like a dugout. The height of the walls does not exceed 0.5 m, and for insulation they are covered with earth. The roof is also insulated. The southern wall is equipped with windows with multi-layer glass. And the fallen snow additionally provides thermal insulation.
Another low-cost option is a poultry house made using frame technology: from small-section timber, sheathed with plywood sheets, OSB, planed boards. Thermal insulation material is laid between them; its thickness depends on the climate. To protect against rodents, the insulation is covered with a metal mesh. This increases costs, but subsequently removing rodents is even more expensive. During construction, it is better to follow the rules for constructing frame houses.
In winter, it is mandatory to regulate the humidity level in the chicken coop, which is ensured by installing ventilation.
Video: fully autonomous warm poultry house on stilts (with bottom rung)
Material selection
The best option for a warm poultry house is wood. During frame construction, the timber is covered with dense rows of OSB sheets, hiding the cracks. When construction is carried out using brick or cinder block, good thermal insulation is necessary, since brick has a high level of thermal conductivity. What material will be used for the chicken coop depends on preferences and financial capabilities.
An insufficiently insulated roof will become a source of heat loss and increased humidity in the room, and the cost of heating the chicken coop will increase. For insulation, it is recommended to line the inside with foam plastic or felt. A permanent roof is made over the winter walking area - a continuation of the roof of the chicken coop itself.
For winter period It is preferable to have a chicken coop with a gable roof so that snow does not accumulate on it
Wood is often used in the construction of poultry house walls due to its environmental friendliness and low thermal conductivity. Even if the frame is erected from metal, it is better to use plank cladding.
The metal frame is always sheathed with wood so that the desired temperature balance is maintained indoors in winter.
To facilitate constant cleaning inside the chicken coop, its floor is made by pouring concrete. The service life of such a floor is long, but it requires good thermal insulation so that the birds do not freeze. In winter, the wooden floor is additionally treated with special moisture-resistant compounds, and the top is covered with a thick layer of straw and hay bedding.
The floor in the chicken coop can be made of concrete, but be sure to cover it with a thick layer of straw
To give the entire structure of the chicken coop rigidity and strength, to avoid distortions of the walls and the appearance of gaps, as well as to raise the walls themselves above the ground, a light strip foundation is used. This also helps keep you warm in winter.
The following materials are used to build a main wall:
- Shell rock is a porous limestone of natural origin with a low level of thermal conductivity. Most suitable for building a chicken coop for 25–30 birds. Standard size the block is 18x18x38 cm. It is laid using the technology of laying foam blocks or cinder blocks.
Walls made of shell rock are erected quickly and retain heat well
- Foam concrete is a common material that is harmless to health. There are no restrictions on the size of the building. The optimal material for wall construction is D400 foam concrete, the block size of which is 20x30x60 centimeters. The thickness of the masonry is determined by the climate of the area.
You can build a chicken coop from foam concrete very quickly, following masonry technology
- Brick is a building material with a low level of thermal conductivity and is durable. It is optimal to build large chicken coops from brick. The brick can be either solid or hollow.
The brick walls of the chicken coop can be lined with boards from the inside
Taking into account the service life of the chicken coop, the material from which the walls will be built is determined. For a novice poultry farmer, wood and plywood are the best choices. Over time, you can dismantle the structure or, conversely, add additional space. What if you do breeding? large quantity birds and build a chicken coop for a long time, then it is better to choose brick or foam concrete. You will also definitely need thermal insulation - foam sheets, rolls mineral wool or other modern material.
For the purpose of thermal insulation of the structure, natural insulating materials are also used: the walls are insulated with straw and hay, and the floor and ceiling are insulated with coarse expanded clay. There is only one negative side to the use of such insulation in comparison with modern materials - these insulation have high thermal conductivity, which requires their use in large quantities. And this is difficult when building a poultry house.
Detailed characteristics of modern building materials for thermal insulation:
- Polystyrene foam is a material with good insulating properties. Has a cellular structure. Thermal conductivity is only 0.047 W/mK, which is lower than that of foam concrete, brick and wool. Sold in sheets different sizes. Easy to attach. Main disadvantage- susceptible to damage by rodents. To solve this problem, the foam is sheathed with sheets of plywood or OSB.
Polystyrene foam has good thermal insulation characteristics and is often used as wall insulation
- Mineral wool - has heat and sound insulation properties. It has a fibrous structure. Thermal conductivity is slightly greater than that of polystyrene foam, but it is not susceptible to damage by rodents. It is recommended to use in conjunction with waterproof and windproof film.
Mineral wool is resistant to damage by rodents, but absorbs moisture from the environment
- Extruded polystyrene foam is a material with a closed cellular structure, produced by polystyrene foaming. It has long term service and excellent insulation characteristics. Its properties surpass almost all existing thermal insulation materials.
Expanded polystyrene has a long service life, but if used indoors for a long time, it causes harm to health through the respiratory system
- Stizol is a foamed polyethylene. It has high thermal insulation and sound insulation properties, is not susceptible to moisture, and is durable. Produced on the basis of metallized film, foil or non-woven fabric. The optimal thickness for use is about 1 mm.
Stizol is used in construction as sheet insulation.
When choosing insulation, it is important to consider how much area it will cover. If the structure is small, use stizol or any polyethylene foam material. For structures accommodating 50 or more birds, it is advisable to combine materials: if the wall is insulated with expanded polystyrene, then the floors are insulated with expanded clay. And when are they required? minimum costs During construction, polystyrene foam and mineral wool are used.
When creating a project to build a chicken coop, you need to determine where the insulation will be installed: if it is planned as interior decoration, then when making calculations it is necessary to increase the overall dimensions of the structure by the thickness of the material being laid.
Video: warm chicken coop with your own hands in 4 days
Preparatory work
The width of the foundation being laid should slightly exceed the thickness of the future wall. In this case, the wall is installed exactly in the center of the foundation. A concrete foundation will additionally provide thermal insulation and provide protection from:
- exposure to moisture on wooden structural elements, increasing the service life of the building;
- access to the chicken coop for predators and rodents, which can easily dig a hole underground.
There are other possible ways to protect against uninvited predators getting inside:
- make a foundation up to 30 cm high;
- place the structure on concrete pillars, raising the floor to a height of 25 cm from the ground;
- cover the walls with metal sheets, burying one edge of the sheet to a depth of 35 cm.
On schematic representation chicken coop, you need to indicate the location of all parts of the building and internal equipment
During construction, it is imperative to install several windows on the south side of the chicken coop for natural light. But they should not be a source of draft.
Since in winter, chickens try to be as close to each other as possible, their placement is organized based on the rule: 1 m2 - for 4–7 individuals. If grown meat breed: 1 m 2 - for 3 individuals. For laying hens: 2.5 m2 - for 10 individuals. The height of the room is no more than 1.8 m.
The size of the chicken coop depends on the number of birds
To build a warm chicken coop yourself, you will need the following:
- poultry house design with precise drawings and dimensions;
- building materials for installing formwork and pouring the foundation;
- plumbing and construction tools;
- building materials for the construction of a bird house.
Video: tricks in building and arranging a winter chicken coop
Making your own chicken coop: step-by-step instructions
At the very beginning of construction, markings are made for the foundation (base) of the chicken coop using wooden pegs and a rope stretched between them. The foundation of the fencing of the walking area is carried out at the same time as the foundation of the chicken coop.
Base
Sequence of work:
- A trench is dug for the foundation. The structure of the chicken coop does not have much mass, so the foundation is made of strip or columnar to a depth of no more than 45 cm. However, the use of a columnar foundation will lead to high costs for thermal insulation of floors.
The foundation for a chicken coop can be strip or columnar.
- First, crushed stone and then sand are poured and compacted at the bottom of the trench, creating a so-called cushion (the thickness of the total layer should not exceed 5–10 cm).
- The formwork is being installed for pouring the foundation. The height of the formwork is equal to the height of the foundation. The upper edge of the formwork serves to level the poured concrete.
The foundation must be made according to all the rules so that it does not warp or crack after drying.
- Reinforcement is placed inside the formwork and tied at the corners with steel wire.
- Concrete is poured into the formwork, leveled over the surface until cement laitance forms and covered with film. It needs to be watered daily for a week to prevent cracks from appearing.
After 20–28 days, when the foundation has gained the required strength, you can begin constructing the chicken coop structure.
Floor
A layer of waterproofing is laid on top of the foundation to protect the structure from moisture.
From the place above which the floor of the chicken coop will be located, the top layer of soil is removed, then sand is poured there and compacted, and a layer of expanded clay is laid as insulation. A mesh is rolled out over the expanded clay and a screed is made using cement mortar. The thickness of the floor screed should be at least 2 cm. For several days, while the screed hardens, you need to water it with water. It is recommended to make the screed with a slope of several degrees, which will ensure free flow of water when cleaning inside the chicken coop.
For comfortable living of chickens, the floors in the chicken coop are covered with boards.
The arrangement of the walking area is carried out in different ways: either it is poured with concrete or covered with boards.
Sawdust, straw, and hay are used as bedding. Usually, during the cold period, the litter does not change, and each time a new dry layer is poured on top of it. This results in natural heating of the floor due to warm droppings mixed with dry bedding.
Another option for arranging a walking area is to preserve the natural soil, which will allow the bird to look for insects, seeds and stones in the future.
You need to think in advance what kind of floor there will be in the bird walking area.
Frame

The sequence of work is as follows:
Roof
A sheathing made of unedged boards or sheets of plywood is nailed to the rafters. A special vapor barrier film or polyethylene is laid and secured along the sheathing. The film is laid in overlapping layers, and the seams are sealed with adhesive tape. Thermal insulation material (mineral wool board) is laid on it, and covered with waterproofing on top.
Most often, the roof of a chicken coop is made pitched due to the simplicity of its construction.
Next, through the waterproofing, transverse strips are nailed to the rafters with the required spacing, which depends on the type and size of the roofing material. If a soft roof is used, then plywood or OSB sheets must be laid on top of the slats, along which roofing material spreads. If slate is used, then wood cladding is not needed.
After completion of the roofing work, the frame and internal wall cladding are insulated.
The work is carried out in the following sequence:

Also as thermal insulation material sometimes polyurethane foam is used. But for its installation, specialists with equipment are involved, with the help of which this insulation is applied to the surface of the walls. The use of polyurethane foam is expensive, but the application process is not labor-intensive and provides maximum protection from the cold.
You can sheathe the outside of a winter chicken coop with edged boards or other facade material, except plastic, since it does not tolerate severe frosts well.
A concrete floor, even with an expanded clay cushion, does not ensure heat retention inside the chicken coop in winter. For this purpose, the floors are additionally insulated.
You can lay infrared film on the floor and use a cement mortar screed on it. This heating system operates both periodically and regularly, ensuring the desired temperature in the chicken coop. Or you can use a less expensive option: cover the floor with wooden panels. These shields are boards tightly fitted to each other, attached to the joists. In winter, plant litter up to 15 cm thick is laid on them to increase floor insulation, and in summer they are removed from the chicken coop, cleaned and disinfected.
The arrangement of the chicken coop should be such that the birds are comfortable both in winter and in summer.
Sometimes electric heating devices are placed on the walls inside the chicken coop, and the installation sites are protected with heat-resistant material. But more often infrared lamps are suspended from the ceiling.
Lighting
The design of the poultry house must have windows. Despite the fact that they are a source of heat loss, their presence cannot be abandoned, since the supply of sunlight is required to maintain the health of the birds.
Therefore, triple glazing is built into the windows, and a mesh is installed on the glass for the safety of birds.
In winter, it is imperative to ensure that the daylight hours are at least 14 hours. This is done with the help of artificial lighting. And when installing an automatic on/off system, you get rid of the unnecessary hassle of maintenance, although you will spend additional money on it.
At first, individual individuals will roost for the night directly on the floor. This is not dangerous if the floor is insulated and covered with shavings or hay. Over time, the birds will get used to it and, at nightfall, will begin to move to their roost. But you can do it differently: wake up the birds early in the morning, turning on the lighting for this, and allow them to fall asleep at sunset.
Ventilation
In a warm chicken coop, a ventilation device is required to remove excess moisture. To do this, a piece of plastic pipeline is installed in the ceiling, which rises 1 meter above the roof. This way ventilation will be carried out naturally due to the existing pressure difference. If the air flow is weak, then an additional channel is made at the floor level (far from the nests), which must be covered with a grille. And the damper installed on it will allow you to regulate the ventilation speed. You can also install an electric fan in the wall.
The ideal humidity level is 65%. A decrease or increase in this indicator negatively affects the activity and health of the bird. To increase humidity, it is enough to install a container with water, and to reduce it, install a hood and hang it infrared lamp: It dries surfaces well.
The chicken coop must be equipped with ventilation so that the birds do not get cold from rising humidity.
Making perches
The perch is made of timber with a cross-section of approximately 4x4 cm or 6x4 cm.
All corners are ground into a rounded shape, and the surface is cleaned to a smooth state so that the birds do not injure their paws. You can also use a tree branch as a perch.
If several perches are installed, then the distance between adjacent planks should be about 30 cm in width and 20 cm in height. For convenience, a small ladder is attached to the lower perch.
Perches are mounted either between two walls, or in the form of a ladder installed across the room
To install perches, you must:
- Determine the location and height of the perch - attach one or more planks near the window at a height of 0.5–0.7 m from the floor level.
- Measure the width of the chicken coop and cut it required amount timber.
- On opposite walls, nail 0.5 m pieces of board with cut grooves for perches.
- Place perches in the grooves and secure with self-tapping screws.
Nests for laying eggs are made in the form of a semi-open box assembled from timber, boards or plywood. And sometimes ready-made plastic boxes are used as nests. If the nests rise to a certain height, then they are mounted on supports.
A ladder is provided to the nests for ease of movement of birds.
Video: do-it-yourself warm chicken coop
Tips for arranging a chicken coop in cellars or basements
There are some features of arranging a chicken coop in the basement:
- Use of bedding - sawdust or hay is used. The sawdust bedding is replaced once every 6–7 days, and the hay bedding – once every 3–4 days.
- Lighting - an electric lamp with LEDs with a power of more than 5 W is mounted. Using a lamp, the required length of daylight hours is ensured: the longer it is, the more chickens will lay eggs.
- Insulation - use cotton wool or any roll insulation with a thickness of at least 5 cm. The use of a waterproofing film is mandatory.
- Ventilation - intake and exhaust ducts are installed. Direct ventilation of the premises is carried out periodically.
- Internal arrangement - the nests are made of timber covered with plywood. One nest is used for several chickens and is approximately 40x40 cm. The perches are attached at a height of at least 50 centimeters. It is allowed to connect the perch and nest by placing a board between them.
There are certain rules for arranging a winter chicken coop that must be followed.
Care after winter: how to treat walls
Sanitation of the poultry house is carried out annually with the onset of warm weather. This prevents the spread infectious diseases among chickens
During disinfection the following is carried out:
- Cleaning - all surfaces of the walls, ceiling, floor, perches and nests are cleaned of dirt with a stiff brush and broom, and then washed with a solution of soda ash in hot water.
- Surface treatment - special means are used (two percent solution of caustic soda or four percent xylonaftha emulsion). When preparing solutions, you must strictly adhere to the recipe and be sure to use personal protective equipment.
After treatment, allow the chicken coop to dry completely for 5-6 hours, thoroughly ventilating the room.
There is always an opportunity to work on decorating the chicken coop
Construction of a chicken coop is a simple task and can be completely solved independently, without involving the services of third-party specialists. You just need to study it well these instructions, and also read the advice of other people involved in poultry breeding.