Chickens always mean fresh eggs and meat, the quality of which you are sure of. In order for them to regularly please the table, you need to take a responsible approach to the process of breeding birds. A significant part of successful livestock farming is a comfortable home, in this case a chicken coop.
Always remember that animals need a warm and comfortable home no less than their owners. How to build a chicken coop with your own hands and what you should pay attention to Special attention? Let's figure it out.

Basic moments
A properly organized home largely affects the egg production of chickens, so it is in your interests to take care of their comfort.

The winter chicken coop should be warm: the temperature cannot fall below 12°C, and in summer it should not exceed 25°C. Failure to comply with temperature limits and drafts will negatively affect the health of the bird, and you risk not seeing fresh eggs for breakfast.

Avoid excessive humidity. The chicken barn must have natural or forced ventilation. The choice of type depends on the size of the poultry house. It will also normalize the temperature and eliminate odor.


Like all living things, chickens need light, so use light bulbs that provide warm yellow light. They should be turned off at night. There are systems that automate this process. Hide the cables well from birds.

But don’t forget about sunlight: the chicken coop should receive both sun and shade. For the same reason, it is recommended to place windows on the south side. It is advisable to install a hole and an aviary on it, since it is least susceptible to cold winds. However, light should not enter the nests.

Safety and tranquility - the house should be located away from sources of strong noise and protected from the entry of rodents and other animals. A good solution would be to build a building on support poles.

For location, they usually choose remote corners of the site, where the noise of the streets will not disturb the birds, and the smell of the chicken coop will not disturb you. Place chickens next to another animal only if the neighbor will not bother them.

The location on a hill will save the chickens’ home from flooding in the spring and in the rain. On a flat area, you can create it artificially, or you can dig a drainage ditch around the perimeter.


It is better to fence the walking area at a rate of 2 m2 per bird. You can approach the issue in an original way: install walking tunnels made of metal mesh around the perimeter of the site.

Dimensions
The dimensions of the poultry house are calculated based on the breed and number of chickens. So, for how many heads is it recommended to allocate 1 m2 of space?
- for 3 meat birds;
- 4 – egg;
- for 15 chickens.

In this case, chicks should be kept in individual premises, separated from adult chickens. This is done in order to ensure free access to food.

For example, 10 birds will feel comfortable in a 2x5 m chicken coop.

The height is chosen so that a person can calmly stand at full height; usually 2.2 m.

Walls and floor

The litter must be changed periodically. For ease of cleaning, provide a special door or hatch in the design.

Windows must be equipped with screens and be able to open. Their area is at least 1/12 of the floor area.

Interior arrangement of the chicken coop
To make nests, plywood, boards and various non-traditional materials are used: baskets, plastic containers. In this regard, chickens are not whimsical and will happily settle in the proposed nest.

The quantity is taken at the rate of one nest per five heads. The parameters of one nest are 40x40x40 cm. The width and height can be reduced to 30 cm. Placement in two tiers is allowed. It is better to place laying hens in a secluded corner away from the hustle and bustle.

Birds love to perch. It is a pole with a diameter of 5 cm. If a rectangular beam is taken, the corners are rounded, and the future perch is sanded with sandpaper. Place them in tiers: the first at a height of half a meter, the subsequent ones 35 cm above the previous one.

Arrange them in a ladder rather than on top of each other. As for the length, it is enough to allocate 25 cm of perch for one bird. The photo will tell you how best to arrange perches in the chicken coop.

If the chicken coop is located in the country and you plan to keep the birds only during the warm season, then you can do without heating, but in winter you can’t live without it.


An electric convector will best maintain the temperature. It dries the air, which solves the problem of high humidity, and uses electricity quite economically. A second heater that turns on only at night will make the birds’ lives even more comfortable.

Arrangement of the corral
Chickens should have the opportunity to walk in the fresh air, for which a pen is equipped. It should not face the shady and south sides. The growth of plants dangerous to chickens, humidity or dirt is not allowed here. Protect him from other animals.

If the house is above ground level, install a ladder. In some cases, the coop door can become a ramp.

Chicken coop photo


If you dream of raising chickens in your country house, but the lack of a specialized room is stopping you, don’t despair; building a comfortable and functional chicken coop with your own hands is not at all difficult.
First of all, you need to decide on the number of chickens that will live in the future building.

Taking this information into account, you can plan the size of the chicken coop and allocate space for the building.

You can make a simple chicken coop from any available materials, naturally, having at least the most minimal construction skills.

Requirements for the building
Any specialized structure must meet the requirements for its functionality. Even at the design stage, some points should be taken into account:
- Ensuring the safety of the structure from predators. Otherwise, you may miss the number of birds or the number of eggs.
- Provide for the possibility of ventilation or constant ventilation of the poultry house.
- The absence of drafts is an important requirement that will prevent all kinds of bird diseases and help maintain a comfortable temperature.
- Thermal insulation is also necessary, especially if you plan to keep chickens all year round.
- For good egg production of chickens, the room needs lighting, which must be turned on at some time of the day.
Chicken coop project
Choose a place for the chicken coop on a hill; in the lowlands, the poultry house will be constantly wet, not having time to dry out from the morning fogs and precipitation.

When calculating the area of the building, do not forget about poultry walking; the more the hens walk, the better they lay. When accurately calculating the area of the chicken coop, take into account the fact that for the comfortable existence of five chickens, 4 sq.m. is enough, and about 7 sq.m. of space for walking.

The clearing for walking chickens would be correctly located to the south. Fence it with a chain-link mesh and be sure to make a roof. It will protect not only from rain, but also from the sun.

If your site is flat, then before construction, make an artificial elevation of sand and crushed stone. To protect the chicken coop from small rodents, mix the clay and broken glass and place on top of the mound.

Natural lighting in the poultry house can be provided by making a door with glass. To provide space, the ceiling is raised to 2 m. If bird nests are placed outside the house, you will not have to go inside to pick up the eggs. You can see a drawing of this version of the chicken coop in the photo.

Foundation
If you are building a summer frame chicken coop, you do not need a concrete foundation for it, just a slight elevation is enough.
When building a permanent brick structure, a foundation is required. A monolithic or strip base is suitable here. It is ideal to place a winter chicken coop in such a room.

Poultry house floor
Earthen and clay floors can be made with a low strip foundation. If desired, the floors can be assembled from boards or concreted.

When using the room in winter, the floor must be insulated with mineral wool, which is laid between the joists and then covered with plywood. Such floors are covered with sheets of roofing felt to provide reliable coverage and protect the floor from bird waste products.


Sand is also good for sprinkling the floor.

Note!

Construction of walls
Most often, the walls of a chicken coop are built of wood; as a rule, it is a frame building covered with clapboard. They are insulated with mineral wool or polystyrene foam, and the outside of the building is covered with a vapor barrier material before cladding.
A brick building requires good heating in winter period, which will lead to costs, and the construction of such a chicken coop will be more complex and expensive.

Walls made of any materials must be disinfected before use; this can be done with ordinary lime.

Chicken coop roof
When building a chicken coop for chickens in the country, it is better to make a gable roof. This technique will help allocate space for roof insulation.

If the chicken coop is of modest size, you can do without an attic and lay the insulation directly under the roofing material. Chicken coops are covered with slate, metal tiles, and professional flooring.
Room ventilation
Good ventilation is important for bird health, especially in summer time. The ventilation system in the chicken coop can consist of several holes on opposite walls with valves.

Note!

The valves will help control and regulate the flow of cold air, which is especially important in winter.

Chicken coop interior
The most important and basic element of the interior of the chicken coop is the perches; they are wooden rounded poles, the length from wall to wall of the chicken coop. It is on roosts that chickens spend most own life.

They need to be fixed at a distance of 50 cm from the floor and 25 cm from the wall and 35 cm between each other. Each resident of the poultry house is provided with 25 cm of poles. So we are counting on 10 chickens in the chicken coop, we will have to place perches at 2.5 m.

If laying hens live in the chicken coop, then the second important piece of furniture will be nests. You need to build at the rate of 5 laying hens per nest. Having built a chicken coop for 20 chickens, you will have to place about 4 nests.

It is best to place them in the dark corners of the chicken coop, having previously been well insulated with sawdust.

The dimensions of the layer box are 30cm x 30cm wide and 40cm high. The nest is raised 50 cm from the floor.
Note!


Lighting
An important condition for the normal functioning of a chicken is lighting. In dark rooms, the bird becomes inactive and its egg production decreases.

The chicken coop must have an opening window, which will provide not only sunlight, but also additional ventilation.

Laying hens must be provided with light up to 18 hours a day. In winter, you cannot do without artificial lighting.

Heating the chicken coop
In winter, the chicken coop must be heated to a temperature of at least 10 degrees during the day and 15 at night. It is important to control the level of humidity in winter; increased humidity will lead to illness and further death of birds.


In our selection of photos of chicken coops, you can choose the best option for yourself.

DIY chicken coop photo


Laying hens can lay eggs in winter just as well as in summer. But for this it is necessary to provide them with optimal conditions, which range from -2°C to +20°C. In addition, there should be a lot of light and a balanced diet. The number of eggs can be the same as in summer period. In addition, optimal conditions ensure the trouble-free existence of chickens, providing them comfortable conditions even in winter. Therefore, when building a chicken coop, you should immediately make sure that it stays warm. If a finished room is being converted, then all measures are taken to ensure that heat loss is kept to a minimum.
 A warm barn for chickens and lighting are important for their normal well-being
 The size of the chicken coop cannot be arbitrary, since there are certain standards for placing poultry indoors. For example, when keeping from 2 to 5 birds, 1 square meter of area is sufficient. If there are problems with the premises, then the bird can be compacted. In such cases, nests and perches are distributed into 2 floors, or even three. This is not a problem for laying hens and they thrive in multi-tiered housing. For them, the higher, the better: a bird always feels safe at a height.

The bird needs a place for winter walking. They feel great outside in winter down to -15 degrees. It is advisable that the place be protected from wind and drafts.
As for the height of nests and perches, everything is purely individual. Chickens can easily live at a height of 2 meters, but maintaining the premises will be very difficult, and the concentration of birds will be too high.
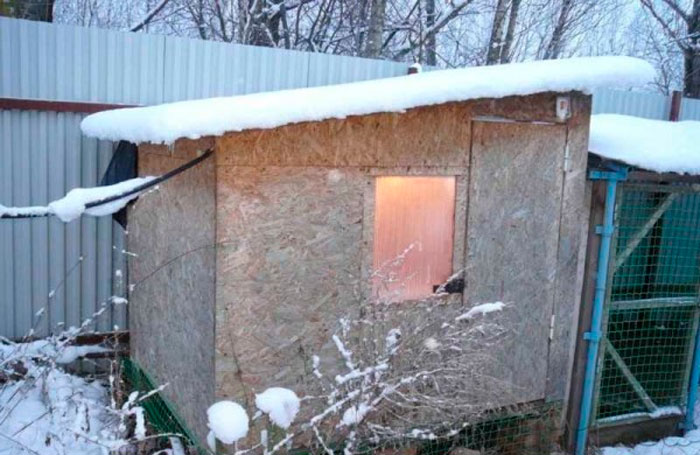
A room like a chicken coop should be cheap, which means that it can be built from any available materials. In other words, a chicken coop is a budget option and it can be easily implemented. The cheapest option is a semi-dugout, when the walls rise above ground level to a height of 0.5-1 meter. At the same time, the depth of the dugout can be 1 meter or a little deeper, so that you can be in the chicken coop at full height. That part of the chicken coop that rises above the ground can be mounted partly from glass located on the south side, and the rest from any building material. In addition, to make the chicken coop warmer, all sides except the south are covered with earth. If you take into account that a layer of snow will be added in winter, the room will turn out to be quite warm.
 Those who are seriously planning to raise poultry should think about building a chicken coop made of foam concrete: it is light and warm
 As an option, a room for a chicken coop based on a wooden frame, sheathed on all sides with plywood or chipboard. After this, insulation is laid and the inside is again sewn up with the same material. How thick a layer of insulation is planned to be laid depends on the region.
If you build a chicken coop from logs or from thick timber, then in the middle zone you can do without additional insulation.
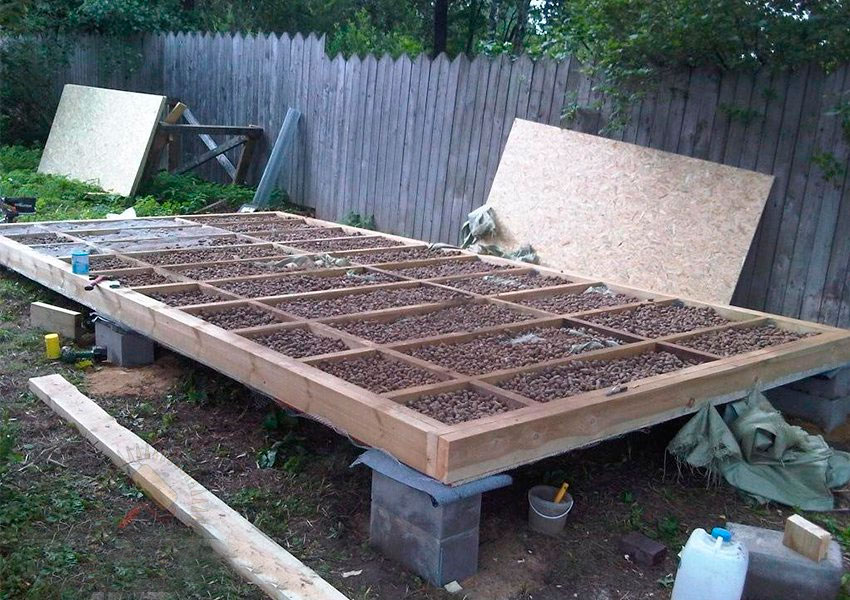 For such a room, the simplest type of foundation is suitable. This may be a pile option or a shallow foundation option. If it is planned to build capital chicken coop made of brick, foam block, cinder block, etc., then the option of a regular strip (not reinforced) foundation is suitable. For buildings made of wood, it is enough to organize a basic foundation from blocks, which you can make yourself.
When using a columnar foundation, it is enough to install the posts every 2-3 meters, as well as in the corners of the building.
What and how to insulate?
A chicken coop that is not properly insulated will require heating in severe frosts if you want to have permanent pets. chicken eggs. But this option can lead to a significant increase in the price of homemade products. Therefore, it is better to immediately build an insulated room, so that later, in winter, you don’t have to think about how to make it warm.
To insulate a room for chickens, any thermal insulation materials. The cheapest option is polystyrene foam, but mice love it. As an option - it will do mineral wool. Some experts argue that membranes are needed on both sides and this increases the cost of the entire process. On the other hand, this is not a residential building and it will be enough to simply sew up mineral wool on both sides. After all, it is not necessary to raise the temperature to +20 degrees.
 Insulating a chicken coop with mineral wool
 It is possible to use polystyrene, since rodents do not like it so much, but it is much more expensive than regular foam. On the other hand, if you line it with polystyrene, then the room does not have to be improved.
It is not necessary to use expensive modern materials, since you can get by with folk, simple and affordable means. For example, clay is taken, mixed with sawdust, and the space in the frame is filled with this mixture. It is even possible to use sawdust itself, which can be compacted in the process of filling the space. You can get good results by filling the space with slag. Although, in terms of characteristics, such insulation will be inferior to modern materials, it will cost much less. Naturally, for warm regions and the middle zone, this is quite enough, but for colder regions this may not be enough.
This is what walls are about. The ceiling and floor must be treated in a similar way, otherwise the whole idea will not give any positive results. As you know, all the heat rises upward and, if you do not insulate the ceiling, it will all end up outside. In such a chicken coop it will always be cold and uncomfortable for poultry.
Typically, hay is stored in the attics of outbuildings for the winter, which significantly insulates them. The same can be done with a chicken coop by hemming the ceiling from below wooden planks, chipboard, plywood or OSB board. As a last resort, you can sprinkle sawdust on the ceiling or insulate it with reeds, and then apply a layer of clay on top. In this case, there is a huge field for experimentation, depending on the availability of certain materials of natural origin. As a rule, economic people will always find a way out of the situation.
It is equally important to insulate the floor in the chicken coop. As an option, an adobe floor mixed with straw, similar to adobe technology, is suitable. Of course, it’s not bad when the floor is durable, for example, concrete, made from a cement-sand mixture. A simple floor will turn out to be quite cold, but if you add, for example, sawdust to the solution, it will turn out to be much warmer. The floor will be warm even when ordinary bottles are embedded in the floor.
 Option for floor insulation in a chicken coop
 The presence of even a small vestibule always makes the room warmer, since heat is retained more efficiently. This approach to building a chicken coop can significantly reduce heat loss and eliminate heating in the winter.
Do you need heating?
Naturally, the best option is to have a heated chicken coop. In such cases, laying hens lay eggs especially actively in winter. Again, it all comes down to economics. If it is not a large room, then there is no point in heating it, and there is simply nowhere to install heating devices. If this is a mini-farm, then giving up heating is simply not reasonable.
Having electricity in a chicken coop can solve many problems, including heating. In this case, it is possible to use fan heaters and IR emitters.
Fan heaters must have built-in automation, which can be used to adjust the heating temperature. It is quite effective and popular way heating Another automation system is also applicable, which involves cyclically turning on and off the heaters, without reference to the heating temperature.
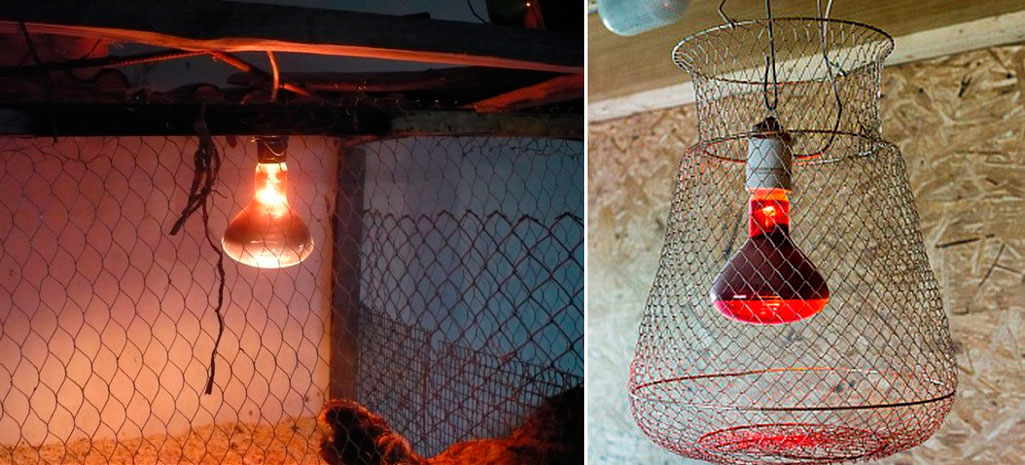
IR emitters are also very popular. They are somewhat more effective because they do not heat the air and heat those objects that fall within the range of IR rays. When installing them, this factor must be taken into account. This means that each lamp is installed above each socket. Although another approach is possible: the lamp is installed in one place where there is enough area to fit all the chickens. If they get cold, they can gather in one place and bask under the infrared rays.
Their only drawback is that they quickly fail due to frequent switching on and off. Best option– this is long-term operation without turning off: the lamp will last longer, and the place will be constantly warmed up.
Oil radiators are not so efficient, therefore, they are rarely used.
Homemade heaters and various designs do not have full protection and are therefore considered a fire hazard, so it is better to protect yourself from such a risk.

This is very interesting option, although it has a number of disadvantages. Firstly, the presence of an open fire inside, especially a wooden room, which can lead to a fire. Secondly, given the small size of the chicken coop, it simply does not make sense to deal with such a problem. As for volumetric premises designed for a large number of chickens, then this option is the most acceptable if the pipe is run through the entire chicken coop. In this case, maximum heat will remain in the chicken coop. If the chicken coop is well insulated, then it is enough to heat it once and the heat will last for several days.
Heating the room using natural methods
There is another, alternative way to maintain optimal temperature in the chicken coop.
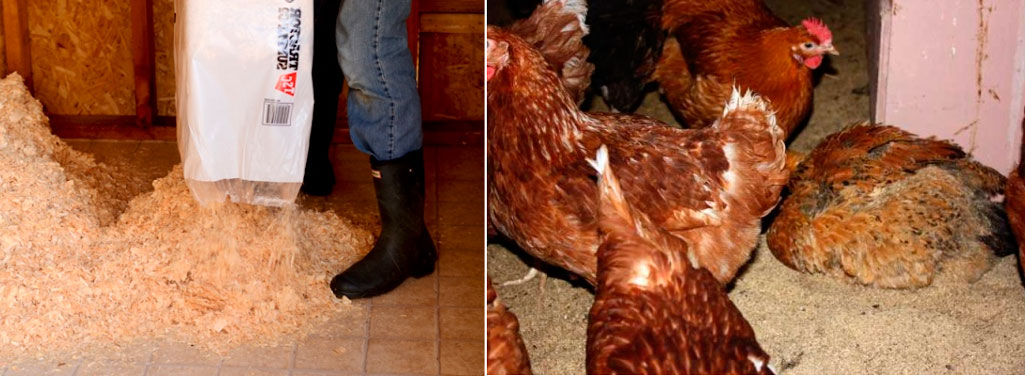 Chickens with sawdust feel great even in the cold
 This is a natural method that is based on obtaining heat from decomposing sawdust. At the same time, it is desirable that the chicken coop be well insulated. To do this, sawdust is poured onto the floor in a layer of 10-15 cm, which should settle for one and a half months. The use of hay is not recommended as it does not control the humidity in the coop, which can make poultry sick. In addition, chickens love to rummage in sawdust and are constantly busy with this, which does not lead to their obesity even with intensive nutrition.
After a month and a half, sawdust is added in a 10 cm layer. After a certain time, a layer of fresh sawdust is added again. By the end of winter, this layer should be about 50 cm. A layer of sawdust of this thickness can keep the temperature in the chicken coop at 0 degrees, which is quite enough for laying hens. If you penetrate deep into the sawdust, the temperature there can reach +20 degrees, which is what the chickens do, constantly burying themselves in the sawdust. In any case, they can warm up at any time.
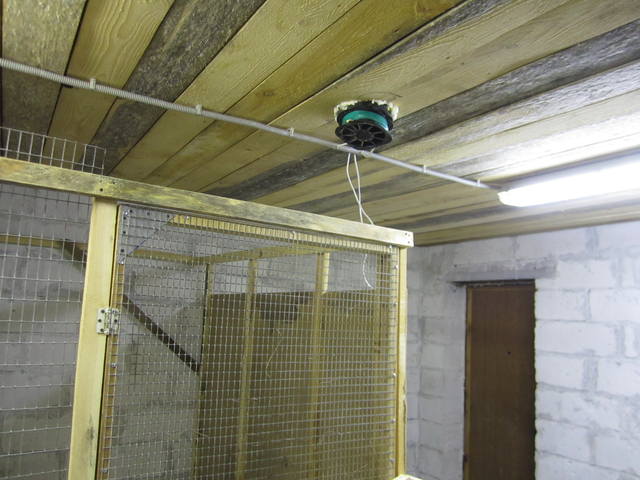
Ventilation
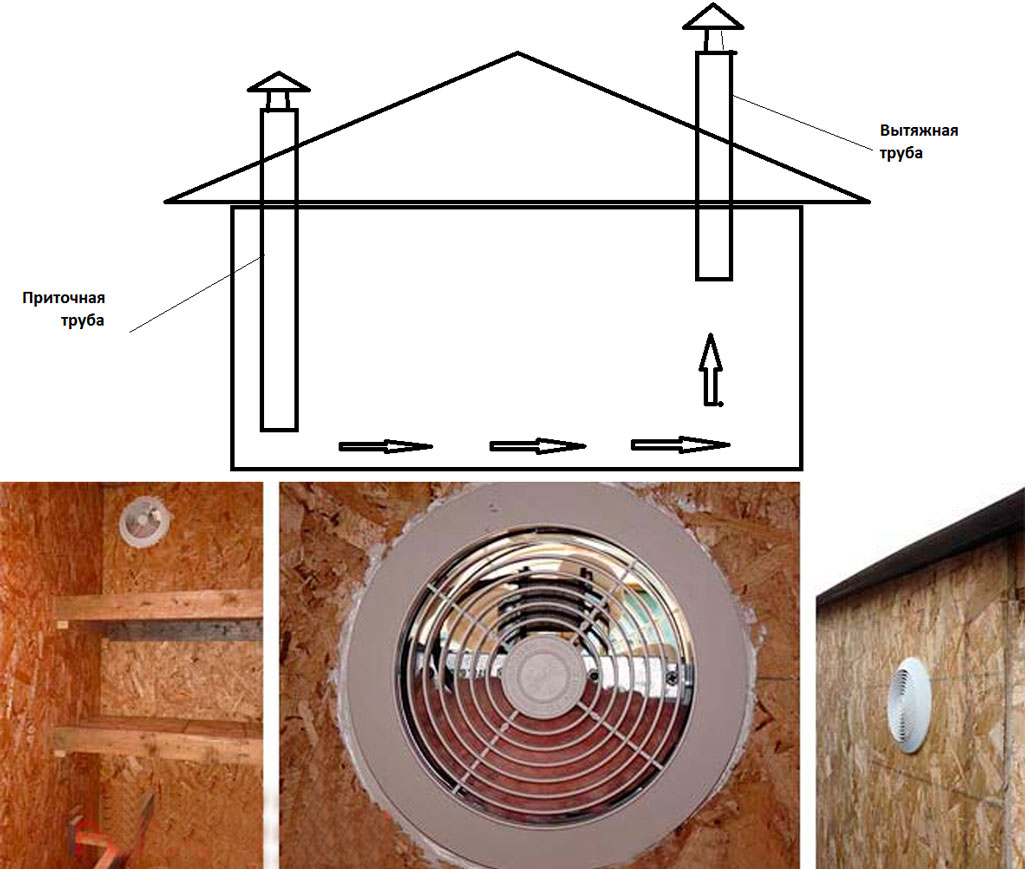
To maintain the microclimate in the chicken coop, ventilation is required. Ventilation can be organized by using a plastic plumbing pipe, which is led through the ceiling and raised above the roof to a height of one meter. In this case, natural draft will be sufficient for effective ventilation of the room.
Alternatively, you can install an exhaust fan, but it runs on electricity, and natural draft does not require any additional costs. If the room is constructed with high quality, without cracks, then additional ventilation holes located in the lower part of the room are needed for air circulation. They must be adjustable.
A very important point is maintaining optimal humidity in the chicken coop, about 60-70%. It’s very easy to increase humidity, but lowering it poses difficulties. Excess moisture needs to be evaporated, which means heating is needed. Therefore, installing at least one IR lamp will not hurt.

There must be a lot of light in the chicken coop, especially in winter, otherwise the chickens will not lay eggs. The daylight hours of the chicken coop should last 11-12 hours, therefore, windows alone will not be enough, especially on cloudy days. In this case, artificial lighting with a timer that controls the operation of the lamps will not hurt, then there will be no need to go around turning the lights on and off.
The presence of a regulator will allow you to shift the daylight hours in one direction or another. Alternatively, you can turn on the lights early and turn them off at dusk. As a rule, hens wake up early, along with roosters.
Building a chicken coop: video
The video contains information about the construction of a chicken coop by a man who decided to leave the city and move to the village. The photographs he posted on the video show all the stages and processes of construction. The information can be very useful for those who take the conditions of village life seriously.
Conclusion
With the onset of winter, the problem of insulation becomes quite acute. Almost everyone needs warmth: people, animals, and birds. The warmer the conditions for pets and poultry, the more effective you can expect them to be. As a rule, with the onset of winter, with the first cold snap, laying hens stop actively laying eggs until they adapt to the new conditions. But you don’t have to wait until they start laying eggs again, although not in such large numbers, but make sure that the poultry feels comfortable even in severe frosts. This will not only reduce the rate at which eggs appear, but will also protect the bird from hypothermia, which can lead to diseases.
Therefore, only a responsible owner will take the difficult, and also costly, path. Despite this, there are a lot of techniques that do not require additional costs, but require desire. The simplest option for insulation is the use of cut and then dried grass, as well as tops of various garden crops, with the help of which you can simply and easily insulate such premises for the winter. It is enough to build a small frame around the chicken coop and then simply fill the gap with dry grass, dry tops and dry stems. With the arrival of spring, all such insulation can be burned, obtaining valuable fertilizer for the garden.
Many owners of suburban areas dream of raising domestic animals, for example, chickens, but they are often stopped by the fact that there is no room where they can keep the birds. This problem is completely solvable, since almost any owner of the site who has necessary tools, materials, sufficient space for construction, and, of course, having at least minimal basic skills in carrying out construction work.
All parameters of the planned construction will primarily depend on the number of chickens that are planned to be purchased. In order for the chicken coop to become comfortable for its inhabitants, it is necessary to listen to the advice of the masters, those who have already successfully installed this adjacent structure and have been successfully keeping birds in it for more than one year.
Chicken coop requirements
In order to design and build a chicken coop correctly, you need to know the basic requirements that this structure must meet. Otherwise, due to ill-conceived design or other unfavorable conditions for domestic animals, poultry breeding will not bring desired results and will only result in losses and frustration.
- The safety of the inhabitants must be ensured from the penetration of small and large predators who love to feast on fresh eggs, or even chicken meat.
- In the chicken coop, you need to ensure that there are no drafts, which can lead to the death of the bird, since chickens can also catch a cold and catch a difficult-to-treat “sore”.
- You cannot do without reliable thermal insulation in a poultry house, especially if you plan to keep chickens all year round, and not just during the “dacha” season.
- Mandatory condition - organization effective ventilation of the chicken coop, since the lack of inflow fresh air also has an extremely detrimental effect on poultry.
- Properly arranged lighting of the room is also very important, since the poultry house must be illuminated for a certain number of hours a day, otherwise the chickens will not lay eggs well.
The project for the future construction of a poultry house begins to be drawn up after necessarily thinking through all of these requirements listed above.
Chicken coop design
- The first thing that needs to be determined when drawing up a project is the area that can be allocated for construction, taking into account not only the poultry house itself, but also its integral part - platform for walking birds.
 When choosing a location, be sure to take into account the size of the “exercise yard”
 The building site should not be located in a low area, as the room will become damp and will not dry out quickly, because atmospheric moisture is always concentrated in such places, and the morning fog lasts longer. It is best to place the house on a small hill.
- Next, you need to roughly calculate the size of the chicken coop, based on the fact that for every five laying hens, for their normal coexistence and development, at least 3 m² should be allocated, for example, the room can be 1500 × 2000 mm in size.
If you plan to have only 2 ÷ 3 birds, then you will need an area of at least 1 m² for them.

These dimensions must be maintained so that the chickens have the opportunity to move freely, and this requires a certain space. You need to know that the more active the hens’ lifestyle, the higher their egg production will become.
- A fenced walking area is also arranged taking into account the number of birds planned for breeding. So, for five chickens, 6 ÷ 7 m² of space should usually be provided.
The walking area and access to it for the birds should be located, if possible, on the south side of the poultry house. It is necessary to provide protection of this site from the covered wind. A canopy must be installed on top of the fenced enclosure, which will be good protection from the hot sun and heavy rain.
- If the area is flat, then it is recommended to create a small elevation for the chicken coop using an embankment of layers of sand and crushed stone of the middle fraction. To protect the chicken coop from rodents, a layer of clay mixed with broken glass is placed on top of the embankment.

- You immediately need to think about how to properly arrange daylight chicken coop. The most optimal An option would be a glazed door, which is installed on the south-eastern side of the building - it is from this direction that the sun is located the longest during the day.
- The ceiling in the chicken coop is raised to a height of 2000 ÷ 2200 mm for the largest possible volume of air space in the room.
- If the window is installed separately from the door, then it is raised to a height of 1100 ÷ 1200 mm from the floor, and its size must be at least 500 × 500 mm.
- To make it convenient to remove eggs from nests in the summer, they are placed outside the poultry house, and holes are cut in the wall for chickens to enter. Roof extension for nests d It should open - then you won’t need to go inside the house to pick up the clutch.

Masonry nests must have a size of at least 400 × 400 mm.
Video: main parameters taken into account when building a chicken coop
Chicken coop foundation
- When building a frame structure for a poultry house, you can do without a concrete foundation - it will be enough to make an artificial embankment using the technology mentioned above from sand, crushed stone and clay, since the chicken coop will not be an overly massive structure.

But in this case, it is necessary to raise the building above the embankment by at least 300 mm, and the space under it must be covered with fine-mesh mesh. It will protect the poultry house from the penetration of small predators.
The lower frame frame must be firmly installed on a surface made of clay mixed with glass, sprinkled with fine-grained crushed stone on the outside. On top of the clay surface, to a height of the frame block of 100 mm, it would be good to make an embankment of fine-grained expanded clay, which rodents generally always avoid.
- If the building is built from brick or, then it will be impossible to do without a reliable foundation.
Any type of foundation is suitable for this structure, be it a strip, monolithic or columnar structure.

— A vapor barrier is laid on top of it, and plywood is fixed onto it.
- After The attic floor will be completely ready, you can begin assembling the rafter system, and then installing the roofing material.
Having erected and insulated the walls and roof, you need to begin arranging ventilation.
Prices for popular types of insulation
Insulation
Chicken coop ventilation
In any building where domestic animals are kept, it is impossible to do without good ventilation, since all animals need influx of fresh air, which will displace the accumulated musty smell. Especially ventilation system necessary in summer high temperatures air outside.
- The ventilation system can be natural. It consists of several holes located on opposite walls. One of them is located at the bottom of the wall, at a height of 150 ÷ 200 mm from the floor, and the other at the same distance from the ceiling, on the wall opposite. Doors in the form of valves are installed on each of the ventilation holes, which will help you manually regulate the intensity of air flow.
Such ventilation works on the principle of natural air circulation in the room due to the intake of fresh air masses from the street.

- Another option is a forced type of ventilation. It is arranged in the same way as a natural one, but an electric fan is installed in the upper ventilation hole, working for exhaust. The ventilation window in which the fan is installed must also have a door so that in winter it can be closed completely and opened only when necessary.
Interior arrangement of the chicken coop
- One of the most important elements of arranging a chicken coop is the perches, where chickens spend most of their lives. It is wrong to think that birds sleep in nests or on the floor, since chickens sit on their perches almost all nights and even part of the day.

— The perch is a block with a cross-sectional size of 50 × 60 mm and a length equal to the width of the chicken coop. Such perches need to be made as at least two. The corners of the bar must be rounded so that the bird cannot injure its paws on them.

— Perches are fixed horizontally on the walls, at a height 500 mm from the floor. In this case, you need to measure the distance from the wall to the first perch, it should be 250 mm, and between the first and second perches - 350 mm.
— It is recommended to install perches on one level, otherwise there will be constant fights for the “upper floors” in the chicken coop. In addition, birds sitting on top will pollute those sitting below with their droppings.
— For each bird living in the chicken coop, 250 mm of perch must be allocated. Based planned livestock birds, the required number of “seats” is calculated, that is, the length and number of perches.
- The second necessary “interior element” for a chicken coop in which laying hens will be kept is the arrangement of nests, at the rate of one nest for 5 ÷ 6 laying hens.
— Nests should be located in secluded corners of the room, where the least amount of light reaches. That's why the most optimal An option would be to add drawers for fire building outside the chicken coop. All that remains is to make holes in the walls through which the chickens will enter. The nests need to be very well insulated.

— The nests should measure 300 x 300 mm in width and height and 400 mm in depth, or, if space permits, 400 x 400 x 400 mm. Masonry boxes are filled with sawdust, straw or hay.

- If the nests are located inside the chicken coop, then they are raised above the floor by 400 ÷ 500 mm and installed under the window so that light never gets inside the boxes.
“They can be installed in two tiers, since they have a roof on top, and the laying hens will not interfere with each other in any way.
— If the nests are raised too high, then a crossbar should be installed along them, and a wooden ladder should be leaned against it so that the chickens can climb up it to the laying sites.

- One more important element is a door for chickens to go out into the enclosure for walking.
— If the chicken coop is raised to a sufficiently high height from the ground, a ladder is installed and secured to the exit opening.

- In the case when The opening is not high from the ground level, then the door itself can serve as a descent for birds if it is made to open from above so that it folds down onto the ground in the form of a ramp.
— The manhole should also be equipped with a mesh door installed inside the chicken coop. The hole can be used as an additional ventilation hole, leaving the main door open and closing it only with a mesh.
Lighting in the chicken coop
The productivity of laying hens largely depends on how the chicken coop is organized. With a lack of light, the egg production of birds will decrease, and in addition, in a dark room their activity decreases, they move little and become lethargic, which can lead to their death.
 Lighting a chicken coop is a very serious matter.
 Therefore, as mentioned above, the window must be located on the south or southeast side of the building. The standard window area should be at least 1/12 of the floor area.
Windows must be opened to ensure ventilation of the room, but it is very important to equip all window openings with a mesh with cells of 10 ÷ 20 mm. A window that has such protection can be left open at night in the summer as necessary, since small predators will not be able to get inside through it.
In order for laying hens to have high egg production, it is necessary to provide them with lighting for 16 ÷ 18 hours a day, which cannot be done in winter and autumn period. Therefore, you cannot do without artificial lighting.
To illuminate 3 m² of a chicken coop, it is necessary to install a lamp, necessarily protected by a lampshade, with an incandescence of 30 ÷ 40 W. Artificial lighting should be directed to nests, feeders and drinkers, but should not illuminate nests for laying.
To save on electricity, and at the same time not have to think about when you need to turn the lights on and off, special connection blocks with sockets equipped with a timer are purchased.

All the lighting in the chicken coop is connected to such an outlet, and the timer is used to set the time when the lights should turn on and off. In this way, it will be possible to accurately determine the “daylight hours” for birds. For example, a timer can be programmed so that the light will turn on at 6 a.m. and turn off two hours later, that is, at 8 a.m., when the natural influx of light is sufficient. Then, for example, the lights will turn on again at 17:00 and will remain on until 21:00. With this device, a constant lighting schedule is established in the chicken coop. As daylight changes seasonally, the timer will be easy to reprogram.

Heating in the chicken coop
If the chicken coop building is good, it can be used year-round, provided, of course, that a comfortable temperature microclimate is created for the birds. Normal temperature for chickens it is considered 15 degrees Celsius, and in winter they need to heat the room to at least 10 degrees.
Therefore, in a year-round chicken coop you simply cannot do without heating devices. In this case, it is necessary not only to create the desired temperature in the room, but also to maintain humidity that is comfortable for the birds, since its excess can lead to illness and death of chickens. Therefore, poultry farmers with many years of experience in raising chickens advise using electric convectors for heating in the poultry house.
 The most The best decision for heating the chicken coop - electric convectors
 “Thanks to the properties of these devices, they are maximally capable of meeting the requirements for creating the necessary microclimate in the chicken coop.
— The efficiency of these devices is much higher than that of oil heaters, due to the good air circulation created in the convectors.
— they dry the air quite well, about the same as wood-burning stoves, but they are safe and cause much less trouble.
— These heaters consume less electricity when compared with other types of heating devices, since, having heated up to the temperature set on them, they turn off, and then, as the air in the room cools, they turn on on their own.
— The optimal solution will be the installation of two convectors, one of which will work around the clock, and the second will turn on on a timer only at night, thereby maintaining the desired temperature in the poultry house. This is convenient because at low night temperatures outside, a constant level of heat will be maintained in the room.
Perhaps for those who are familiar with the information on building and maintaining a chicken coop for the first time, at first glance, keeping chickens will seem very difficult. However, believe me, when everything is arranged wisely and enters a constant rhythm, it will become clear that there is nothing particularly difficult in this process.
You can organize the provision of the chicken coop with everything necessary in such a way that you will have to go there once every three to four days in order to clean the floor. And on other days all that remains is to collect eggs from nests.
By the way, a chicken coop can be made not only convenient for poultry, but also very beautiful, capable of adding an interesting “note” to the design of a personal plot.
Video: beautiful compact chicken coop
And if there is not enough space at all, but there is a desire to raise at least a few chickens, then you can build a mini-poultry house, spending very little money and time on it.
Video: miniature chicken coop - in a few hours
If you have the desire and minimal experience in keeping chickens and you are thinking about how to build a chicken coop with your own hands, then we will tell you how to build a winter chicken coop for 10 chickens.
The small size and thermal insulation of the chicken coop will allow the birds to warm the room with the heat of their bodies. At the same time, building such a chicken coop is within the power of every householder! This project will not take too much time and will not require expensive tools.
DIY chicken coop for 10 chickens.
When designing and building a chicken coop, it is important to keep many components in mind. After all, a chicken coop is both a comfortable home for birds and an outbuilding designed to make it easier for people to care for animals and increase labor productivity. Therefore, before making a chicken coop with your own hands, let's figure out what design elements and features should be inherent in every good chicken coop.
1. We rise above the ground
Dampness and moisture are the main enemies of any chicken coop. In a damp room, birds begin to get sick, so the chicken coop is always raised above the ground. Some designs provide for a very high lift - up to a meter, and sometimes higher. If your area, like ours, does not have excessive humidity, then 25-40cm should be quite enough.

Speaking of the area! Choose right place for a chicken coop - this is 50% success. Here are some tips to help with this:

3. Inputs and outputs for chickens and people
Each chicken coop must have an entrance for birds, as well as access for cleaning the premises. In our chicken coop, the passage for the chickens is made behind the back wall, and two doors provide the possibility of cleaning the chicken coop.

4. Nests and roosts
Chickens will lay eggs in the nests, and you will take these eggs from the nests, so the nests should be comfortable for both you and the chickens. It is believed that The ideal nest size is 30x30cm in length and width, and 30-40cm. in height. In this case, it is recommended to make the entrance to the nests narrower.

There should be easy access to the nests from the outside.

The lid opens, so you don't have to climb inside the coop to collect eggs.

The lid must be inclined so that water flows freely from it and does not fall into the nests.

Total The length of the perch is calculated based on 25 cm per chicken. Since we are planning our chicken coop for ten chickens, we have enough crossbar for the entire length of the chicken coop (almost 2.5 m).

5. Lighting and ventilation of the chicken coop
Chickens simply need light. Reduced daylight hours are one of the main reasons why chickens stop laying eggs in winter, and experienced owners know that this problem can be solved by turning on a light bulb. Therefore, there should be windows in the chicken coop!

It is better to make windows on at least three sides so that light penetrates into the chicken coop throughout the day. Also note the hinged ventilation window on the back wall. In wet weather it can be opened for additional ventilation. The windows above the slots on the front wall also open. Ventilation is very important, but remember: no matter what tricks you use to ventilate your winter coop, be sure to provide the ability to adjust the air flow up to its complete blocking - this will be useful to you in winter, when ventilation will suck out precious heat.

Chicken coop drawing.
Below we provide drawings of our chicken coop. For construction, we used softwood timber and boards, as well as 15mm thick plywood. It is quite possible to use OSB for the floor and roof underlay. When specifying the pitch between joists and rafters, the distances are indicated between the centers of the beams.


How to insulate a chicken coop with your own hands
So we built a chicken coop. Now we have to insulate it. Various materials can be used as insulation. Mineral wool is perfect for this.

As well as polystyrene foam and polystyrene foam.

At worst, you can line the walls with cardboard and old blankets.

The insulation is placed between the beams and then covered with plywood. Otherwise, birds may peck it off (they especially love polystyrene foam).

In winter, it is also worth covering the windows with insulation. It is important to provide artificial lighting.

In case of severe frosts, it is possible to provide infrared lamps. At the same time, their operation can be controlled by a timer or even a thermal relay - this eliminates unnecessary hassle, eliminates the human factor (forgot to turn it on/off) and saves money.

DIY chicken coop. Summer paddock.
During the warmer months, chickens need more space and will happily spend most of their time outside. Therefore, when making a chicken coop with your own hands, you need to make an open summer pen for chickens. The paddock area is calculated using the formula 1 sq.m. for every chicken.

Pay attention to the mesh at the bottom of the coop - it protects against predators. It should be buried 20-30cm into the ground, since some predators are quite capable of making a tunnel. And if in your area there are large predator birds, then the pen must also be protected from above.

It is also very important that at least part of the pen is in the shade - the chickens should be able to hide from the scorching sun. If there is no natural shade, then build a small canopy.

So that birds can freely enter and exit the chicken coop raised above the ground, a simple ladder is usually built for them.

Do-it-yourself chicken coop from scrap materials.
A German farmer turned an old kitchen cabinet into a small chicken coop.

This scrap coop is fully compliant with EU chicken housing specifications and provides enough space for three hens to collect and lay eggs.

Chickens need space to roam, so the coop is placed in the backyard to give them plenty of room to roam.

A chicken coop made from scrap materials shows how modern methods keeping chickens can be realized by non-standard means.

As you can see, in the construction of such a seemingly simple thing as a chicken coop, there are many nuances and important points, lack of knowledge of which can ruin all efforts.

But despite this, build it with your own hands good chicken coop Anyone can do it.

The main thing is to arm yourself with the right knowledge and think through all aspects of the design in advance. You can build a chicken coop according to our drawings, or, taking their basis, modify its structure to suit your needs.
Please share your experiences and tips on this topic in the comments!