Burning on a cutting board is no different from burning on any other wooden object. Of course, cutting boards are constantly exposed to water, a knife or other liquids. Therefore, if you are going to not only create a decorative element from the board, but decorate work surface, then be prepared for the fact that she will not live with you very long. But what does service life mean compared to the joy of creating a real, albeit small, masterpiece with your own hands? Let's look at popular designs that are just right for burning on a pre-prepared cutting board.
We analyze popular designs for burning on a cutting board
For cutting on a cutting board, 4 types of wood are typically used. All of them are different in their density and color. The lighter the wood, the softer it is, which means the lower the temperature of the burner will work. In addition, light shades of wood give great opportunity in creating shadows and various shades of strokes, which means that it will be easier to create real “living” paintings on their surface. It is the light and soft varieties of trees that are best suited for beginning burners.

First, you need to decide whether the board will just be a decoration for the kitchen or will it still be used for its intended purpose?
If you want to use the board in the future, then the drawing should not occupy the working part of the board. A simple pattern bordering the board or a small picture in the very corner will look great.

You can make the board not just beautiful, but also useful - if you burn a simple line on it, it will be easier to cut food into slices of the same length and thickness.
Using a burnt pattern, you can also mark the functionality of the board. For example, burning bread on a cutting board bakery products, fish on a fish board, also fruits and vegetables. This will help avoid the problem of mixing the smells of products, because wooden boards very tightly hold the smell of the products being cut on them. For such burning, you can use the templates presented below, or download others from the Internet.

If you just want to create an original decorative element, then the choice of pictures will be much wider. Again, a board with a burnt image of animals divided into specific meat parts with the name of each of them can be very useful in the kitchen.
Any mother or grandmother will be very pleased to hang in the kitchen a cutting board received as a gift and made by the hands of a beloved child. But it’s enough to buy a wood burning set for children, help translate a beautiful greeting picture and teach the child how to burn it correctly. Spending time with your child will allow you to give your mother or grandmother an excellent board, and your child to acquire a new exciting hobby. Look at an example of such work in the photo:

Video on the topic of the article
To transfer any template to wood, you can always use a simple carbon copy, but what to do when you don’t have it? Watch the videos below, perhaps one of the methods described in them will suit you.
Wood painting is considered one of the oldest types of creativity and drawing. This method decoration was widespread in Rus'; wooden boards were painted, panels, trays and boxes were decorated with paints. To learn how to decorate yourself wooden items, you just need to learn the basic painting techniques.
This type of decorative and applied art has been passed down from generation to generation. Adults and children depicted original patterns using folk motives, which were later framed. Decorating with the help of painting various interior items was considered popular. This art has survived in this form until today, when decorative painting wood is used to decorate furniture, dishes, toys, and musical instruments.

Craftsmen use coloring compounds for various purposes as materials for their work. You can paint on wood with gouache, acrylic, watercolor and even oil. Making your own beautiful painted board for cutting food is not difficult even for a child: the whole process consists of selecting a design, transferring it to the surface, and gradually decorating it. It is important to achieve the right combination of colors so that the boards look harmonious.
There are three types of painting techniques:
- Khokhloma - characterized by a black background, as well as yellow and red colors, where fancy flowers are depicted.

- – the main motifs are drawings dedicated to urban scenes, epics and flower arrangements.

- - a type of painting on wood, the main subjects of which are ornaments and horses.

To learn how to paint on wood, you need to familiarize yourself with the basic techniques, which you can learn about in the following sections.
How to paint a kitchen board with acrylic paints?
The most convenient material for getting acquainted with folk art and mastering technology are acrylic paints. They are thick enough and can be mixed to achieve a spectacular image. After painting a wooden board with such paints, it is not necessary to varnish the surface, because acrylic creates a durable protective film.
To work you will need:
- kitchen cutting board with a smooth surface;
- specified paints of the required colors;
- tassels;
- stencils for painting.
Choose high-quality artistic acrylic paints that have sufficient thickness - this is how the drawing will be rich.

The surface of the board must be flat; if there are protrusions on it, it is recommended to use sandpaper and sand the surface of the wood. After this, the masters recommend saturating the base with white acrylic so that subsequent sketches will lie flat on the board. While the workpiece is drying, you need to transfer the design onto wood, you can find out how to do this in the last section of this material.
The peculiarity of the products obtained after painting is that they have a bright and rich color. You need to start painting the board with large elements of the design, gradually moving on to smaller details. To highlight individual details of the image, paint them with a thin brush in black or white.

After painting on wood with acrylic paints, the product must be thoroughly dried. The next step will be varnishing the board if the product is intended to be used for its intended purpose. If the finished result will serve only a decorative function, then there is no need to varnish the board - painting with acrylic paints will stick to the wood on its own.
In the video: painting a cutting board with acrylic paints.
Painting wood with watercolors and its features
The technology of painting wooden bases with watercolors involves quickly applying paint to the surface. Some argue that watercolor is completely unsuitable for such coatings, because excessive wetting of the wood leads to its damage. You can correct the situation and learn how to properly paint on wood with watercolors - you just need to choose the right technique.
For beginners, painting with watercolors should not be a complicated procedure; you can practice on wooden blanks in the form of nesting dolls. After transferring the drawing, you need to brush it once with a wet brush over the area of the workpiece that needs to be painted. This is done for better paint adhesion. Step by step, large areas are first painted, and then colors are added to the details.

The use of watercolor on wood has a number of features:
- the ability to create light and airy images, equipping them with shadows and color transitions;
- lack of relief of the stroke, which cannot be said about painting wooden bases with acrylic or oil paints;
- a face painted on wood in watercolor most accurately conveys the shades truthfully;
- the ability to mix watercolors with other types of paints for painting on wood.
The finished product can be coated with clear varnish. Watercolors are also used to decorate backgrounds on panels, because this paint is a pigment diluted with water, which is most optimal for large areas.
Gouache for painting as an alternative
A cutting board for the kitchen is one of the practical items of regular use. To make this accessory pleasing to the eye every day, it is recommended to paint it; this can be done with gouache paints on wood. This coloring material is similar to acrylic, but is a little less rich in saturation.

Painting on wood with gouache consists of the following stages:
- Sanding the board. If the surface of the product was not smooth enough, it must be polished with sandpaper.
- Structure protection. If the board does not have a varnish coating, it must be treated with stain.
- Priming. For this, acrylic of any suitable color is used. Wooden board It is worth carefully covering with paint without gaps. This will make coloring easy and quick.
- Drawing. After translating the image or drawing it yourself, you need to start painting on the board. For beginners, it is better to choose simple patterns or floral motifs. Before painting the wood with gouache, you can add a little PVA glue to the jar for better adhesion.
- Varnishing. After finishing the process, it is recommended to open the product with varnish. You can use any composition that you have at home, but odorless acrylic varnish is considered the most suitable.
The master class presented in the photo below is designed for people who do not have the skills to paint kitchen boards. Painting on wood brings pleasure, and the resulting result delights everyone around you.

Apply varnish to finished product It is necessary in several layers, but after the previous layer has completely dried. The kitchen is a place where moisture is constantly exposed, so this stage is considered mandatory.

Methods for transferring a drawing onto a base
Some fans of painting on wood only with experience begin to draw pictures on wood on their own. Beginners cannot do this, so the question arises, what are the ways to transfer a picture onto a wooden base? You can find out more about them below:
- Carbon copy. This method is considered the simplest - it requires regular dark or (in the case of a black base) white carbon paper. The printed sheet is placed on a carbon copy, under which a wooden blank is placed. Using a pen, the drawing is completely outlined. As a result, an image is formed on the workpiece that can be painted. The resulting painted product is neat.

- Tracing paper. To make the painting have beautiful borders, you can use tracing paper. To do this, it is applied to the prepared drawing and traced along its contours. Next, the sheet is turned over and rubbed generously with graphite. After this, tracing paper is placed on the tree and the image is traced with a sharp object. Using this method it is possible to draw even the most complex patterns.

- Soap. The method is similar to the previous one, but it is good when the templates for painting are transferred to a black surface. It is necessary to repeat the same operations, only rub the tracing paper not with graphite, but with soap.
To hone your skills, experts recommend using different wood painting techniques. It’s also a good idea to paint on a former wooden base for a tray, on a box or other things. The resulting products can be given as a gift or used to decorate your home.
Master classes on painting wood (2 videos)
Often, when we come to a housewarming party, we think in stereotypes and give tea sets or dishes. But what if each guest comes with a set of cups or plates? We advise you to pay attention to such a wonderful gift as a cutting board, especially since you can paint it yourself. Or rather, not even paint it, but burn your own drawing on it! The topic of designs for burning on a cutting board is very popular today, and that’s what we’ll talk about.
Even if you have no experience in pyrography or wood burning, it’s okay, this activity is available to everyone: both adults and children. There is absolutely nothing to be afraid of here, because pyrography is not difficult, but very exciting. You can see an example in the photo.
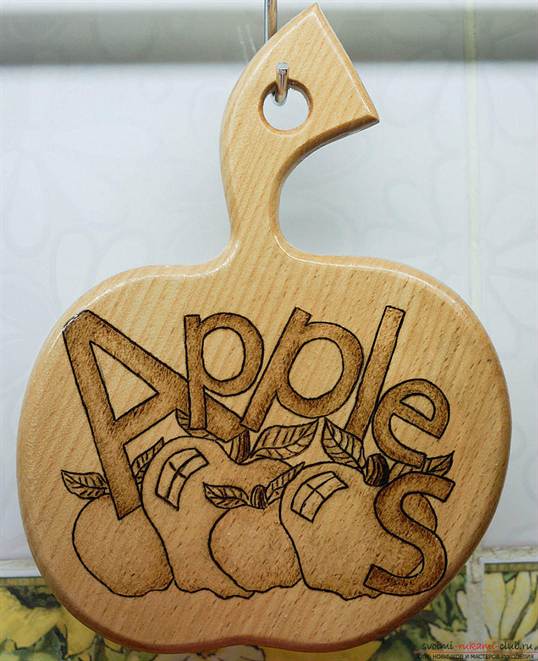
Wood burning designs are easy to find online and there are a wide variety of patterns and stencils that are suitable for beginners. The main thing in this matter is to be patient and have 1.5-2 hours left for a simple drawing.
What you will need

First of all you need pyrograph. This is a special wood burner. It can be purchased at craft stores. The pyrograph also comes with a special set for wood burning. This set includes a board (not a cutting board) and a ready-made stencil for burning.
It is very easy to buy a set; today they are distributed in almost all hobby hypermarkets and handicraft stores.
You will also, of course, need cutting board. It is best to choose a board made of light wood. Linden or birch are perfect. The next thing you need is sandpaper. Acrylic or watercolor paints will also come in handy. paints, to decorate the board with color. Additionally you will need wax to carry out the waxing procedure after finishing painting the finished drawing. Waxing will add richness to the image and preserve the colors of both wood and paint for a long time. You will also need stencil and pencil to transfer the drawing onto wood.

Learning to translate

Many people ask the question “How to transfer a drawing onto a board?”, so this is done using a stencil. You need to find and download pictures of fruits, flowers or animals that interest you, as these are the most commonly used patterns for wood burning. It's best to choose simple templates, especially if you are doing pyrography for the first time.

Print the downloaded stencil and cut out the figure if the figure in the picture is empty. If there are additional internal parts, you need to use carbon paper. Place it on the wood, place the printed stencil on top and trace the design. Try not to let the image move.

There is another way to transfer a picture to the board. You also need to print the stencil you like, printed in a mirror image. Prepare a bowl of water, decoupage glue, wood varnish, acrylic paints, a brush and a sponge.
Cut out a stencil or finished design, then carefully coat it with decoupage glue and attach it to wooden surface face down. Smooth the design with a sponge so that it does not “bubble” and also so that there is no excess glue left. Let dry. It is best to leave the work to dry overnight.

Once dry, moisten the motif with a damp sponge and begin to erase the paper until the design appears on the wood. Carefully get rid of all the paper. Then we begin to rub the remaining paper with our fingers, making pellets that remain on the wooden surface. We brush them off the tree, and what remains is a finished drawing, which, after complete drying, can be supplemented by burning (for example, burning its outlines) or simply decorated with paints. Then coat the work with varnish.

Mastering the technique
Once the design is traced onto the board, it’s time to start burning. Make sure the board is completely dry. Then heat the burner until the nib turns dark red.
Be careful when working with a hot pyrograph, it is very dangerous! It is better to do everything more slowly, but there will be no consequences.
Burning is best done from the contour to the center. That is, we first outline all the outer edges and only then move on to the inner ones. It is best to burn in separate areas: once you have worked on one, move on to the next, but in another part of the drawing. This will allow the drawing to cool evenly and will not create unnecessary lines or random strokes. When the work is completed, it can be decorated with paints. And then treat it with wax so that the board has a shine.
Let the owner of the house decide for himself whether to use your gift in everyday life or hang it on the wall or put it on a shelf. In any case, your gift will find a worthy place in the kitchen and in the heart of your friend!


- Material selection
- Made from solid material: cut wood, wide board or sheet of plywood
- Step 1: design
- Step 2: Preparing Tools
- Step 3: processing the wood blank
- Step 4: details
- Step 5: Protection
- How to make a board from fragments
- More ideas
cutting board must be clean and durable. It can perform 2 functions: be a decorative accessory, and serve as a cooking device.
Creating a kitchen board is a creative process that does not have a clear algorithm.
What kind of food cutting board can it be?
The technical composition must be free of toxic impurities.
The groups are fastened with clamps and leveled with slats in the upper and lower planes (see photo).
When the glue has dried, the group blanks are sanded and planed to make them even.

Dividing a large board into narrow fragments makes it possible to process workpieces on machines. Focused on the width of the working areas of planing equipment.
The processed group blanks are leveled in thickness, glued together, lubricating the side ends with glue, and the structure is secured with clamps.

Step 5: Trimming and Final Sanding
When the glue has dried, the board is cut to the required size and the surface is sanded again. The corners can be rounded with a router.
A small groove is cut along the perimeter of the board. The juice generated when cutting food will accumulate there.

Step 6: Oil Treatment
The finished product is treated with oil.

In a similar way, a board is made from fragments of any shape.


More ideas
For boards, you can use driftwood and unusual pieces of wood. Sometimes clear shapes are avoided; they make do with grinding and impregnation of the product with protective oil.

You can cut a hole in the finished board to remove scraps, sand the cut, attach legs to the board, etc.

Care
Wooden boards absorb odors and accumulate bacteria. To prevent this from happening, you should grind and saturate the product with oil at least 3 times a year. The service life of the board will increase.