You can breed chickens even on a small country plot. The costs will be quite small. And all because you can build a chicken coop for 10 chickens with your own hands, using a ready-made drawing as a basis.
General arrangement of chicken coops and their types
All chicken coops consist of two main areas: for overnight stays and for daytime walking. Based on this, poultry houses can be roughly classified as follows:
- Chicken coop with free range area. The chicken house is separate, and the birds can move freely around the site. Such a chicken coop has one drawback - it is difficult to control the chickens, which can spoil the flower beds. Wherein chicken droppings will be dispersed throughout the site.
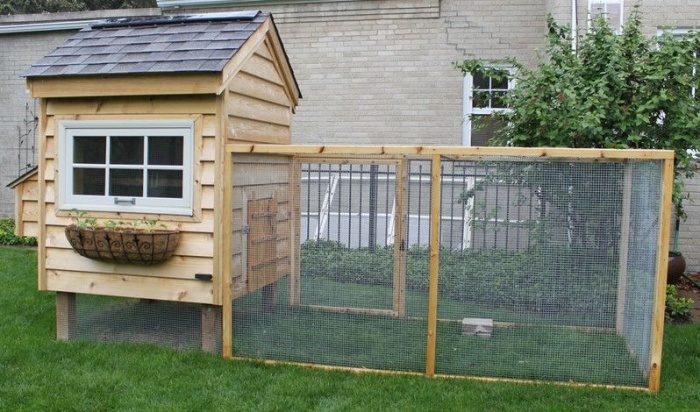
- Combined chicken coop. This is the best option for full-fledged poultry keeping. The main thing is to choose correct sizes buildings and walking areas.
- Closed chicken coop. As a rule, these are greenhouses converted for keeping birds. Requires constant cleaning. They have proven themselves well as a summer home for chickens.
- Cells. If the size of the plot does not allow you to install a full-fledged chicken coop, you can install hanging cages for keeping chickens on the wall of a barn or house. They are placed at a low height, in several rows above each other. The walking area is either left free or a small enclosure is built. Such bird houses have proven themselves well when raising chickens meat breeds.
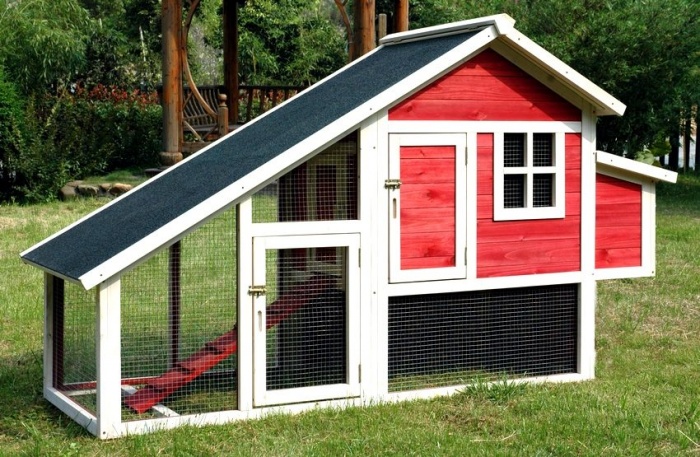
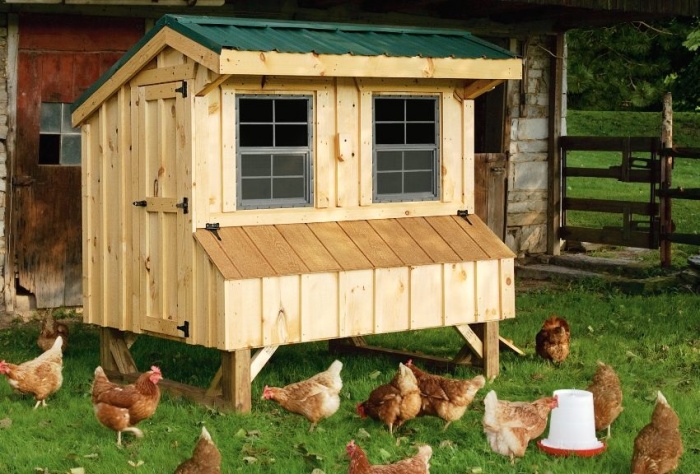
- Mobile chicken coops. Most often these are small summer houses that can be moved or transported using wheels installed at the bottom. They are designed for 5-10 chickens. Made from lightweight material.
Photo gallery: different types of chicken coops
A closed chicken coop will prevent birds from running around the entire area  A chicken coop with a free-range area requires attention from the owner, since he will have to keep an eye on the birds
  A chicken coop with an aviary is suitable for a plot of any size
  The aviary can be located under the chicken coop itself
  Chickens can be kept in specially equipped cages
  Cells can be arranged in rows
  Mobile chicken coops can be easily moved
Interior arrangement of the chicken coop
The chicken coop must be equipped with a perch, drinking bowl, feeder and nest. The health of the birds and their egg production depend on how correctly and conveniently the house is equipped.
The perch consists of perches with a diameter of 5–7 cm. They are installed at a height of 40–60 cm from the floor. The length of the perch is taken at the rate of 20–25 cm per head. There can be several perches; they can be installed in different ways.
Bird nests are located in the darkest places, usually opposite the perch. They can be made from wood, baskets, plastic boxes.
It is very important to remove droppings in a timely manner, as it releases ammonia and can cause chicken disease. A straw bedding that needs to be changed periodically will help facilitate this process. But if the chicken coop is small, the floor can be made of welding mesh and a special aluminum tray.
To prevent diseases, pre-treat the walls inside the chicken coop with lime.
Both in the chicken coop and on the run there must be feeders and drinking bowls. They should be installed in such a way that birds do not overturn the contents and can be easily refilled. Feeders can be installed in a bunker type. It is better to choose drip drinking bowls. Debris does not accumulate in them and water does not stagnate.
It is important that the chicken coop has a window. Its size is at least 1/4 of the floor area. In winter, additional lighting is turned on, artificially extending the duration of daylight hours to 15–17 hours. This allows the hens to lay eggs throughout the year.
Walking area for different breeds chickens will vary in size. If birds are raised for meat (Langshan, Cochin, Plymouth Rock, Brahma, broiler breeds), they must be kept in conditions that restrict movement. The walking area should be minimal.
For laying hens (Lenorca, Hamburg, Andalusian, Russian White breeds), the walking area should be spacious enough so that the chickens do not become fat and stop laying eggs.
How much and what material is needed
Of course, if you have certain skills, you can build a chicken coop out of brick. But this is labor-intensive and expensive. As an alternative, reinforced concrete blocks can be used. But this pleasure is not cheap, and requires additional insulation.
The best material for building a chicken coop is wood. As a rule, the remains after building a house are used: fiberboard, chipboard, OSB boards, timber, boards. You can also build a chicken coop from reeds, if they grow in your area. During construction, do not use materials or paint with a strong odor.
To insulate a winter chicken coop, you can choose any thermal insulation material. Foam plastic and mineral wool are ideal. But it is necessary to insulate in such a way that there are no gaps between the joints of the main materials, and the birds cannot get to the insulation and peck it out.
The roof is covered with slate, roofing felt, polycarbonate. For summer chicken coops, it is not recommended to use a metal profile, since it gets very hot.
An aviary for birds, as a rule, is fenced with chain-link mesh or reinforcing mesh, but you can also use plastic garden mesh.
The canopy is made of material that can protect from rain. It can be polycarbonate, reinforced film, linoleum.
Photo gallery: chicken coops with different types of roofs
 A chicken coop made of OSB boards can be covered with PVC panels
  A wooden chicken coop with a thatched roof looks very unusual
  A chicken coop with a pitched roof can be seen very often
Drawings of different designs with dimensions
The summer chicken coop is the simplest and cheapest design. To make it you don't need a large number of material, the presence of any special skills and abilities. In most cases, summer chicken coops are built without a foundation, providing additional protection from rats and other predators.
If desired, you can convert an old greenhouse into a summer chicken coop. At the same time, the house itself can be small, but the walking area is spacious. Bird nests can be installed on the side of the chicken coop, in a separate compartment.
To prevent the bird from overheating in the sun, the aviary is equipped with a canopy.
The winter chicken coop differs from the summer one in its larger size and insulated walls. For such houses, a foundation must be made and an additional vestibule installed in order to better retain heat in the room. In winter chicken coops, additional lighting is provided, ventilation is installed and a fenced walking area is equipped.
The size of the structure is calculated based on the sufficient area for one bird (three chickens need 1 m2 of area). As practice shows, it is better to build a more spacious chicken coop, since in the future the population may increase and the birds will be cramped.
A mobile chicken coop can be easily moved, which means its size will be minimal. It provides the ability to feed and care for birds without the presence of a person inside. As a rule, they are designed for a small number of birds (from 3 to 10 pieces). The frame is made of bars, and the main elements (doors, roof) are made of OSB boards, fiberboard, slabs and other available materials.
 The diagram should be as detailed as possible
  Even a small chicken coop should be tall
  The diagram must indicate all dimensions and materials used.
Step-by-step instructions for making a summer house for chickens in the country
Step-by-step instructions will help you easily make a chicken coop with your own hands.
Choosing a place to build
The choice of location is only important if you are not making a mobile chicken coop. Otherwise, it is recommended to adhere to the following rules:
- a rectangular chicken coop should be built in the direction from east to west;
- the windows of the chicken coop should face the south or east so that there is maximum illumination throughout the day; it is advisable that the bird hole be on the same side;
- It is recommended to locate the chicken coop away from noisy places, in the depths of the courtyard, because stressful situations negatively affect egg production;
- You can choose an elevated place so that water does not stagnate under the house, since birds do not tolerate dampness indoors, and chicken droppings that get into the water can lead to the spread of infection;
- the chosen location should be protected from the wind, because chickens do not tolerate drafts well.
Laying the foundation
For construction summer chicken coop usually a columnar foundation is used. To do this you need to do the following:
- Using pegs and a cord, the boundaries of the future building are outlined.
- The top layer of soil (up to 20 cm) is removed with a shovel.
- Holes 50 cm wide and 70 cm deep are dug in the corners. In a rectangular chicken coop, additional posts are installed along the long side every 0.8-1 m.
- The required level of supports above the ground is beaten off with a rope (20-25 cm).
- A layer of gravel (about 10 cm) is poured into the bottom of the pits.
- Together with the cement mortar, the first two bricks are laid, the next two are placed perpendicularly.
- The masonry is driven to the required level.
- The solution is left to harden for at least 7 days.
- When the solution has completely hardened, the pillars are treated with bitumen or special mastic. The entire area where the earth was removed is filled with gravel. It performs the function of drainage.
How to build a frame with your own hands
After the foundation is built, you can begin building the frame:

Final exterior work
Once the frame is ready, you can begin arranging the chicken coop. First of all, the window is outlined and cut. It should be done on the east or south side. A hole for chickens is also cut. It can be made in the form of a door that opens outward or a special valve.
The door to the chicken coop should open outward so as not to crush any birds that may be near it.
If the hole is located high, you will need to make additional ladders so that the bird can easily get outside. In this case, it should be next to the perch on the same level as it.
Particular attention should be paid to the fact that various predators like to visit chicken coops - ferrets, foxes, rats. Therefore, you need to ensure that there are no cracks. It is better to dig a strip of metal or slate into the ground along the entire perimeter of the enclosure, 30 cm above ground level.
How to build a mini-house for chickens: step-by-step instructions
To make such a chicken coop you will need little material. Its base is no more than 1x1.5 m, and its height is only 1.2 m. It is designed for 3–4 laying hens. You can keep chickens in it if the ladder is placed at a smaller angle of inclination.
Since such a chicken coop does not require a foundation, all work can be carried out right on site:
- Frames for the lower box are assembled from timber using self-tapping screws and a screwdriver. Immediately the mesh is attached to them using a construction stapler.
- They are also connected to each other, after which two crossbars are attached to them.
- The upper frames are made. A window frame is attached to one of them so that you can open the chicken coop from above and supply food and water. The mesh is attached to them with a construction stapler.
- A compartment for the future “house” is fenced off, for which boards of the required size for the floor are filled.
- The remaining three walls of the “house” are decorated, a hole is cut and a ladder is installed.
- The finished side frames are installed on the top box and fastened together. The ends are covered with mesh.
- The ridge part is formed, for which you need to attach three longitudinal boards on top. A cross member is attached to the free end to enhance the rigidity of the structure.
- A door is installed in the “house”, a nest and a perch are designed. We install bolts.
Video: building a mini chicken coop
Features of building a frame winter chicken coop with your own hands
The winter version is a more complex design. It must have a foundation or a very well-insulated floor, additional lighting, a ventilation system, and a vestibule attached. It is advisable to install a thermometer inside. If there are chickens in the chicken coop, you need to consider additional heating.
Many people believe that a winter chicken coop can be installed in a regular barn by insulating it. But this is not entirely true, since about a third of the area is used for keeping poultry, and the entire room needs to be heated. This is why it is better to build a compact winter chicken coop.
You need to think in advance about insulating the walls. But remember that due to the thickness of the insulating material, the internal area is reduced.
Foam plastic and mineral wool can be used as insulation. The main thing is to carefully cover the material with plywood or boards.
The ventilation pipe should be located at the top of the chicken coop. In severe frosts, it can be covered with a rag so that cold air does not get inside the chicken house.
Video: convenient winter chicken coop
How to make a mobile chicken house
Mobile means quickly and easily moved. For the manufacture of such chicken coops, only lightweight materials are used, for example, plywood, OSB board, thin boards. To make it easier to move such chicken coops, special handles or wheels are used. They are easy to attach if you initially provide for this in the design when drawing up the diagram.
Such designs are designed for 5–10 birds. During summer period as needed, the house can “roam” throughout the site.
Photo gallery: mobile chicken coops
 Small wheels allow you to move from place to place
  Wheels in the center and handles on the back of the coop make it easy to move the structure
  You can also use small bicycle wheels
  A chicken coop for several layers can be easily moved
Video: mobile chicken coop on the site
By designing and building a chicken coop yourself, you can provide for all the nuances of keeping poultry, get maximum results and enjoyment from further use.
Breeding poultry on private farmsteads for the sake of eggs and dietary meat, it is widespread. It is grown on natural feed, without additives or growth stimulants. The result is tasty and safe products.
For personal consumption for one small family, 10 chickens is enough. Without a warm room, productive cultivation is impossible.
Building a winter chicken coop for 10 chickens with your own hands is the first step towards realizing your dream. It is necessary to build a warm house and arrange it inside.
Choosing a location for the chicken coop
Construction of a chicken coop at the dacha is an important stage for a novice poultry farmer. Choosing a location for the chicken coop is of great importance.
According to the regulations, premises for keeping animals cannot be located closer than four meters from the boundaries of the site.
You should not place it near a well or borehole. It is better to place a winter chicken coop in a secluded place, away from a busy road and noisy neighbors. This will help relieve the bird of unnecessary noise, create a calm environment, and avoid increased anxiety and stress.
A small slope facilitates natural drainage during spring floods and heavy rains. Pits and low spots are not suitable for a chicken coop, as there is a high probability of flooding.
Chickens wake up early, so it is better to place windows facing east. This eliminates the need to turn on the lights early in winter and you can save a little money.
DIY construction
Used to raise chickens different types chicken coops. Winter chicken coops are built in the form of open and closed structures.
The open option involves the construction of a chicken coop for 10 chickens with a comfortable house for living and free access to the walking area. In closed structures, birds walk in enclosures.
In private farmsteads, open-type chicken coops are most often used to keep chickens. The bird feels comfortable in a permanent building at any time of the year. Comfortable perches and nests are placed here, drinking bowls and feeders are installed.
If desired, the bird goes to the walking area, where it basks in the sun and breathes fresh air. To protect the birds from snow and rain, a small canopy is installed on the walking area. This is a good place to hide from bad weather and scorching sun rays.
If there is not enough space on the site to equip a full-fledged winter chicken coop with walking, the problem will be solved by installing a two-story structure. Its upper part is a full-fledged chicken coop with solid walls, perches and nests. There is a comfortable enclosure on the lower floor.
Required materials and tools
Avoid Spread infectious diseases and periodic disinfection of walls, floors, ceilings and dishes helps to raise healthy livestock. During construction, it is necessary to use materials that are resistant to antiseptics.
Poultry can live all year round only in permanent buildings with airtight walls, thick windows and doors. If a barn or greenhouse made of polycarbonate was used as a summer chicken coop, they must be well insulated before the cold weather begins.
Capital walls are built from brick, wood, stone, or foam blocks. To build a wooden frame, you will need dry timber, racks, a board to form the rafter system, construction corners and anchor bolts.
For the outer cladding of the frame, siding, plywood, OSB, edged board. The interior decoration is made of durable, moisture-resistant materials that the bird will not be able to peck and will be damaged. These are edged boards, OSB boards, lining, plywood, chipboard.
As thermal insulation material use expanded polystyrene, mineral wool, polystyrene foam, foil materials, or simply plaster the room. When building a permanent chicken coop with your own hands, you cannot do without a jigsaw, a screwdriver, a hammer, a grinder, a level and a shovel.
Calculations and drawings
Large and small construction, including a do-it-yourself chicken coop for 10 chickens, begins with drawings.
At this stage it is necessary to think through the details. Compose detailed plan. Write a list of necessary building materials. Calculate the final cost of construction.
When drawing up a chicken coop diagram, not only the materials for the walls and roof are taken into account - the interior is also detailed. Consider convenient placement of feeders, drinkers, nests and perches.
Temporary chicken coops are relevant when breeding broiler breeds, which are purchased in the spring and raised during the warm period. Summer structures can be erected without a permanent foundation and assembled from any available materials.
Drawings of a portable chicken coop for 10 chickens are easy to make yourself, even without engineering skills. When the need for a portable chicken coop disappears, the structure is dismantled.
The construction of a winter chicken coop is economically justified when keeping poultry all year round. Low winter temperatures force chickens to stay indoors all the time and only go out for short walks when the weather is good.
When drawing up a plan for a winter chicken coop, it is necessary to provide a heating and ventilation system. Capital buildings are installed on a solid foundation that protects the structure from distortions and tilting.
To determine the permissible dimensions of a room, it is necessary to take into account maximum load throughout the year, taking into account the arriving young animals. The standard load for sedentary broilers and laying hens when kept on the floor is no more than 5 birds per 1 m².
A 2x2 chicken coop is quite enough to house 10 chickens. If you keep birds in cages, you will need a much smaller room.
To calculate its size, you need the number of livestock, the dimensions of one cage and a plan for their placement. When installing cages in two rows, the occupancy of the chicken coop doubles, which is very convenient in limited areas and when raising poultry in the country.
Construction of foundation and walls
A capital chicken coop for all-season raising of chickens needs a foundation and high-quality wall insulation. A strip foundation is ideal for such buildings. Unlike a columnar structure or piles, the distance between the ground and the floor will be filled with a thick layer of concrete and will become a reliable protection against the penetration of cold air.
To build a strip foundation, a trench is dug, the depth of which is at least 50 cm. Its width depends on the thickness of the future walls with a margin of 15-20 cm. A sand cushion about 15 cm high is laid at the bottom of the trench.
Each layer of sand is thoroughly moistened and compacted using a beam or vibrating plate. Install formwork protruding 30 cm above ground level. For stronger adhesion of concrete, a reinforcing frame is used.
The formwork is filled with a ready-made mixture of cement, crushed stone and sand, taken in proportions of 3:5:1. The foundation is covered with film until completely dry.
Wooden frame
A chicken coop made using frame technology is the most economical and quickly erected option. Thanks to the multi-layer construction, the room is warm in winter and cool in hot weather. To protect the wood from fungus before starting work, it is treated with antiseptics and impregnations.
The frame is assembled from timber. To do this, install corner vertical posts and fix them using steel corners with self-tapping screws. To securely fasten the elements together, slopes made of the same material are mounted.
Then additional racks are installed. The distance between them depends on the size of the insulation. If the chicken coop is large, horizontal jumpers can be secured at the bottom, top and middle of the structure.
When constructing the frame, a hole for chickens, a doorway and windows of the optimal size are left. For the future floor and ceiling, wooden logs are laid at a distance of 50 cm.
Roof reinforcement and flooring
Wood is an excellent material for making floors. Cleans well and handles easily chemicals. For the floor it is better to use an edged board. It fits tightly and leaves virtually no gaps.
The boards are laid on the joists close to each other and secured with nails. To ensure that the bird feels comfortable in any weather and does not freeze its paws in severe frosts, a double sex device is practiced. To do this, a sheathing is laid on the rough flooring, then a layer of insulation and a finished floor.
The chicken coop will also need a roof. The single-pitch design is the simplest to implement. To manufacture it, install a rafter system made of timber with emphasis on the upper frame frame.
The front struts are made much larger than the rear struts. They are attached to the frame with metal corners and securely fixed with jibs. Then waterproofing is laid and covered with slate or corrugated sheets.
Interior arrangement
A comfortable living space contributes to the productive rearing of livestock and prevents the development colds and case. When building a winter chicken coop with your own hands you will need:
- high-quality insulation walls, windows and doors;
- device in the chicken coop reliable ventilation system;
- heating the room in winter;
- sufficient lighting;
- comfortable perches and nests, spacious feeders and drinking bowls.
The importance of insulation
Insulating the chicken coop will eliminate drafts, block free access to cold air, create an optimal microclimate, and prevent the development of colds. As a result of the work carried out, heating costs are reduced and production costs are reduced.
If a chicken coop for keeping 10 chickens is made of thin material, it requires mandatory insulation. Insulation is conveniently carried out using frame technology. To do this, a frame made of wooden beams is mounted on the outside or inside of the load-bearing walls.
The inner part is filled with insulation laid in several layers. For finishing, safe materials with a dense structure are used. The outside of the frame is sheathed with moisture-resistant material.
Doors and windows require special attention in the chicken coop. They often become a source of cold. As a result of drafts and hypothermia, the bird suffers from colds and egg production drops.
Meat breeds, when raised in such conditions, stop gaining weight. Eliminating cracks helps retain heat inside the room. As a result of high-quality insulation, you get a warm house for chickens that can be used in any weather.
Ventilation
High-quality insulation does not let air into the chicken coop. During the winter it is in a clogged state. In a closed room, there is increased humidity and condensation forms on the walls. As a result of prolonged waterlogging, the litter becomes rotten and mold forms on the corners.
Regular ventilation using window vents is only possible in warm and calm weather. On frosty days, such ventilation releases large volumes of cold air and provokes colds. A high-quality ventilation system will help to avoid negative consequences.
It is a necessary element of the winter version of the chicken coop: it optimizes air temperature and humidity, removes bad smell out. Poultry farmers equip winter chicken coops with a forced-air system with a fan.
For this purpose, fans with low power are used. The presence of a power regulator allows you to control air humidity taking into account weather conditions. Installation of protective grilles will provide the necessary security.
Chicken coop temperature in winter
The average standard temperature for the well-being of chickens in winter is 15 C°. Under such conditions, the level of egg production drops slightly.
A complete lack of heating leads to negative consequences. Chickens' egg production levels drop sharply.
When left in a cold room for a long time, eggs freeze. Hypothermia and inflammation of the paws occur. Colds and infectious diseases progress. On cold days, you can't do without heating the chicken coop.
The chicken coop is heated using one of the available options:
- electric heating ;
- gas;
- steam;
- stove;
- air convection oven ;
- infrared lamps .
Installing automated heating will make it easier to control the temperature level and reduce costs. The built-in sensor is triggered when the temperature drops to critical level and turns on the heating. Having warmed up the room to standard values, the system automatically turns off.
Winter lighting
To maintain egg production at a high level, the chicken coop needs to be illuminated for at least 12 hours. Poultry farmers prefer infrared lamps. They provide diffused light and heat the room.
With high-quality insulation in regions with a mild climate, one infrared lamp quite enough to heat 10 m². Lamps are installed at a height of at least 50 cm. When placing lamps on the floor, protective metal mesh is used.
Automation of lighting contributes to significant energy savings. To regulate the level of lighting in the winter chicken coop, a photosensor is installed. It reacts to minimal changes and turns on the light when it gets dark.
Drinkers and feeders
To feed chickens you will need comfortable and functional feeders. Hopper-type feeders are effective in using. The bird easily gets food, scatters it in minimal quantities to the sides and does not trample it under its feet.
As a result, there is a large saving in feed, and the chicken coop is always clean and dry. Feeders are placed at a height of 10-15 cm from the floor level. It is better to use a separate container for each type of food.
This prevents mixing of dry food, mineral supplements and mash. Separate placement will make cleaning the chicken coop and dishes easier.
Conventional bowl and vacuum drinkers require constant attention and often become clogged. As a result, the bird drinks dirty water and walks with wet paws.
Automated chicken watering will save poultry farmers from constantly visiting the chicken coop. Nipple-type drinkers with a drip eliminator connected to a large container of clean water are easy to use. The distance between drinkers depends on the breed and is at least 20 cm.
There should be no more than four heads per drinking bowl. With this placement, the bird will be provided with fresh water in the required volume.
Perches and nests
Raising healthy livestock is impossible without proper rest. For comfortable placement, birds need perches. They are usually made from thin bars and given a rounded shape. Instead of bars, you can use ready-made cuttings.
Perches must comply with regulatory requirements. They cannot be too thin, as they will easily break under the weight of the chickens. A diameter of about 7 cm will be quite enough.
If the perch length is too short, the bird will feel some discomfort. If the floor in the chicken coop is not heated, the perches are placed at least 50 cm.
Perches are installed around the perimeter of the chicken coop in one row or multi-level structures are used. Thus, a large number of chickens can be freely accommodated in a small area. When installing multi-level perches, the size of the chickens is taken into account.
For comfortable sleep, one chicken needs a perch at least 25 cm long. The height between the crossbars should be 60 cm. When installing perches, it is necessary to consider a reliable fastening that guarantees the safety of the chickens.
When raising laying hens in a chicken coop, nests will be required. The lack of a convenient nest forces the bird to look for a secluded place for eggs in the walking area. For 2-3 hens, one nest will be enough.
Nests are made of boards or plywood. The bottom is covered with a thick layer of straw. Equipping a through hole and installing a tray automates the process of collecting eggs, guarantees cleanliness and protects them from pecking.
Important hygiene details in winter
Effective keeping of chickens in winter is possible if certain conditions are met:
- To maintain egg production at a high level, birds need balanced diet, access to fresh water and vitamins.
- She needs daily walk. The duration of the walks depends on weather conditions.
- Raising healthy livestock is impossible without whitewashing walls, disinfecting dishes, drinking bowls, perches and nests.
- Chickens need ash. It will help prevent the massive spread of insects living in the feathers.
- Sand placed in the chicken coop will improve the processing of solid feed.
- To hatch quality eggs, chickens need mineral supplements, so they are given crushed eggshells.
How to protect chickens in winter
Creating optimal living conditions will help prevent the development of colds and frostbite on paws. The temperature in the chicken coop should not be below 10°C. In cold weather, space heating is required.
Daylight hours cannot be less than 12 hours. Excessive humidity and drafts contribute to the spread of colds. With prolonged exposure to drafts and cold, mass mortality of birds occurs.
Build capital chicken coop making 10 chickens with your own hands is not at all difficult. This requires basic tools and a little experience in repair work.
When building a cozy house for chickens on your own, there is no need to hire specialists. A high-quality winter mini chicken coop, built according to your own design, will become the real pride of a zealous owner.
Eggs are necessary not only for healthy eating, this is also a source permanent income. Having started breeding laying hens, the farmer receives not only fresh product and meat recognized as dietary, but also chickens. Bird droppings are great as fertilizer. In order for chickens to lay eggs properly, you need to build an insulated chicken coop for 10 chickens with your own hands. This is a small shed, and even a beginner can handle its construction.
Show all
Defining the Goal
Before creating a bird house project, you need to think about the scale of the construction and the goals that should be pursued by building a poultry house. A dozen chickens will provide a family of 3 people with eggs and meat, but this quantity is not enough to make a profit.
If you need a source of income, but the fear that you won’t be able to cope with the construction of a large house overshadows everything, you need to start small. Try to build a mini-poultry house for 10 laying hens. In the future, you can easily expand the premises and start making money by selling fresh eggs or meat.
You can buy a ready-made poultry house, because there are several options on sale. They are easy to install in a country house or village. But all of them are unreasonably expensive and it is difficult to add an extension to them for breeding livestock and expanding the business.

Size calculation
First, you should draw a sketch of the future structure, or better yet, a drawing. We must try to reflect in as much detail as possible everything that is planned to be done. Based on this sketch, you can clearly imagine the house and calculate its dimensions.
It is much more convenient not to copy exactly finished projects, which are designed for an ideal landscape, but draw your own diagram. After all, the site may have hills or lowlands, wetlands, etc.
But if the user is not an expert and is doing such a project for the first time, he needs to look at ready-made diagrams and, choosing the most suitable one, remake it for his site. Pay attention to calculating the dimensions of the chicken coop. Egg production and offspring depend on this.
Well-known poultry farmers claim that 1 m² of space is enough for 3-4 laying hens or 2-3 boilers. By simple division it turns out that 3-4 m² is enough for 10 chickens. In winter, individuals cluster together (several ones are collected), and the space can be reduced to 2.5 m². But you shouldn’t crowd the birds and take away the extra half a meter from them.
For birds, not only is a poultry house important, where they can sit out on frosty days, but also a place to walk, otherwise they will become weak, get sick and may die. Minimum dimensions This space for 10 individuals is usually equal to the dimensions of the house and is 2.5-3 m².

Choosing a location for a poultry house
After making a drawing and determining the dimensions of the future structure, you can begin to look for a place to build a house for birds. It is very important. The chickens have to live there, lay eggs, eat, sleep, and walk. This place should not bring discomfort to the living of birds.
When choosing the location of the future building, you must strictly follow the rules:
- 1. You should choose a location with dry soil - a hill or hillock will be useful. Low-lying areas with excessive humidity or swampy ground will have a detrimental effect on the mood and health of poultry.
- 2. It is desirable that the site has a slight slope. During the rainy season, the water will go downhill, not lingering near the chicken coop, and will not swamp the soil.
- 3. The location chosen for the building must be illuminated.
- 4. It is better if the walking enclosure is made on the south side. Then the sun will illuminate and warm him most of the year.
- 5. You cannot place the poultry house directly on the ground, as short-sighted farmers do. It will freeze in winter, and the laying hens may get sick, because they will sit for a long time in nests located on the ground.


Selection of foundation and its manufacture
For structures of this type, it is advantageous to make a foundation, the construction of which does not require a long wait until the concrete hardens. It is desirable that it be light and easy to pour.
There are two types of foundation that fit this description:
- columnar version;
- tape method.
Drawings of a summer and winter mini-chicken coop almost always include a columnar version - it is made for light buildings. Other advantages of this method:
- with this option for making a foundation, ventilation is formed under the floor, which helps protect the chicken coop from the invasion of mice;
- it helps to save money, because the wooden covering absorbs less moisture and its service life is extended.
To build a foundation, the following materials and tools are required:
- asbestos-cement pipes or ready-made concrete pillars 120-140 cm long and 20 cm in diameter (if it is not possible to get them, you can use about 36-48 pieces of plastic or iron barrels with a caliber of 20 cm for oil, for example);
- fittings (30-50 cm rods);
- cement + gravel or poured concrete;
- bricks or stones;
- large diameter nuts with washers;
- shovel;
- drilling rig
Foundation arrangement
This process begins with clearing the area of debris and stones, marking the future corners of the building and connecting them with lines. On the lines (every meter) holes are dug or pegs are driven in, marking the places for the posts. Ideally, for a house with a walk of 3 x 3 m² you need 12 of them.
You can get by with only 4 concrete pillars in the corners, but then you will need to install 2-3 supports made of bricks or stones under each wall of the barn. It is advisable to cement them, because high humidity in autumn or winter can cause the bricks to become damp and fall apart.

After determining the number of pillars, the foundation construction process begins:
- 1. If there is a drilling rig, holes with a caliber of 20-25 cm and a length of 1 meter are made around the perimeter (at the marked points). If there is no such unit, you will have to work with a shovel.
- 2. Cut the thread yourself (or give it to a turner) from one edge of the reinforcement at a distance of 10 cm, select a washer and nut for it.
- 3. Insert barrels into each of the drilled holes, having previously knocked out both bottoms or pipes. They should rise 20-40 cm above the ground.
- 4. Insert the fittings in the middle of the pipes or barrels and strengthen them so that the threaded end protrudes 15 cm.
- 5. Pour ready-made concrete or prepare a mixture at the rate of 66% cement, 33% gravel.
To facilitate the process, it is better to get ready-made poles 120-140 cm long and dig or drive them 1 meter into the ground. To secure the reinforcement in them, you will need to drill a corresponding hole in the concrete, fill it with cement mortar and insert a rod.
Helpful advice! If the floor height above the ground is 40 cm or more, it is reasonable to use this space for walking chickens. Cover it with netting and make a ladder so that the birds can walk there whenever they want.
Frame construction
If a columnar foundation is made, then it is easiest to build a frame structure on its basis. The peculiarity of this design is high speed and simplicity. You can make a frame in 1-4 hours. The following materials will be required for this:
- beams 10 x 15 cm (4 pcs.) for supporting elements;
- beams 7 x 7 cm for vertical walls, floor base and roof connecting beams;
- hammer, nails, pliers;
- screwdriver, screws.
It should be taken into account that the length of the bars depends on the selected dimensions of the structure.
First you need to install the supporting elements on the columnar foundation. To do this, take 10 x 15 cm beams, place them on the pillars with the wide side and mark the location of the exposed reinforcement. Then they drill holes in them, put them on the rods, put washers on them and secure them with nuts.
Next stage:
- 1. Place one 7 x 7 cm beam horizontally onto the supporting elements, so that the outer edges of the lower and upper beams coincide. On the inside, the difference between the elements should be 8 cm.
- 2. Install the verticals on the support element from the inside and nail them to the horizontal beams every 75-100 cm.
- 3. Secure the vertical posts by inserting and hammering the crossbars between them.
- 4. Stuff the mauerlat on top - the roof support beams.

If you are making a chicken coop with a pitched roof, the racks of the front and back rows should be of different lengths. For a normal slope slope for a house 2-3 meters wide, a difference of 45-60 cm is enough.
When building a poultry house, you must not forget about at least one window and doors for the birds and their owner, take care of this in advance. After installing the door frames and windows, you can begin to install the flooring.
Making the floor
Chickens should feel comfortable and warm even in Siberia with its cold climate. To do this, it is necessary to build a double insulated floor. It takes approximately 4 hours to cover the rough flooring. The same amount for the top. The entire work will take half a day or a day.
Flooring materials:
- bars 7 x 7 cm;
- slats 5 x 5 cm;
- rough and regular boards;
- standard insulation;
- sawdust, straw.
The design is not new and very simple. It is necessary to make a cellular sheathing and hem it with “rough” boards from below. Then put insulation into the cells and lay a normal floor on top. As lathing, slats 5 x 5 cm or beams 7 x 7 cm are used. Boards can be taken 30-40 mm so that they do not sag under the weight of the owner.
Instead of special insulation, you can make do with waste - straw or sawdust. If the sheathing is made of 7 cm beams, then a thick layer of these ordinary materials, literally “lying under your feet,” will serve perfectly as a free heat insulator.

How to make a roof?
The easiest option is a pitched roof. If, when building the frame, you foresee in advance a difference of 50-60 cm between the front and rear walls, then making such a roof will not be difficult. Beams that pull vertical risers from above will serve as a Mauerlat.
Roof materials:
- slats 5 x 5 cm for rafters;
- slats 3 x 3 cm or 3 x 4 cm for sheathing;
- roofing felt or film for waterproofing;
- any roofing;
- boards or chipboard;
- nails;
- insulation, straw, sawdust.
Stages of roof construction:
- 1. Perpendicular to the beams of the rear and front walls, it is necessary to fill 5 x 5 slats every half meter to make rafters.
- 2. A waterproofing film or roofing felt is laid on them.
- 3. A sheathing made of slats 3 x 3 cm or 3 x 4 cm is stuffed on top.
- 4. Place insulation into the cells.
- 5. Install and secure the roofing material (reeds, corrugated sheets, iron, slate, etc.).
For additional insulation, the roof is hemmed from the inside with boards or chipboard. Insulation is placed on top of the ceiling or a thick layer of waste (sawdust, straw) is poured.
Manufacturing of walls and their insulation
After completing the roof and floor, it is necessary to sheathe the walls. At this stage, you should consider how to ensure required temperature inside the poultry house. If you decide to keep chickens permanently, you need to think about insulating the walls of the chicken coop at the construction stage.

If the microclimate of the room is disturbed, the birds become lethargic and inactive, and experience discomfort. The offspring and egg production drop sharply. Chickens can die if they are not provided with a temperature of 10-15 degrees.
The materials for the walls are:
- boards or chipboard;
- plywood;
- nails, screws;
- standard insulation.
For the winter version, you should sheathe the frame from the outside and inside, putting insulation between them. Boards or panels are nailed on the outside. Then they put in insulation (mineral wool, glass wool, ecowool, expanded polystyrene, jute, etc.) and sew it up with plywood. It is not necessary to sew boards from the inside. Plywood at a temperature of 15 o will not warp or rot. Material for interior decoration Plastic, fiberboard, etc. can serve.
If there is no confidence that normal temperature conditions are ensured, and the owner is afraid for his birds, there is a reason to install a heater. It is fenced off with a strong mesh and turned on as needed. When constructing a chicken coop as an extension to the house, you can connect heating pipes to it and install a radiator or other type of heater behind the mesh.
Features of the internal structure
The space inside the house should be comfortable for the birds (they will live in it) and their owner, so that he takes care of them without slouching. Laying hens' nests are built near one of the walls. They can be made in the form of low boxes with straw or hay.
Experienced poultry keepers take them outside the main structure, attaching nests to it, as in the picture. To collect freshly laid eggs and subsequently clean the nests, it is advisable to make a special insulated lid on the outside.
During construction, it is necessary to think about the way the birds feed and install a feeder at the intended food intake site. Its length depends on the number of individuals and for 10 chickens it is at least 1.5 m. It is not necessary to build a long box, because you can install 2 separate troughs of 75-100 cm each.
It is advisable to make and place 2 more small feeders inside the house, installing them on 15 cm legs or hanging them on the wall. It is necessary to pour shells, chalk, shells, and gravel into them. These components contain substances necessary for the formation of eggs.
It would be a good idea to set up a feathered dust bath in the house. It's very easy to do them. You need to take several containers, place them anywhere and fill them with ash, sand or soil from the garden. When chickens bathe in them, their plumage improves and some types of pests die.

Additional tips are described in the table:
Equipment element What should be done Arrangement of elements and other data Ventilation During the life of chickens and other birds, a lot of gases are released, so you must remember to equip the house with fresh ventilation. In winter, cover the inlet and vent so that the chickens do not catch a cold For the normal process of air outflow, it is necessary to provide a window in one of the walls (almost under the roof) or make a forced exhaust using a cooler by making a hole for it. The air supply pipe is placed on the opposite wall at a height of 50 cm from the floor Window To prevent chickens from weakening and molting, the rays of the sun must enter the room. For 10 m², 0.5-1 m² of windows is enough You can make any number of windows, for example, one large or several small ones on all walls Perches They are needed for birds to rest. You can make them from branches, sticks, poles. The roosts are calculated like this. In winter, 20 cm of its length is enough for one individual, because the chickens cluster together. But birds do not sit huddled together all the time. For their comfort, it is necessary to increase this value to 30-40 cm and make a perch for 10 chickens from 3-4 meters of poles Use poles or planed (to obtain a rounded surface) slats with a caliber of 3-4 cm. For adult birds, they should be installed at a distance of 50 cm from the floor with laid bedding. For young ones - 25-30 cm. There should be 25-40 cm from the wall to the nearest perch. A gap of 35-40 cm is required between every two perches Nests For production, any containers are used: baths, baskets, boxes or boxes made of wood, etc. If a remote option is envisaged, it is advisable to insulate the nests for the winter and make a double floor. For 10 individuals, only 3-4 places for laying are needed. They distribute 3-4 hens per nest, because they lay eggs according to a certain schedule The minimum size of nests for a bird to stay comfortably in it is as follows: - depth – 0.4 m;
- height – 0.3 m;
- width – 0.3 m.
Schedule of egg laying by one individual (by day):
The final stage of arrangement
Upon completion of construction, the house needs to be finished. Some people believe that the birds will be fine anyway, but this is a mistaken opinion. Thanks to the finishing, the chicken coop will become comfortable for the birds and owners to stay in it and can even turn into a decoration for the area.
For this you need:
- hammer;
- Rabitz;
- nails;
- door hinges, lock;
- slaked lime;
- dye;
- composition that prevents wood from rotting.
Conclusion
When building a shed for birds, many nuances will arise. But all issues can be completely resolved by simple methods.

A few final tips:
- 1. There is no need to save money and build a room according to minimal calculations. If the yard space allows, you need to make the shed more spacious.
Poultry farming is gaining momentum great popularity. Chickens are especially loved by farmers. You can easily get both meat and eggs from these birds. Breeding and keeping laying hens does not involve huge financial costs and unnecessary burdens. The main thing is to provide for living creatures comfortable conditions for existence. Setting up a poultry house will not take much time and will be affordable for every owner of his own farm.
You can start by maintaining a small family. To build a winter chicken coop for 10 chickens with your own hands, you need to prepare a place for the house, decide on the material and, of course, draw up a detailed drawing, making simple calculations. All this can be accomplished by one person, without additional help.
Technical features
Basic technical feature winter chicken coop is worth mentioning the need to insulate it. The bird has a hard time withstanding cold, drafts, and temperature changes. You need to make sure that the room is free of cracks and gaps. Then the birds will feel comfortable and lay eggs regularly, without failures. Otherwise, the arrangement of a winter poultry house for ten chickens does not differ significantly from the construction of a summer version of the house.

Optimal sizes and area
Define optimal sizes and the area of the future chicken coop is quite easy. It is necessary to take into account the basic characteristics of the farm. Among them:
- purpose of bird breeding (meat or eggs);
- livestock size (how many layers in a family);
- features of the land and area where the house will stand.
If a farmer has a lot of free space on his plot, he can make a larger poultry house if he wishes. If there is not enough land, you will have to make the most compact option.
A family of 10 chickens will produce approximately 3 eggs daily. If the owner wants to organize a business supplying and selling eggs or meat, it is recommended to start large quantity birds - at least 50, and preferably 100.

Blueprints
Before you build a house for laying hens, you need to draw up a design for a chicken coop. For this, a drawing is drawn. On the Internet you can find ready-made diagrams, as well as training videos. But you don't have to strictly follow their instructions. It is quite possible to use your own imagination and transform the standard drawing of a winter chicken coop for 10 chickens. If the owner has no previous construction experience, it is better not to invent new schemes, but to act according to existing ones.
The main thing is that the building is functional, with enough free space and comfortable for both birds and humans.
It is worth considering that in winter birds like to sit side by side. So they warm themselves against each other. As a result, they will need less space, and 4 individuals will fit per 1 m².

Selecting a location
For a chicken coop for 10 chickens, you need to choose a convenient and right place. First of all, it must be dry. Humidity is bad for the health of birds. Dampness risks causing the chickens to catch a cold, and this, in turn, will negatively affect their ability to lay the eggs the farmer needs.
What else influences the choice of location:
- whether the surface is sloped - this factor will help protect the livestock from the accumulation and penetration of rainwater;
- will there be enough light - the house should be well heated by the sun;
- on which side the building will be installed - preference should be given to the south side.
You cannot place the poultry house block directly on the ground. First you need to build a solid foundation.

Materials and construction stages
The material for a chicken coop for 10 chickens can be very different. It all depends on the capabilities and wishes of the bird owner. Most often used for construction: 
- wooden boards;
- plywood;
- beam;
- foam concrete;
- shell rock;
- sandstone.
A winter house must always be insulated, no matter what material it is built from. Everything you need to start construction can be bought in specialized stores, markets, ask neighbors on the site, or use leftover materials from construction or repairs country house or baths. There is no point in purchasing expensive material.
To the question of how to cover a building, the answer is this: they mainly use roofing felt or slate. Some people choose metal roofing. But this option cannot be called successful. The chicken is a shy bird. And with every rain, snow or hail, precipitation will hit the metal and create a sharp noise. The kittens will become frightened and, most likely, their productivity will drop. For the farmer, this outcome is undesirable.

Foundation and site preparation for it
The choice of foundation is based on the type of material. As an optimal solution, it is recommended to choose a columnar foundation. It is elastic, durable and reliable. The costs for it are small, as well as the low degree of complexity of its arrangement. An alternative is a strip base.
How to build a foundation:
- Clear the selected area of land, remove the top layer (approximately 30-60 centimeters).
- Pour sand mixed with gravel onto the bottom. They will play the role of the so-called “pillow”.
- Make formwork from boards 25 centimeters wide.
- Use rods for reinforcement.
- Take concrete grade M300, no less.
Once the concrete has hardened, you can proceed to the construction of the chicken coop. The size of the site must match the dimensions of the planned building.

Columnar
As the name implies, this type of base rests on pillars. Suitable for light weight poultry houses.
Advantages:
- requires little time to create;
- it is convenient to install;
- natural ventilation is organized.
How to build a columnar foundation:
- The first stage is drilling pits. Depth - no more than a meter. The diameter of each pit is approximately 20 centimeters.
- Next is the formwork. The material is asbestos cement pipes.
- The prepared pipes are installed in the dug recess.
- Reinforcing bars are placed next to them.
- Everything is filled with concrete.
Once the concrete has hardened, you will need to attach the support beam to the base. That's all!

Tape
This foundation is more suitable for a chicken coop for 20 birds. But if desired, it can also be laid for a smaller structure.
How to make a strip base:
- The first stage is digging a trench along the perimeter of the future chicken coop. Depth – from 50 centimeters, width – from 35 centimeters.
- The second stage is clearing the bottom of the trench from pebbles, roots and other things.
- Then you need to level the bottom and compact it tightly.
- Then you need to pour crushed stone (middle fraction), level it again, and on top - construction sand. The thickness of the layer with crushed stone is 15 centimeters, the layer with sand is slightly less – 10 centimeters.
- Assemble the formwork.
- Place fittings on the bottom. Use ribbed rods with a diameter of 1-1.2 centimeters. The distance between the rods should be 15 centimeters.
- The final stage is to pour the concrete.
Finally, you need to level the top, cover the resulting structure with film and arrange it for 1-3 weeks.
The term depends on temperature regime(weather):
- +20°C and above – 1 week;
- 17°C-20°C heat – 2 weeks;
- less than +17°C – 3 weeks.
At the end of the period, the formwork is removed, and the construction of a poultry house for ten chickens continues.
Chicken coop owners should remember that any foundation needs waterproofing. This can be done by covering the base with bitumen mastic or by laying a double layer of rolled waterproofing. The proposed methods can be combined to increase efficiency.

Walls and floor
Wooden planks are usually used for flooring. The following layers are laid:
- untreated boards;
- vapor barrier material;
- processed boards.
The walls are also built from wood. Sometimes there are combinations of boards, plywood and lining. A brick chicken coop also has its place. It retains heat well in winter and provides the necessary freshness and coolness in summer.
The insulating material is roofing felt. It is laid in a double layer. All voids and cracks both in the walls and on the floor are closed with timber or fiber made of flax and jute.

Roof and ceiling
In order to properly arrange a roof for a poultry house, you need to remember some of the features of this matter. Firstly, it is worth choosing a gable roof, since this shape will protect birds from moisture entering the house (the consequences of snow and rain).
Secondly, there is no need to use a metal coating. It is better to give preference to tiles or slate. Thirdly, it is imperative to carry out thermal insulation. To do this, use mineral wool or chipboard - the farmer’s choice. You can also arrange a small attic. They usually put food there, some equipment, parts for perches, and bedding for laying hens.
First, the ceiling beams are installed and the covering is laid on top. The material is boards, and the insulation is expanded clay, coupled with coal slag.

No overlap
The roof for the chicken coop can be built without a ceiling. In this case, the height of the walls will be about 140-150 centimeters. You also need to adhere to the following parameters:
- roof type - gable;
- raise the skate by 180-200 centimeters;
- Be sure to insulate the roof, covering the entire area.
The advantage of building without a ceiling is that it allows for significant savings. But the disadvantage is that it is uncomfortable for a person - you will have to tilt your head every time so as not to touch the ceiling and hurt yourself.

On poles
A mini poultry house on poles involves a roof, which is installed at a height of 180-200 centimeters. Other characteristics are:
- it is necessary to dig four beams in the corners of the building;
- make the floor overlap at a height of at least 50 centimeters above ground level (limit – 80 centimeters);
- do not forget about insulation;
- build an inclined ladder for birds and equip it with perches.
The version on poles is usually built for summer keeping of birds. But with high-quality and sound insulation, it will serve well in winter.

Insulation and vapor barrier
It is necessary to maintain a comfortable temperature and humidity level indoors. Drafts must not be allowed to form. Chickens are afraid of them and also do not tolerate dampness well. These factors negatively affect not only the health of the birds, but also their ability to lay eggs. In order for the chickens to winter without harming their physical condition, it is necessary to insulate the chicken coop and ensure that the thermal insulation is at the highest level.
 In order not to waste time and not agonize over solving the problem, you should use ready-made diagrams, drawings and photos. The material for thermal insulation can be mineral wool or ecowool, or polystyrene foam.
After laying the selected insulation, the walls must be covered with boards. Material – wood, plastic, chipboard. After the above steps, the temperature in the chicken coop will be suitable for the birds, and they will feel good without causing unnecessary trouble to their owner.
Mineral (basalt or glass) wool
If the room is built in the form of a frame, insulation with mineral wool will become the best option solving the problem.
How to do:
- Cover the frame on the outside.
- Install waterproofing.
- Leave a gap for ventilation (2-3 centimeters is enough).
- Lay insulation.
- A special membrane must be fixed on top of the insulation. Its function is vapor barrier.
- Then comes the inner lining. For it, plywood, boards, OSB or other variations are used.
Correct sequence of layers: 
- lining inside;
- vapor barrier;
- insulation;
- clearance for ventilation;
- waterproofing;
- cladding on the outside.
The layers are listed in sequence from inner to outer layer. Efficiency will directly depend on the operation of the fan. Its task is to remove excess steam and moisture.
Polystyrene foam and polystyrene foam
 To lay polystyrene foam as insulation, it must first be crumbled with a saw. You need to take a saw with fine teeth. Then, once the material is cut, it needs to be secured. For this they use polyurethane foam(small expansion). Then, for greater strength and compaction of the foam, you should fill the strips on both sides along the racks.
Two options are acceptable - laying polystyrene foam outside, that is, from the side of the walls, and from the inside of the chicken coop. However experienced poultry farmers They say that with external cladding it is necessary to perform waterproofing. Polystyrene foam has the ability to “bloom” when exposed to moisture. In winter, when there is a lot of snow and precipitation, this risk increases, so you need to stop it.
Important! It is recommended to leave small gaps between the walls and the insulation itself. The gaps create natural ventilation. Thanks to it, excess moisture will evaporate. As a result, the chicken coop will not become damp and will last for many years.
Interior arrangement of the chicken coop
After the main work has been completed, you should move on to organizing the internal space of a chicken coop for 10 chickens. One of the main points is installation and arrangement. This is especially important for laying hens. The degree of egg production directly depends on whether the perch is comfortable for the hen.
Parameters for perches:
- material of manufacture – wood;
- Be sure to sharpen the perches and round the edges;
- height – up to 80 centimeters, but not less than 65 centimeters;
- intermediate distance – up to 70 centimeters, but not less than 55 centimeters.
In addition to the perches themselves, you need to provide trays and trays for the birds. It is better to make a chicken roost so that it is easy to remove for cleaning. Cleaning and disinfection of roosts should be carried out regularly to avoid infection of chickens with various infections.

Lighting
The development of chickens and their psychological comfort depend on lighting. The daily routine is also directly related to lighting. It is necessary to wake up and drive chickens at the same time. And they will understand this by turning the light on and off.
What else does lighting affect?
- correct development of chicks;
- weight and size of eggs;
- well-being of birds;
- emotional state of the family;
- egg production.
 Chickens' vision is not designed to see well in the dark. Turn the lighting off and on smoothly. Otherwise, the quons will get scared and may accidentally injure themselves or their relatives.
When putting the chickens to bed for the night, you need to wait until they are all in their roosts. Then turn off some of the lamps. Wait a little longer and turn off all the lights.
You should also turn on half of the lighting fixtures first, and then, when the birds wake up, turn on the rest. Recommended brightness is 35-45 lux for chicks and 10 lux for adults.
Heating
 Chickens are afraid of drafts, which can easily cause them to catch colds. Heating in the poultry house must be adjusted. First you need to insulate the walls and ceiling of the room. For this purpose, polystyrene foam, mineral wool or ecowool are used. Because even if the house is heated, but the cracks are not sealed, the heating will be of absolutely zero use.
Doors and window openings should also be insulated. Then make a heavy bedding on the floor that will retain heat and keep out the cold. It is made from slaked lime, and sawdust and straw are also added to it. Other components include peat, fallen leaves, and manure.
Ventilation
The importance of temperature and humidity conditions when keeping chickens has already been discussed above. If the humidity is too high or, conversely, too low, this will have a detrimental effect on the health of the birds. Ventilation must be installed at the earliest stages of construction in order to avoid problems later.
 First, natural ventilation is performed. A hole is punched in the wall so that air can freely penetrate inside. A plastic pipe is inserted into the resulting hole. You will need to pick up a lid for it. This way, the poultry house owner will be able to control the natural ventilation system.
Another option is exhaust ventilation. But it is chosen by those owners who have at least 20 chickens. For a population of 10 birds, such a system may not be particularly necessary. But if the owner wishes, exhaust ventilation can be equipped with his own hands.
How to equip an exhaust ventilation system:
- make a couple of holes for the pipes, and they need to be made slightly away from the perches so that the quons do not catch a cold;
- pipes through which it will be supplied Fresh air from the street, place it 35-40 centimeters from the roof;
- place the exhaust pipe so that it rises at least 1.5 meters above the roof level;
- To prevent precipitation from getting inside the building along with the air, place unique umbrellas at the ends of the pipes.
If there are no pipes, they can be made from wooden boxes. But first they need to be painted and puttyed.
In order for air circulation to occur evenly, the pipes must be placed opposite each other, that is, at opposite edges of the chicken coop. Exhaust ventilation is started manually. It can be additionally equipped with sensors that will show the humidity level. Using the sensors, it will always be possible to track the mode and adjust it.
Chicken run
 To feel good and maintain proper activity, chickens need to go for walks. Even at the stage of designing a house, you need to think about a place for walking. There should be enough space for the entire family of birds. Each individual should feel calm and free. The approximate size of the enclosure is 2x6 meters. The walking area should be protected from potential intrusion by other animals, such as cats or dogs. They may attack the chickens or simply scare them. The aviary must also be equipped with a canopy so that the sun does not scorch the birds and precipitation does not cause illness. The run should ideally be located in a quiet place, because chickens are afraid of sharp sounds and noise. But if it is not possible to isolate the family from noise, you need to at least take care of their safety.
If you follow all the recommendations, setting up a chicken coop with your own hands will not cause any difficulties. With patience, attentiveness and a sincere desire to make a quality home for birds, the intended goal will be achieved and successfully implemented.
Useful video
Video about a winter chicken coop with walking:
The best products are those that are grown with your own hands. The owner always knows what additives and fertilizers he applied. A similar approach applies to raising pets. Many have found it useful to have a flock of ten laying hens.
With the right choice of breed, every day you can consistently get from 8 chicken eggs. But this is only possible with proper care, which cannot be provided without a good chicken coop. The article will consider the option self-made houses for chickens
Requirements for chicken coops
A chicken coop is not an easy impromptu shed that can be made for show. There are certain requirements that it must meet. They are:
- protection from adverse weather conditions;
- the presence of a constant temperature inside;
- availability of high-quality lighting;
- the chicken coop must have sufficient space inside;
- sleeping places and nests must be provided;
- availability of walking space;
- construction from non-toxic materials.

The protective function of the chicken coop is one of the important ones. The design must be designed in such a way that precipitation in the form of rain or snow does not get inside. In addition, the chicken coop should not be blown through. The bird is sensitive to climate change, so it can catch any infection.

A stable temperature must be maintained inside the chicken coop in both cold and warm seasons. Someone decides to build several chicken coops for two seasons. There should be good lighting inside the room. Thanks to it, you can increase the number of eggs laid.
The bird should be comfortable inside the chicken coop, so it is necessary to provide enough space both in the nests and in the sleeping areas. If there are only sleeping places, then the bird will have nowhere to lay, so it is important to take care of the nests. The latter are located in such a way that the territory is not passable, since the eggs will constantly be soiled by bird droppings. The bird cannot sit still all the time, so it is necessary to provide a place for it to walk. Materials are selected without toxic emissions, as this will subsequently affect the health of consumers of meat and eggs.

Types of designs

In addition to the fact that chicken coops are divided into winter and summer, there are other parameters that determine the buildings to certain groups. Conventionally, they can be divided into:
- with a free walking area;
- combined;
- closed type;
- cells;
- mobile chicken coops.

If there is more than enough territory for a chicken coop, then it makes sense not to completely occupy it with a building, but to leave an area for the birds to walk. In this case, it is fenced with mesh or other material so that the bird does not wander off. In an open area during the warmer months it is easier to provide food and water to the bird. Combined chicken coops are used year-round and do not require modifications. Closed structures limit the bird's walking area not only with a fence. Such structures have a roof; chicken coops are usually similar to greenhouses. Such chicken coops are often used when industrial cultivation birds. One of the disadvantages of this solution is the need for periodic cleaning so that large amounts of droppings do not accumulate inside.
In some cases, it is almost impossible to allocate space on the site to build a chicken coop. This may be due to a limited area or a special design of the site. In this case, poultry cages are an excellent solution. They can be placed in any room and installed in several tiers. The requirements for poultry cages are similar to those given for standard chicken coops.

The ideal solution is to raise meat chickens in cages. Thanks to a sedentary lifestyle, body weight is gained faster and the meat remains tender. Mobile structures for poultry houses can be moved around the yard. They are a lightweight version of a chicken coop and are used in the warm season.
Blueprints
A review of the drawings will allow you to choose the appropriate option for specific conditions. In addition, you can combine several options and get your own.
The chicken coop option shown in the drawing above can be used for a larger number of poultry. It has everything necessary premises, which allow chickens to feel comfortable. The yard for walking poultry is fenced and has an additional exit, which can be used both by the owner and to move the hens to a larger area. There is a separate sleeping area for the birds, which has an opening window, which is useful in summer. The nests are located in a separate room, which is not a walk-through room. At the same time, there is another entrance through which it will be convenient to collect eggs.
Another interesting option poultry house, which has similar features to the previous one. There is also an area for walking outside near the house itself. There are also two entrances for the owner. Notable is the presence of a vestibule that cuts off cold air in winter. Nests and sleeping places for birds are in the same room, but the former are raised above floor level to make them more difficult to get into. The dimensions in the drawing are given in centimeters.
This good example summer design for birds. As you can see, the walking area is fenced with a strong fence, which is especially useful for those areas where foxes are frequent guests. This metal will prevent them from getting inside the chicken coop. Feeders for 10 birds are located along one of the walls. On the other hand, nests can be made in a similar way, which means that the bird does not have to be stressed when removing eggs.
Construction of a chicken coop

Understanding the features of a chicken coop is the key to building a chicken coop yourself. This simple process, which requires basic skills in working with the tool.
Design
Before choosing a place where a chicken coop for 10 chickens will be located, you need to draw up your own drawing of the structure. This may be a rough plan with dimensions. It is important to think carefully about the internal arrangement of the various elements. For ten chickens there should be at least four nests indoors. An example of how a bird's perch might be positioned is shown below. It is necessary to plan the perches in such a way that droppings from birds that will sit above do not fall on those that are below.
Feeders for ten birds are best placed opposite the perches. This will simplify the bird's access to the feeding area. It is advisable that the containers be raised from the floor by 10 cm. One or more windows must be installed. Their area is calculated depending on the total floor area. The first percentage should be 30. The floor inside the building should not be too slippery to make it easier for the bird to move along it.
Selecting a location

When the issue with dimensions is resolved, you can move on to choosing a specific area for the chicken coop. It is better to choose an area that will be located on a slight elevation. This is done in order to prevent the accumulation of water from precipitation in the chicken coop or enclosure. It is necessary to evaluate the sides that are most often blown and avoid them. The ideal location would be the south side of the house, where it is sunny and warm most of the day, which is important for the bird’s well-being.

The distance from the chicken coop to the main building should be sufficient so that the smell does not penetrate into the house. If there are sources of clean water in the yard, for example, a well, then the poultry house must be removed at least 40 meters from it. You shouldn’t place a chicken house right next to your neighbor’s fence. It is better to place it at a distance of 4 meters. The area where the chicken coop will be located should not be a walk-through area. The bird does not like uninvited guests on its territory.
Foundation

The chicken coop is a light-weight structure, so several foundation options are suitable for it. But it is safer and easier to construct a conventional strip structure for a chicken coop. In accordance with the selected dimensions of the chicken coop, the territory on the site is marked out. The turf is removed to allow access to the soil, making it easier to work. A trench is dug with a shovel. Its width should be 5 cm greater than the width of the chicken coop wall. A depth of 30 cm will be sufficient. The bottom of the pit is well compacted and leveled. After this, a ten-centimeter layer of crushed stone cushion is laid. It is also leveled and the same pillow is poured on top, but made of sand. It also needs to be compacted well.

The next step is the installation of the formwork into which the concrete solution will be poured. The structure of the foundation for the chicken coop will be strengthened by a metal grid, which is laid before pouring. It is important to compact the concrete well so that it fills the pores. If the walls are built of brick, then you will need to wait until they fully gain strength, which can last up to one month. If the structure is made of wood boards, then work can continue in two weeks.
Walls

The construction of chicken coop walls can be made from various materials. A simple solution would be to assemble them from sheet material. OSB boards are suitable for this. The first step is to waterproof the surface of the foundation for the chicken coop. First of all, it is opened with bitumen mastic, on which roofing felt is laid. Next, you will need a beam with a cross-section of 10 cm. It is screwed to the base using dowels. Racks with the same cross-section are mounted on the timber. They can be secured to the base with metal corners and jibs. The upper frame of the structure is being performed, which is designed to strengthen the racks. Vertical racks made of boards with a width of 10 cm are mounted every 60 cm.

The places where windows and doors will be located are additionally reinforced. A vapor barrier is fixed from the inside. Insulation in the form of mineral wool. After this, the outside walls of the chicken coop are sealed with waterproofing to cover the insulation inside. After this, the inside walls of the chicken coop can be lined with OSB sheets. The outside of the chicken coop is finished with siding or moisture-resistant OSB sheets.
Roof

The best option for a chicken coop would be a gable roof. Thanks to the presence of the attic, an additional air layer is formed, which will act as an insulator. Triangular trusses with the selected angle are installed on the top trim. The roof of the chicken coop is waterproofed, sheathing is made and roofing is laid. As the latter, you can use corrugated board or slate. The ceiling will need to be insulated. For these purposes, a vapor barrier is nailed from the inside, onto which mineral wool is laid from the attic side. The ceiling is hemmed with moisture-resistant OSB sheets.
Floor

The space inside the foundation for the chicken coop is filled with soil and compacted. After this, the surface is waterproofed with polyethylene film or roofing felt, which are laid overlapping. Lags are installed to the frame of the chicken coop, and insulation is also laid between them. It is sealed with waterproofing on top and moisture-resistant OSB is laid on the floor of the chicken coop. There is a video about a budget chicken coop below.
Summary
In addition to good lighting, care must be taken to ensure that the birds in the chicken coop always have fresh air. For these purposes, supply and exhaust ventilation is constructed. It promptly removes ammonia that is formed from poultry droppings.