Creative project“Birdhouse” (a collective project for 2 – 3 people is possible) 1. Justification of the project We always look forward to every spring with excitement, when nature comes to life, birds fly in and sing. Starlings fly into our garden, but we don’t have a birdhouse for them. So I decided to make them a birdhouse. In 5th grade we learned to saw, plan, drill and join wood parts. Now I can do a lot myself and will definitely make a birdhouse and attach it to a tree. 2. Project plan To complete my project, I need to think in advance about the shape and dimensions of the birdhouse, select materials, draw a drawing or sketch of the birdhouse, determine its dimensions, select tools for processing, think over the manufacturing technology, manufacture it and figure out how to attach it to the tree. You can draw up a project implementation plan, that is, a thinking scheme, as follows (Fig. 1).
3. Possible options for birdhouses and choosing the best option. It is better to make a birdhouse from natural wood or from a hollow tree, as the birds will get used to it better. It should be warm and not deteriorate from moisture or crack from the sun. The birdhouse can be made from boards or thick plywood. The roof can be made of boards or even tin or plastic. It's easier to make a rectangular shape. The boards can be fastened with nails or screws. The first option (Fig. 2) involves making a birdhouse from planks with a sloping roof.
This option is simple, but not a very beautiful option. A roof made of two planks would look better (Fig. 3).
Option 3 – birdhouse made from the trunk of a hollow tree (Fig. 4). It has a shelf under the entrance hole on which the bird can sit and rest. Yes, and the chicks can sit before their first flight.
Option 4 – a birdhouse made of a hollow tree with an entrance from a hollow knot (Fig. 5). This design makes it more difficult for the cat to get the starling and chicks out of the birdhouse.
I shared my opinion with friends and parents about which birdhouse design is better. The majority noted the first option as the best. Of all the options, I choose the first one. It is the simplest. There are materials for its manufacture. It consists only of planks that can be easily knocked down with nails or connected with screws. 4. Birdhouse drawing The requirements for the drawing are as follows. All dimensions of the product must be shown on the drawing. It will be easy for me to mark and cut the boards. There should be a hole in the birdhouse, as my parents told me, with a diameter of about 5 cm. A starling can freely crawl into it. The hole can be marked and drilled along its contour, then cut or sawed, the hole can be cut out with a jigsaw and cleaned with a file. But it’s better to cut it out right away with a jigsaw if the board is not thick. I read that you cannot nail a birdhouse into a living tree using wood nails. Can be nailed to a dry or separate knot or secured to the roof of a building, for example to wooden parts with nails or screws. You can screw the birdhouse to the body using wire without a fastening strip. The tree grows wider and over time the wire cuts into it. It would not be harmful to fasten the birdhouse with wire and place wooden blocks under it. To the birdhouse you need to nail a board to the back wall in advance. The drawing of my product is shown in Fig. 6.
5. Manufacturing technology For the walls of the birdhouse, I selected a board 20 mm thick and 140 mm wide. I marked the front and rear walls with a length of 350 and 300 mm. The side walls need to be cut obliquely. The bottom will have a size of 140 180 mm (Fig. 6 and Fig. 7). The hole is cut out with a jigsaw. First, a board is nailed to the back wall to attach the birdhouse and the ends of the nails are bent. The walls are nailed or attached with screws (Fig. 7).
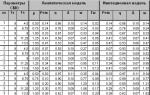
The walls and bottom are nailed tightly. Under the cover, the side walls are cut down at the angle of the roof. The roof is made of boards, plywood, tin or plastic measuring 140 × 260 mm and nailed with small nails. Manufacturing technology is recorded in technological map(Table 1). Table 1. Technological map for making a birdhouse 
Manufacturing process I made my birdhouse according to my drawing and according to the technological map in the technology room and at home. Required Tools all are available. The boards are well cut with a saw and planed with a plane, and smoothed along the edges with a file. At first I thought it would be easy and quick to make. Now I know that this is not true. The birdhouse turned out good. I think starlings will settle in it. 6. Economic justification project 6.1. To make a birdhouse, boards were required. The length of the board is: 350 mm x 4 walls = 1.4 m. Its volume is approximately 14 cm x 2 cm x 140 cm = 44300 cm3 = 0.044 m3. The price of one cubic meter of boards is 4 thousand rubles/m3. The cost of our board is: 0.044 m3 x 4 thousand rubles/m3 = approximately 17 rubles. The rest of the materials are free from waste. 6.2. To make a birdhouse it took 200 g = 0.2 kg of nails. Price of nails: 80 rub./kg. The cost of nails is: 0.2 kg x 80 rubles/kg = 16 rubles. The total cost of product C at costs Z will be: C = Z1 + Z2 = 17 + 16 = 33 (rub.). 7. Defense and evaluation of the project I wrote for the defense short report for 5 minutes. I told how I made my birdhouse in class at the defense of the project. Everyone praised me. Now it will be nice for the birds too. I received a good grade for the birdhouse.
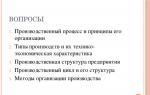
Content
- Formulating the problem.
- Buyer problems.
- Design requirement.
- Search for alternative options.
- Necessary materials and tools.
- Product options.
- Choosing a rational project.
- Safety precautions.
- Manufacturing technique.
- Economic calculations.
- Ecological justification.
- Product evaluation.
- Finished product.
Formation of the problem.
Justification of the project topic
I decided to make a house for starlings. I like these birds. It will be good if they arrive in the spring and settle in my birdhouse. I think they'll like it. After all, my birdhouse will be one of the best homes for birds. I have everything you need to make it.
I thought about this topic. Birds really need houses. They will settle in new apartments, hatch chicks and feed them pests from our garden. And the guys and I will watch them and rejoice that we did something good for the birds. Starlings have a habit of imitating every sound they hear, and we wanted to check it out.
I've seen birdhouses in pictures, in textbooks, and on neighbors' trees. From this I concluded that the bird house should be spacious, bright and cozy for the residents. The finished birdhouse will need to be hung on a tree, but not nailed to the trunk, but attached without nails, so as not to harm the tree.
Target: make a birdhouse.
Task: develop a design and make a birdhouse.
Technical requirements for the product:
a) choose the right shape for the birdhouse;
b) take into account what type of bird the birdhouse will be made for;
c) it must have a beautiful appearance.
Historical background
birdhouse - this is a room for starlings in the form of a small booth mounted on a long pole or on a tree near the house.
Probably every schoolboy who studied at school made at least one birdhouse and hung it on a tree. This work of schoolchildren was their most common contribution to zoological protection and nature conservation.
The custom of building houses for birds in Rus' was approved by Peter the Great. Today, more than fifty types of bird houses are known, and the most famous of them is the birdhouse.
Options for your product.
What should a house be like? Each species of bird has its own requirements for shelters where they could build their nest. Simple closed houses will attract tits and sparrows (depending on the size of the entrance hole), but houses with a slightly open front wall are more suitable for robins. For starlings, a short round stick under the entrance (entrance), installed perpendicular to the front wall, is useful. What a bird house can be like and how to make it is shown in the figure
Form: round, square, triangular.
Material: iron, plastic, fiberboard, wood.
Tree: birch, pine, oak, linden.
Roof shape: square, round, rectangular.
Safety precautions.
1. Securely secure the workpiece in a vice.
2. Work smoothly, without jerking.
3. The hacksaw handle must be in good working order and fit tightly onto the shank.
4. When finishing the work, you need to loosen the clamp on the hacksaw and hold part of the workpiece.
5. You cannot sweep away the shavings by hand; you must use a special brush.
6. Do not turn on the machine without the teacher’s permission.
7. Securely fasten the tailstock of the machine.
8. Before starting the machine, put on safety glasses.
9. Do not stop the workpiece with your hands.
Manufacturing technology.
It is best to make bird houses from boards 20-25 mm thick. You can use boards and slabs with a thickness of at least 15 mm. On the outside of the house, the boards can be planed, but on the inside they cannot be planed, since it is very difficult for birds and chicks to get out on the smooth, planed surface of the wall. If the boards turn out to be planed, then notches must be made on the front wall of the house from the inside, below the tap hole - deep transverse scratches. The birdhouse should have small narrow slits necessary for ventilation, so the walls of the nesting box should not be particularly carefully adjusted to each other.
Technology and sequence of product manufacturing
1. Preparation for work and compliance with safety precautions.
2. Making templates for birdhouse parts.
3. Marking parts on a board processed on all sides.
4. Sawing along the intended lines.
5. Assembling the birdhouse body.
6. Bottom fastening.
7. Roof installation.
8. Attaching the arrival board.
9. Attaching the block to the back wall of the birdhouse.
10. Cleaning up cuts.
Necessary materials and tools for making a birdhouse.
- Wooden block. 7. Scissors.
- Board, birch or pine. 8. File.
- Wood saw. 9. Sandpaper.
- Square, ruler. 10. Drill.
- Pencil. 11.Drill.
- Paper A 4. 12. Nails.
Birdhouse dimensions:
Wall:
Height -300 mm;
Width -200 mm.
Material: pine.
Square bottom:
150 mm x 150 mm
Material: pine.
Cap dimensions:
Width-200 mm;
Length - 300 mm.
Material: pine.
Ecological justification.
My birdhouse is made of wood. Wood is natural, pure, natural material. This material does not harm its inhabitants and the environment.
Modern materials are mainly made from pressed materials, which contain toxic substances that are harmful both during manufacture and during operation. These disadvantages are absent when working with natural wood. Products made from natural wood are not only beautiful, but also when a person comes into contact with wood, some physiological processes are normalized.
The presented product meets all hygienic requirements, as it is made from environmentally friendly material, namely wood. The coating (varnish) in the solid state is non-toxic, therefore, this product is absolutely harmless to birds.
Economic calculation of product costs
The costs of designing and manufacturing a product must be recouped by the benefits it brings and be less than its cost. They largely depend on the cost of materials and are determined as follows. First, they calculate how much and what materials will be needed to make the parts of the product.
Machines are used to make birdhouses. Since the use of machines requires electrical energy, appropriate calculations must be made to justify the economic feasibility. To calculate the cost of making one birdhouse, you need to know the cost of materials, energy costs, and equipment depreciation.
Based on the calculations, the cost of a birdhouse is very low, and it can be put up for sale at a price of approximately 150-180 rubles.
Product evaluation.
|
Negative points |
|
|
Manufacturing materials are available. |
One line was cut unevenly, because... little work experience. The defect has been fixed. |
|
The job was done well. |
|
|
I liked working with the birdhouse. |
|
|
Manufacturing technology is feasible. |
|
|
The birdhouse model matches the choice. |
Finished product.
The theme of my creative project is “Birdhouse”. It turned out cozy and beautiful. I really hope that the starlings will like the house. All that remains is to hang it on a tree.
To make the birdhouse, the problems were solved: cut out strictly along the intended lines, process the knot. Everything worked out well for me. I'm happy with my job.
I hope that everyone will like my birdhouse. I chose a certain manufacturing option. I made the birdhouse according to my choice.
CREATIVE PROJECT Theme of the project: "BOOKING HOUSE" Prepared by the project: teacher of labor training at the Amvrosievsky comprehensive boarding school, IIII century. for orphans and children deprived of parental care Kalanchuk Sergey Viktorovich
Amvrosievskaya secondary school boarding school for orphans and children deprived of parental care labor training teacher Kalanchuk Sergey Viktorovich
Justification of the project and historical background Justification of the project topic In technical lessons, we learned to use various tools and technologies that I skillfully use in practical work. And when the question arose about participating in the regional Olympiad, I wisely used the knowledge I acquired to make a product necessary for a creative project. As a product for a creative report, I took a birdhouse project, which is so necessary in the spring for feathered friends. Historical information It is now difficult to say who made the first bird house, when, and from what. Descriptions of birdhouses made of birch bark (birch bark), bird houses woven from willow twigs, straw and covered with clay have been preserved. Birdhouses first appeared in our country. Why is this so? Probably because people like the starling with its perky, cheerful song. Perhaps people were especially happy about the arrival of the first starlings - after all, spring warmth always came after them. Every spring, all over our country, both children and adults make and hang birdhouses and other bird houses. This must be done wisely, knowing the habits and inclinations of birds. Why, for example, did starlings begin to settle so eagerly in man-made houses? The fact is that the birdhouse is raised on a high pole above the roof, it can be seen from all sides.
On page 18 of the ancient treatise on the birds of Giovania by Pietro Olin, printed in Rome in 1622, a starling is described, and an engraving is placed against the text. This engraving shows a starling in the foreground, and behind is a clay pot-like vessel with a hole attached to a tree. This appears to be one of the earliest depictions of an artificial starling nest. There are also older images of such birdhouses. A triptych painted by Gerard David around 1500 depicts clay nests hung on the wall: from the entrances of these urns or pots a wide variety of birds fly out. It can be assumed that birdhouses of this kind were widespread in Holland already in the early Middle Ages. But not in other countries, since the famous “Ornithology” of the Italian Aldrovandi directly states that these birdhouses are an invention of the Flemings. Aldrovandi writes in 1599: “As I heard, the Dutch even arrange artificial nests for starlings, similar to those that we described in the chapter on sparrows, in the local dialect called Spraewepotten, that is, vessels for starlings.” Inhabitants Most often, starlings and tits live in the birdhouse (hence the names). However, there are many other birds that can live in a birdhouse, for example, robins, wagtails, sparrows, pygmy owls, pied flycatchers, redstarts and others
Fig.2. Various designs of bird houses. 1 – birdhouse with a removable lid made of slab; 2 – the house is attached to the tree with wire (dimensions are given for a titmouse). The taphole is also made square - in the center (3) or in the upper corner (4). It is advisable to make birdhouses with two entrances (5). House for wagtail (6), for pied, redstart - in the form of a diamond - 7, for flycatcher - 8).
Cover dimensions: Width – 250 mm; Length – 180 mm. Material: pine. Dimensions for the base of the birdhouse: Width – 150 mm; Length – 180mm. Material: pine. TECHNOLOGICAL MAP 3 4 1 2 5
Spring is the time when nature comes to life, trees bloom, animals wake up after hibernation, and birds fly from warm countries and delight us with their singing. Remembering that at this time of year our feathered friends lack food and shelter, many people hang birdhouses in the trees - birdhouses. Birds make nests in a birdhouse and hatch chicks. Helping birds is a very accessible and noble task for young nature lovers. You may ask, why is this necessary? A birdhouse is a nesting place that can be inhabited by starlings, sparrows, flycatchers, and sometimes woodpeckers and squirrels. This means that next to your house there will be a small dwelling for animals from the Red Book. In this way, you will help save animals that are in danger of extinction. Hanging birdhouses near your home is an old folk tradition. Birds living nearby provide invaluable assistance to gardeners in the fight against insect pests. For example, one brood of starlings can eat about 1000 cockchafers and their larvae in 5 days! Birds also delight us, residents of villages and large cities, with their appearance and singing. I worked on a birdhouse, it turned out beautiful! How much is needed - in diameter, How much is needed - height. I diligently, according to the rules, Did everything according to the drawings, Only the picky starlings didn’t like something. I'm sad - there's nothing to do, I know my labors are in vain. But in the rejected birdhouse... sparrows took up residence! And daddy is there, and mummy is there, and the cheerful squeaking of the chicks. And imagine - I don’t miss the starlings one bit! I woke up early: I couldn’t sleep because of the idea... I took a saw, an axe, a plane, boards, nails, a hammer, and I sawed and planed, helping our school. I only worked for an hour, I sawed seven boards, nailed them together, drilled a hole for the birds, sealed the cracks with putty,
I painted all the boards with fresh, soft, blue paint - my birdhouse became beautiful. I tell all the kids: I give it to the starlings! Economic calculation of product costs The costs of designing and manufacturing a product must be repaid by the benefits it brings and be less than its cost. They largely depend on the cost of materials and are determined as follows. First, they calculate how much and what materials will be needed to make the parts of the product. Machines are used to make birdhouses. Since the use of machines requires electrical energy, appropriate calculations must be made to justify the economic feasibility. To calculate the cost of making one birdhouse, you need to know the cost of materials, energy costs, and equipment depreciation. Based on calculations, the cost of a birdhouse is very low, and it can be put up for sale at a price of approximately 3,035 hryvnia. Potential clients of such a business are nature and bird lovers. Especially those who own their own private house or dacha. As a rule, in such cases, there are gardens in the courtyards in which various birds can live. And the owners, not being able to make birdhouses for birds with their own hands, may well ask for help. Analysis of completed work.
When solving the problem of developing a birdhouse design, we outlined three possible options shapes of birdhouses and settled on one that was most suitable for us. During the implementation of this project, we consolidated our knowledge and skills in wood processing, methods of joining parts and types of decorating products. In the process of work, we came up with ideas for creating a number of new products of this type. The most interesting section of “Technology” for me is the section “Creative Projects”. This contributed to the creation of this product. And a section such as “Entrepreneurship” will help you complete your business plan and there will be a prospect of entering the market with similar products. The results of the work are: 1st place in the regional Olympiad on labor training in 2010/2011 for 10th grade student Dmitry Zabara; 1st place in the regional Olympiad on labor training in 2011/2012 for 10th grade student Evgeniy Tereshchuk in 2011/2012


STEPS OF THE PROJECT IMPLEMENTATION Recommendations for making a birdhouse Suitable for manufacturing are slabs, planks, various pieces of boards, slats Standard sizes for a birdhouse: front and back walls - 20x30 cm, side walls - 15x30, bottom and sleeve for the lid - 15x15, lid - 20x25, entrance - 40-45 mm. The thickness of the boards is 2 cm. The sequence of assembling the house: the side walls are attached to the bottom, then the front plank and, finally, the back. We must try to make the house firmly built, without cracks. The easiest to make is a house with rectangular walls, without a sloped or gable roof. It is desirable that the bottom of the house has a square shape. The birdhouse lid must be removable for cleaning and inspection of the nesting box. A “house” roof is unacceptable. The inner surface of the nesting boxes should be unplaned: it is very difficult for chicks, and even adult birds, to get out on a smooth surface. If the house is made of darkened boards, then it should not be painted. If the boards are fresh, it is better to paint them outside with stain, green or brown paint. And remember that you are making these houses for birds! Originality and creativity, of course, is always held in high esteem, but the birds will not understand this; moreover, a house that is too bright and ornate can simply scare them away.
 HOW TO PLACE How to secure the birdhouse? The hanging height should be from 3-4 to 4-6 meters. Only one nesting box is hung per tree, at a distance of more than meters from another tree. Houses for starlings can be placed crowded, within 2-3 m. The nesting box should hang vertically or with a slight slope forward. It is best to tie houses to trees using soft wire, aluminum or annealed steel. Any synthetic rope or cord will also work. Do not nail the houses under any circumstances! You can use a transverse strip, with which the nest box is attached between two branches.


Birdhouse Completed by: 6th grade students Leader: Petrishchev S.N.

Goal: Spring is the time when birds fly from warm countries and delight us with their singing. We remember that our feathered friends do not have enough food and shelter, many hang birdhouses on trees - birdhouses. Birds make nests in a birdhouse and hatch chicks. You may ask, why is this necessary? A birdhouse is a nesting place that can be inhabited by starlings, sparrows, sometimes woodpeckers, and squirrels. This means that next to your house there will be a small dwelling for animals. In this way, you will help save animals that are in danger of extinction.

A bit of history: On page 18 of Pietro Olin's ancient treatise on the birds of Giovania, printed in Rome in 1622, a starling is described, and an engraving is placed against the text. This engraving shows a starling in the foreground, and behind is a clay pot-like vessel with a hole attached to a tree. This appears to be one of the earliest depictions of an artificial starling nest. There are also older images of such birdhouses. A triptych painted by Gerard David around 1500 depicts clay nests hung on the wall: from the entrances of these urns or pots a wide variety of birds fly out. It can be assumed that birdhouses of this kind were widespread in Holland already in the early Middle Ages.

Materials and tools: cutting boards, nails or screws. bow saw, hammer, plane, drill, square, awl, pencil, ruler.

We are students 6 "b" Sequence of making a birdhouse: the class decided to make a birdhouse for migratory birds. We chose the material, drew the dimensions of the parts we needed on it, and then cut out all the parts with a hacksaw. We made a hole so that the birds could fly into the house using a chisel.